
How to Fix a Stone Wall Without Missing the Real Problem
Start by checking what moved. If the wall is stable and only the mortar is crumbling, remove loose mortar and repoint the joints with a mix suited to the existing stonework. If a dry-stacked stone has slipped, reset it and pack the space behind it with small, angular stones. Clear blocked drainage so water does not keep pushing on the wall.
Do not patch a leaning or bulging wall. Keep clear of it and ask a qualified mason or structural engineer to assess the cause before anyone takes it apart. A lasting repair fixes the water or foundation problem, not just the visible gap.
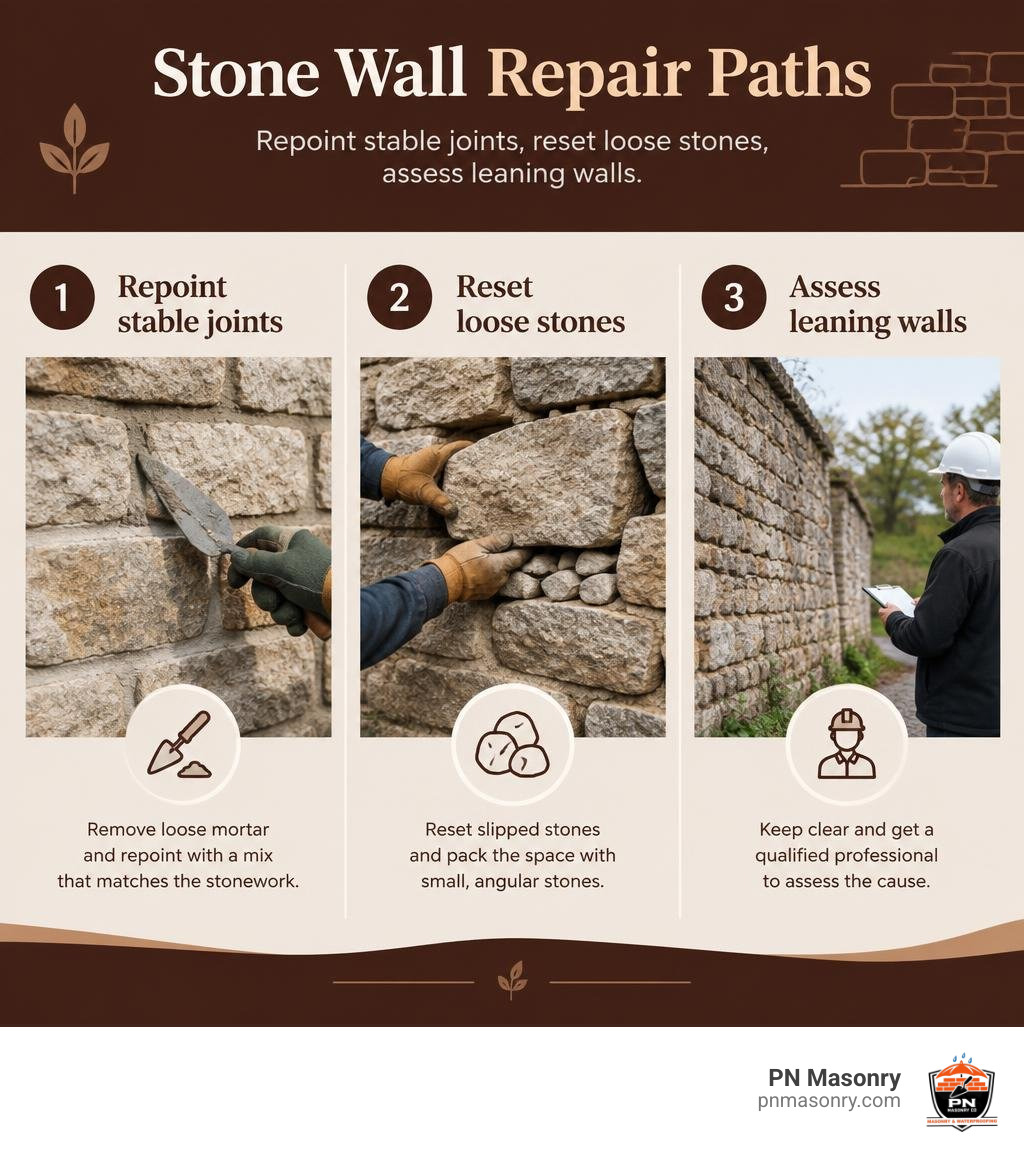
Important fix stone wall terms:
Diagnosing Stone Wall Failure: Hydrostatic Pressure, Frost Heave, and Settling
Before picking up a trowel or a lump hammer, we need to diagnose what is pushing, pulling, or destabilizing the masonry. Stone walls—whether a centuries-old dry-stacked boundary fence or a mortared retaining wall—interact continuously with the ground beneath them and the soil behind them. If you patch the stonework without removing the underlying stress, the wall will crack or shift again within a season or two.
Identifying Water and Freeze-Thaw Damage
Water is the primary culprit behind failing stone masonry. In fact, poor drainage leading to excessive hydrostatic pressure accounts for roughly 70% of all stone wall repair calls.
When rainwater or groundwater collects behind an unvented or clogged stone wall, the saturated soil becomes immensely heavy. A retaining wall measuring just 4 feet tall can hold back over 10 tons of wet earth per linear yard. As water pools behind the stones, it creates massive lateral pressure that pushes individual units outward.
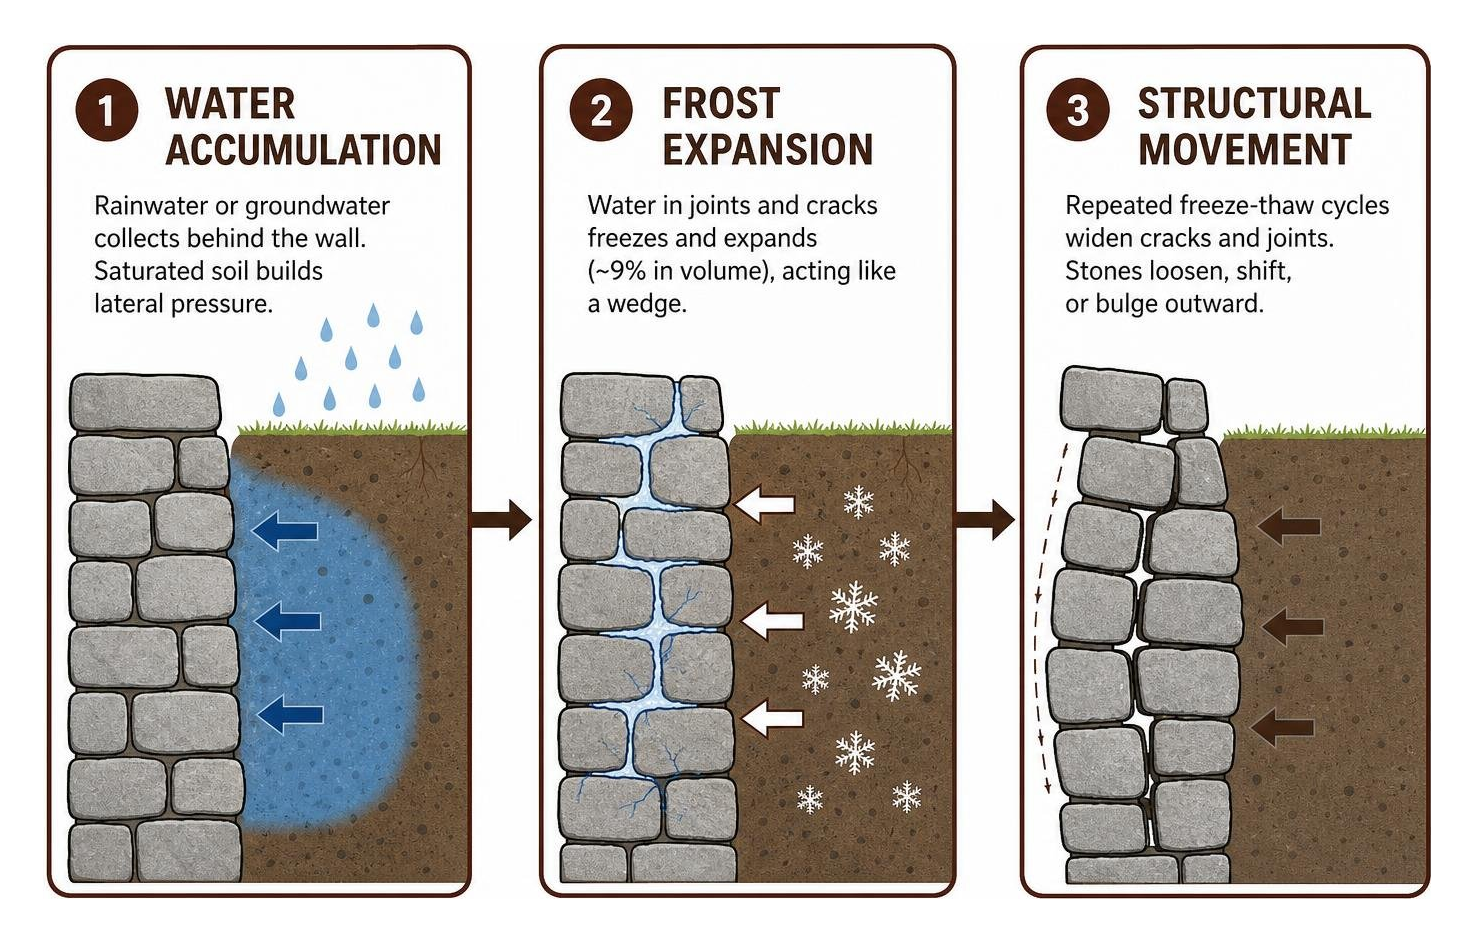
In northern climates subjected to 30 to 60 freeze-thaw cycles every winter, moisture trapped within hairline cracks or deteriorated joints undergoes destructive expansion:
- Water expands roughly 9% in volume upon freezing, exerting immense hydraulic force inside tiny voids.
- This expansion acts like a mechanical wedge, widening microscopic fissures a fraction of a millimeter with every single frost cycle.
- Over 5 to 10 winter seasons, a negligible hairline surface crack can expand into a half-inch structural gap.
- Surface indicators of moisture retention include heavy white salt deposits (efflorescence), moss cultivation along lower courses, and spalling—where the outer face of soft stones flakes away due to internal ice pressure.
For property owners dealing with sub-grade moisture and foundation cracking, recognizing these water pathways is crucial. You can explore our dedicated insights on fieldstone foundation cracking problems to understand how deep-soil moisture compromises structural baselines.
Evaluating Wall Lean and Foundation Bulges
A wall that is slightly off-plumb requires careful measurement to determine whether it is slowly settling or nearing catastrophic collapse.
To accurately evaluate a leaning wall:
- Drop a Plumb Line: Suspend a weighted string from the top outer edge of the wall down to the grade level. Measure the horizontal gap between the string and the bottom face of the stone.
- Apply the 1/6th Height Rule: If the horizontal lean exceeds 1/6th of the total wall height (for instance, an 8-inch tilt on a 4-foot wall), the structure has lost its center of gravity. Immediate stabilization or controlled dismantling is required.
- Inspect for “Belly” Bulges: An isolated outward bulge across the middle third of a wall indicates that internal hearting stones have slipped or settled under soil pressure.
- Install Calibrated Crack Monitors: For mortared walls, secure acrylic crack monitors across prominent diagonal stair-step fractures. Track them over a 60- to 90-day monitoring window. Any movement exceeding 1/16 of an inch indicates active, continuous foundation subsidence or lateral failure, rather than historical settlement.
Dry-Stacked vs. Mortared Walls: Choosing the Right Repair Strategy
Stone walls fall into two distinct structural categories: dry-stacked (held together solely by friction, stone interlocking, and gravity) and mortared (bound by a cementitious or lime paste). You must never treat a dry wall like a mortared wall, and vice versa.
Lime Mortar vs. Portland Cement for Mortared Walls
One of the most destructive mistakes we encounter in the field is using modern, rigid Portland cement to patch historic or soft fieldstone masonry. Traditional lime mortar possesses a functional lifespan of 80 to 120 years before it naturally weathers and requires renewal.
Lime mortar is designed to be a “sacrificial” material. It is softer and more flexible than the stones it surrounds, allowing the wall to micro-adjust to seasonal thermal expansion without shattering the stone faces.
| Property | Natural Hydraulic Lime (NHL 2 / NHL 3.5) | Standard Portland Cement (Type S / M) |
|---|---|---|
| Vapor Permeability | High (Breathable; allows trapped moisture to evaporate freely) | Low (Creates an impermeable vapor barrier) |
| Flexibility & Elasticity | High (Accommodates subtle structural and thermal movement) | Low (Extremely rigid; brittle under tension) |
| Compressive Strength | Low to Moderate (Sacrificial to protect natural stone) | Very High (Can crush soft limestone and sandstone) |
| Initial Curing Time | 7 to 28 days (Requires gradual damp curing) | 24 to 48 hours (Rapid chemical hydration) |
| Long-Term Durability | Exceptional with soft stone; prevents stone face spalling | Causes stone “rot” and edge fracture in historic walls |
When modern, non-porous Portland cement is smeared over old stone joints, water becomes trapped inside the stone behind the rigid mortar seal. When winter hits, the stone face spalls off while the hard cement remains intact.
For historic structures and older properties, integrating professional tuckpointing using authentic lime-based binders is essential to preserve the wall’s fabric. You can also consult this guide on how to repair a crumbling stone wall for specific historical restoration principles.
The Science of Structural Hearting in Dry-Stone Construction
In a dry-stacked wall, the secret to structural longevity does not lie on the visible face—it lies buried in the center. This internal core is known as structural hearting.
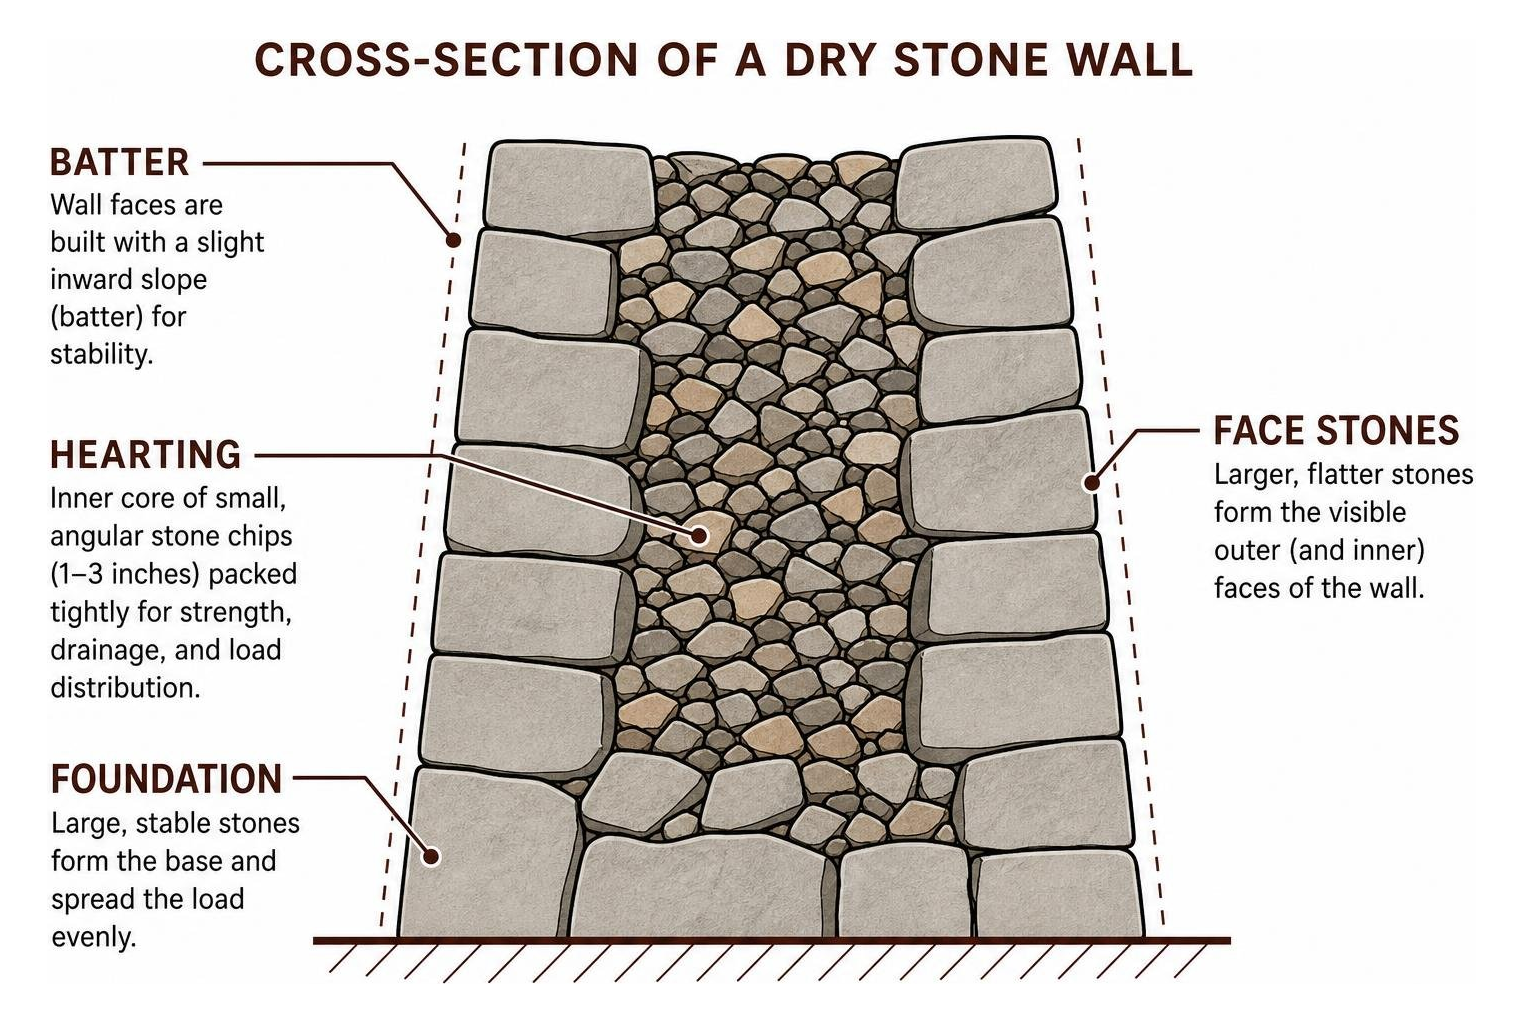
Hearting consists of small, sharp, angular stone chips (typically 1 to 3 inches in size) packed tightly into the void between the outer and inner face stones:
- Friction Locking: Angular stones wedge tightly against one another and bite into the back sides of the larger facing stones. Never use smooth, rounded river pebbles or pea gravel for hearting; round stones act like ball bearings and cause the wall to bulge outward.
- Continuous Drainage: The interconnected voids within clean, angular hearting allow ground moisture to percolate freely down through the wall base, eliminating hydrostatic pressure entirely.
- Load Equalization: Properly packed hearting transfers the downward weight of upper courses evenly across the entire footprint of the foundation stones.
For comprehensive methodologies on setting dry courses, review our breakdown on how to repair a stacked stone wall.
Core Methods to Fix Stone Wall Structures
Whether you are performing spot maintenance on a mortar joint or reconstructing a collapsed section of a dry wall, adhering to proven masonry sequences ensures a permanent fix.
How to Fix Stone Wall Mortar Joints Through Repointing
When mortar turns to powder or pulls away from the rock, complete repointing restores structural weatherproofing.
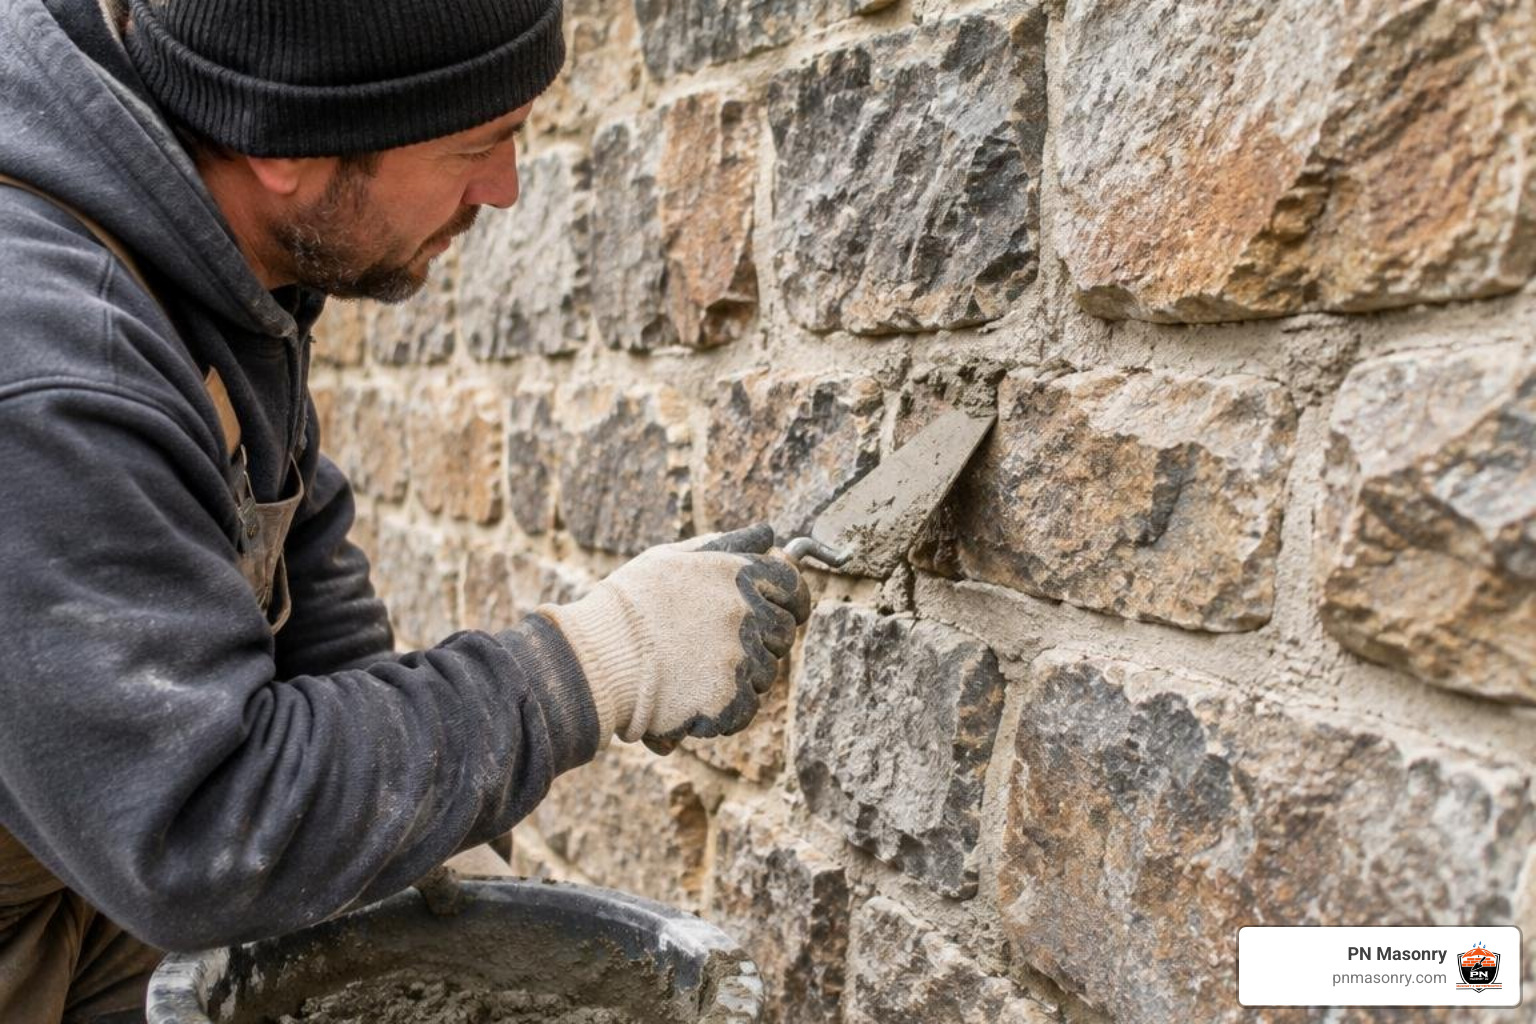
Follow these step-by-step procedures:
- Rake Out Failing Mortar: Using a plugging chisel, hand hammer, or a slow-speed diamond mortar raking disk, clean out deteriorated mortar to a depth of at least 1 inch (or twice the width of the joint). Maintain a square-bottomed joint profile rather than a shallow V-notch to give the fresh mortar mechanical support.
- Wash and Clean: Blast away all stone dust, loose grit, and biological growth using a stiff wire brush and clean water.
- Dampen the Substrate: Thoroughly pre-wet the joint surfaces several hours before repointing, and dampen them again right before applying mortar. Dry stone will suck water out of fresh lime mortar too quickly, causing it to desiccate, turn powdery, and fail.
- Pack Mortar in Lifts: Mix a workable batch of Natural Hydraulic Lime (NHL 3.5) and sharp sand (1:2.5 ratio). Pack the mortar firmly into the joint using a thin tuck pointer, working in 1/4-inch to 3/8-inch layers (lifts). Compress each lift thoroughly to eliminate internal air voids.
- Strike and Tool: Once the final lift becomes thumbprint-hard, strike the joint with a pointing tool or flush cut it, then lightly tap it with a stiff bristle brush to expose the sand aggregate and match the historic texture.
- Cure Gradually: Shield the new mortar from direct sun, wind, and heavy rain using damp burlap sheets for at least 7 to 14 days.
Following joint repairs on vulnerable exterior structures, applying breathable brick and block sealing and waterproofing barriers helps shield masonry against excessive moisture absorption without locking in vapor.
Rebuilding Bulging Sections Using the One-Over-Two Rule
If a dry-stone or fieldstone retaining wall exhibits a structural bulge, you cannot simply push the stones back in. The bulging section must be dismantled and systematically rebuilt.
- Dismantle to the Sound Foundation: Carefully take down the failing section in a V-shaped or stepped pattern down to the solid base course. Lay the stones out on the ground in sequential order to simplify reconstruction.
- Sort Your Materials: Separate your face stones, tie stones, and small angular hearting fragments. Always gather about 20% more angular hearting stone than you think you need before beginning.
- Enforce the One-Over-Two Rule: Every stone placed in a course must sit firmly over the vertical joint between two stones on the course below it (one-over-two, and two-over-one). This cross-bonding distributes downward weight diagonally across the entire wall and prevents continuous vertical “running joints,” which are primary fracture lines.
- Set Through-Stones (Tie Stones): Every 3 to 4 linear feet, install a long “through-stone” that extends across the full width of the wall. These stones physically tie the front face to the back face, preventing the two sides from separating.
- Pack Hearting Continuously: As each course of face stone is set, immediately fill and hand-pack the interior core with angular stone chips.
- Set Capstones: Cap the top of the wall with heavy, wide stones spanning the entire wall thickness. Secure them tightly to lock the lower courses and shield the internal hearting from weathering.
For additional field-tested techniques on restoring structural integrity to garden fences and property borders, explore this master guide on how to repair a fieldstone wall.
Correcting Leaning Retaining Walls and Soil Pressure
Retaining walls must fight gravity and soil physics simultaneously. When rebuilding or stabilizing a leaning stone retaining wall, you must incorporate a proper batter—an intentional inward slope toward the retained earth.
- Establish the Batter Line: Set your guide stakes with an inward slope of at least 1 inch for every 2 feet of wall height (a 1:24 batter; freestanding dry walls often use a 1:6 to 1:12 batter). This ensures gravity pulls the stones back into the retained hillside rather than allowing them to tip outward.
- Install Deadman Anchors: For walls over 3 feet tall holding heavy slopes, integrate T-shaped “deadman” stones or treated anchors that extend 3 to 5 feet back into the retained soil. The weight of the earth resting on top of the anchor holds the wall face firmly in place.
- Relieve Lateral Surcharges: Excavate dense, clay-heavy soil immediately behind the wall face and replace it with free-draining angular stone.
If your property features decorative stone facades that have pulled away from structural backings alongside leaning walls, specialized stone veneer repair and replacement can restore structural adhesion and appearance. For deeper tactical methods on shoring, review this guide on how to repair a leaning stone retaining wall.
Installing Essential Drainage to Prevent Future Wall Failure
A stone wall is only as durable as its drainage system. If you rebuild a stone retaining wall without establishing clear drainage pathways, hydrostatic pressure will compromise your new work within a few wet seasons.
Perforated Pipes and Weep Hole Placement
Relieving trapped groundwater requires a dedicated drainage channel behind the masonry:
- The Drainage Trench: Excavate a 12-inch wide trench directly behind the entire height of the stone wall.
- Perforated Drain Pipe: Lay a 4-inch perforated PVC or rigid corrugated drain pipe along the base of the trench behind the wall footing, sloping downward at a minimum 1% grade toward a daylight exit point.
- Filter Fabric Encasement: Wrap the drainage gravel in non-woven geotextile filter fabric (“burrito wrap” technique) to prevent fine silt and soil particles from washing into and clogging the gravel voids over time.
- Weep Holes: For mortared retaining walls, install 2- to 3-inch PVC weep pipes every 4 to 6 feet along the bottom course, angled slightly downward to let water drain out naturally. In dry-stacked construction, ensure that base stone joints remain open and unmortared to act as natural weep channels.
Surface Runoff and Backfill Compaction
Managing surface water prevents excessive volumes from ever reaching the back of the wall:
- Backfill Selection: Use clean, washed 3/4-inch angular crushed gravel for backfilling behind the wall. Avoid rounded gravel, unwashed sand, or fine topsoil within the primary drainage zone.
- Layered Compaction: Place backfill gravel in thin 6-inch lifts, tamping each lift firmly with a mechanical plate compactor or hand tamper. Uncompacted backfill settles over time, creating surface depressions where water pools.
- Geo-Grid Soil Reinforcement: For retaining walls exceeding 4 feet in height, embed horizontal layers of high-tensile geo-grid fabric between backfill lifts, locking the soil matrix into a stable mass.
- Surface Grading: Grade the top 6 inches of soil above the wall with a positive slope (at least a 2- to 3-inch drop over 10 feet) that channels surface runoff away from the wall crest.
DIY vs. Professional Costs: When to Hire an Expert
Deciding between a weekend DIY fix and professional masonry intervention comes down to structural scope, wall dimensions, and personal safety.
DIY vs. Professional Repair Cost Comparison
Catching minor joint degradation early avoids costly structural intervention. Spot-repointing failing mortar when it first begins to crumble can save $5,000 to $12,000 down the road by preventing wall displacement, underpinning, or helical pier installation.
| Repair Scope | DIY Cost Range | Professional Masonry Cost Range | Project Duration | Equipment & Skills Needed |
|---|---|---|---|---|
| Spot Repointing Mortar Joints (10–20 linear ft) | $50 – $150 (Mortar, trowels, chisels) | $350 – $1,200 | 1 – 2 Days | Chisels, tuck pointer, lime mortar safety gear |
| Resetting Fallen/Loose Stones (Minor area) | $40 – $100 (Chipping hammer, hearting) | $300 – $800 | 4 – 8 Hours | Basic dry-stacking tools, safety boots |
| Partial Wall Rebuild (Bulging dry wall, up to 3 ft tall) | $200 – $600 (Gravel, filter fabric, hearting) | $1,500 – $4,500 | 2 – 4 Days | Shoring timbers, plate compactor, stone walling hammer |
| Structural Retaining Wall Rebuild (>4 ft tall with drainage) | $800 – $2,500 (Materials, equipment rental) | $4,500 – $15,000+ | 1 – 2 Weeks | Excavator, geo-grid, engineered drainage, laser level |
| Foundation Crack Bracing & Underpinning | Not recommended for DIY | $5,000 – $25,000+ | 1 – 3 Weeks | Helical piers, hydraulic jacks, structural engineering sign-off |
How to Fix Stone Wall Hazards Requiring an Engineer
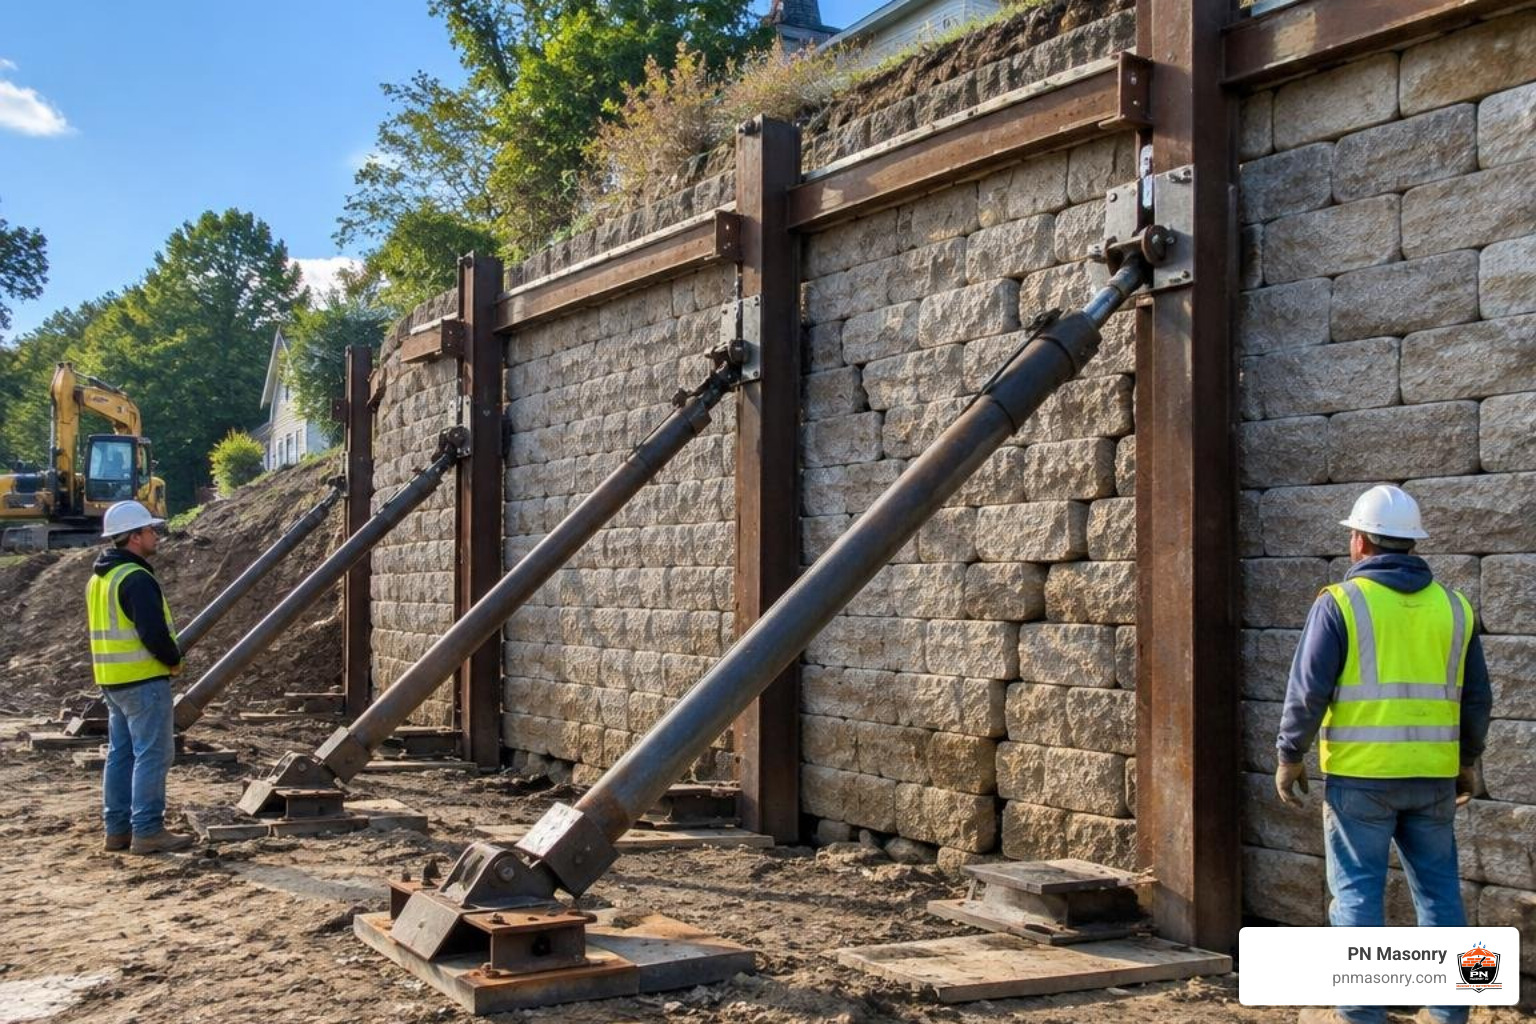
While low garden borders are great DIY candidates, structural walls present significant safety risks. You should immediately halt DIY efforts and contact a licensed structural engineer or professional masonry contractor under the following conditions:
- Severe Wall Bowing: The wall has bulged outward more than 2 inches from plumb over an 8-foot span.
- Total Height Exceeding 4 Feet: Retaining walls taller than 48 inches carry immense soil loads and frequently require municipal permits, engineered plans, and structural calculations.
- Active Foundation Undermining: Soil has washed away from beneath the primary footing stones, leaving the wall suspended or sinking unevenly.
- Adjoining Structural Hazards: The stone wall supports a driveway, patio, building foundation, or high-traffic walkway.
- Large Foundation Shearing: Horizontal cracks running through structural basement stonework accompanied by active water intrusion.
Frequently Asked Questions About Stone Wall Repair
Can I use standard bag mortar from a home improvement store to patch a stone wall?
No. Standard bagged mortar mixes from big-box stores (such as Type S or Type M cement) are formulated for modern concrete masonry blocks and hard modular bricks. They cure into an extremely rigid, vapor-impermeable matrix. When applied to softer historic fieldstone or limestone, they trap internal water and cause the outer face of the stones to spall and crack during freeze-thaw cycles. Always use Natural Hydraulic Lime (NHL) or custom Type N / Type O breathable mortars for natural stone repairs.
What is the recommended batter angle for a dry-stone retaining wall?
The standard rule of thumb for dry-stone retaining walls is an inward batter of at least 1 inch for every 2 feet of wall height (a 1:24 ratio). For freestanding dry walls or retaining walls on steep slopes, a steeper batter of 1:6 to 1:12 (1 to 2 inches of inward lean per foot of height) provides greater gravity-locked resistance against lateral earth loads.
How do I fix a stone retaining wall that is bulging outward?
An outward bulge cannot be pushed back into alignment. To fix it correctly:
- Temporarily shore up upper sections if necessary.
- Dismantle the stones around the bulged area down to stable foundation courses.
- Remove silted, clogged soil from behind the wall.
- Rebuild the stone face course by course using the one-over-two rule while introducing an inward batter.
- Pack the interior core with clean, angular stone hearting and replace the backfill with 3/4-inch crushed gravel protected by geotextile fabric.
Conclusion
Restoring a failing stone wall requires diagnosing the root cause—such as trapped hydrostatic pressure, frost expansion, or shifting hearting—before completing cosmetic fixes. By choosing breathable lime mortars for mortared walls, maintaining the one-over-two interlocking rule, packing dense angular hearting, and installing dedicated backfill drainage, you can ensure your stone masonry remains structurally sound for decades to come.
When structural movement exceeds safe DIY limits or your property requires comprehensive foundation stabilization, our experienced team is here to assist. At PN Masonry, we provide full-service residential and commercial masonry solutions across Cook County, Illinois. From historic stone restoration and precision tuckpointing to structural retaining wall rebuilding, our team handles complex brick, block, and stone challenges with unmatched craftsmanship.
Contact us today at PN Masonry to schedule an on-site structural evaluation or discuss your upcoming masonry restoration project!