
Chimney Flashing Replacement Stops Leaks at the Roofline
If water is getting in around your chimney, don’t rely on another coat of caulk. A lasting chimney flashing replacement means removing the nearby shingles and old metal, checking the roof deck and mortar for damage, then installing new underlayment and flashing that directs water back onto the roof. The counter-flashing must fit into sound mortar joints, not just sit against the brick.
Look for ceiling stains, damp attic wood, rust, or loose metal. If the mortar is cracked, the roof is steep, or the leak has reached the attic, hire a qualified roofer and masonry professional. Fixing the metal without fixing damaged mortar can leave the leak in place.
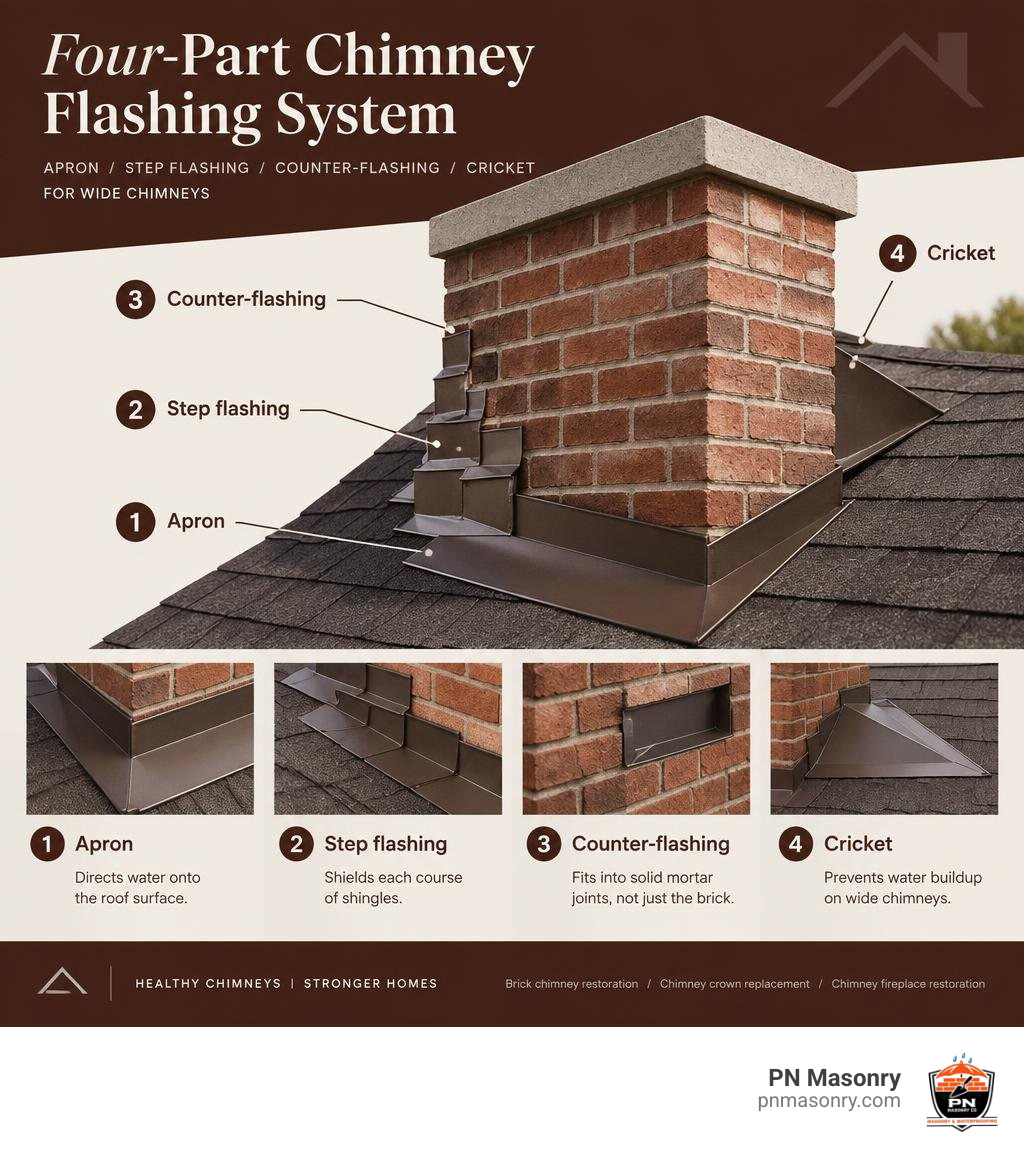
Chimney flashing replacement vocabulary:
Identifying Chimney Flashing Failure and Leak Hazards
Because a masonry chimney penetrates every layer of your roof assembly, it is inherently vulnerable to water intrusion. When the sheet metal barriers bridging the gap between porous brickwork and the wooden roof deck fail, water travels along roof rafters, framing studs, and ceiling joists before showing visible signs in finished living spaces.
Signs You Need a Chimney Flashing Replacement
Water intrusion often announces itself subtly before causing catastrophic structural failure. Homeowners should regularly inspect both their living areas and attic spaces for early warning signs:
- Interior Discoloration: Light brown or yellowish water stains creeping across the ceiling or down adjacent drywall after heavy rain.
- Attic Indicators: Dark water streaking on the sides of the chimney masonry, damp attic insulation, or musty odors during humid weather.
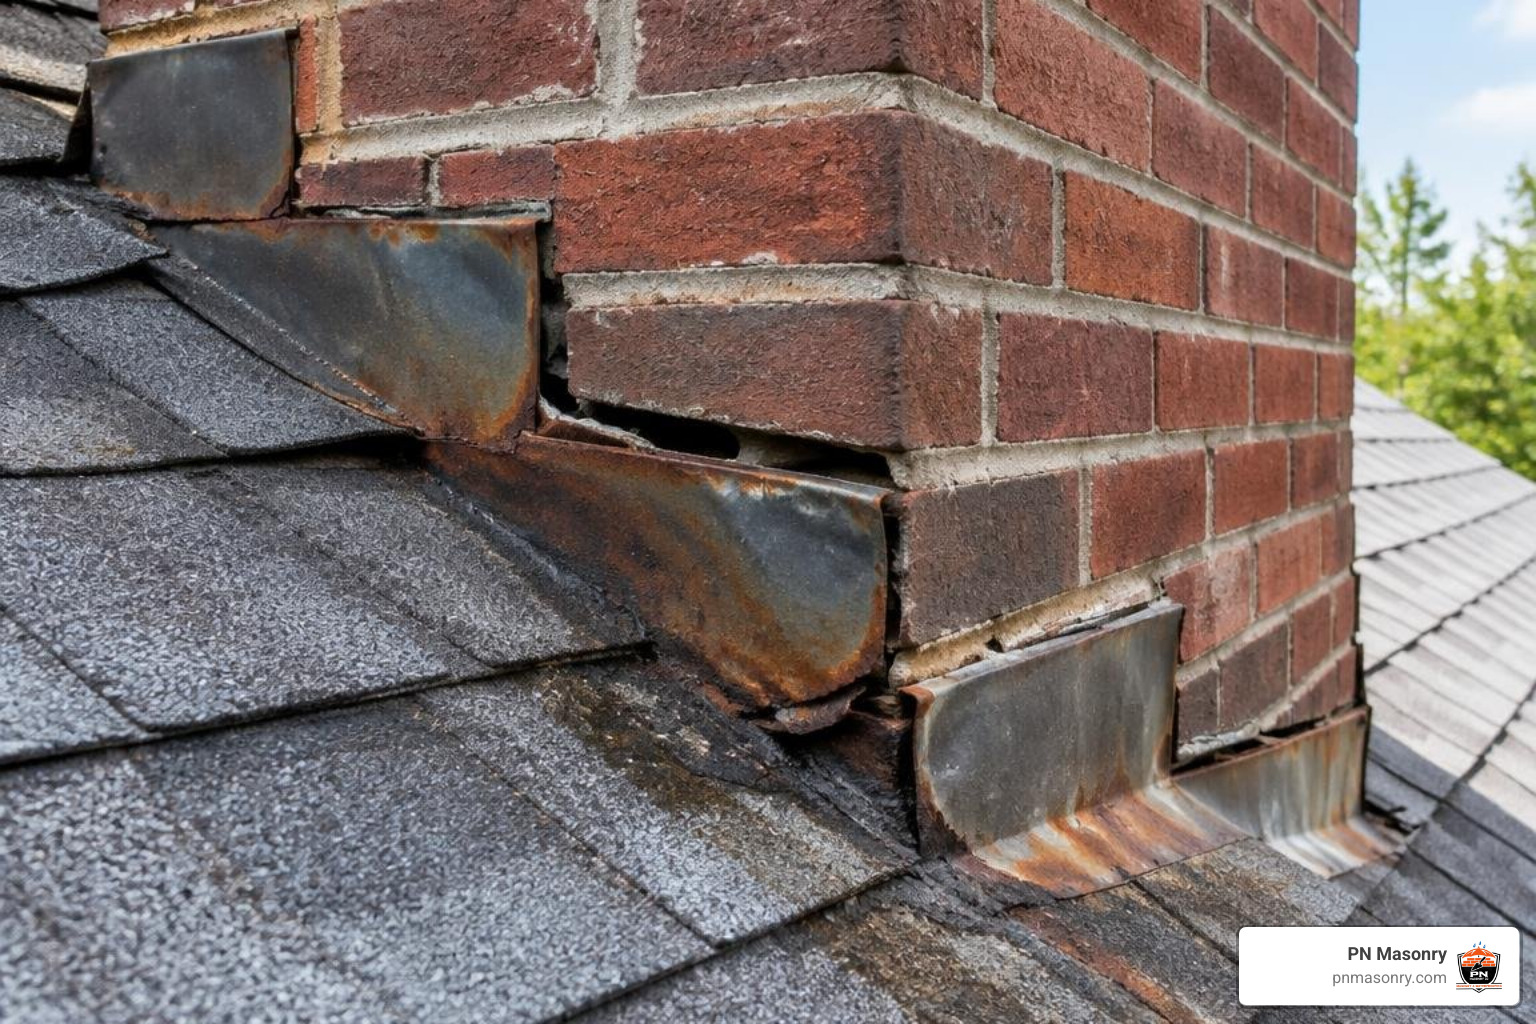
- Surface Metal Degradation: Flashing pieces showing visible rust, corrosion pinholes, or warped sections pulling away from the brick face.
- Deteriorated Sealants: Cracked, dried-out roofing cement or peeling silicone beads along the top edge of the metal.
- Loose Counter-Flashing: Metal edges dangling or detached from mortar joints.
When you notice these warning signs, securing specialized chimney flashing repair prevents minor water infiltration from becoming an extensive structural rebuild.
Hidden Masonry and Roof Decking Deterioration
A flashing leak rarely stays confined to the sheet metal itself. Water trapped beneath loose flashing seeps directly into the roof decking, causing subfloor rot, fungal growth, and structural timber decay.
In cold climates subject to seasonal freeze-thaw cycles, trapped moisture enters the porous brickwork, causing face spalling and mortar joint erosion. Addressing deteriorating joints through essential masonry tuckpointing is necessary before anchoring new sheet metal, ensuring the new installation remains completely watertight.
Understanding the Four-Part Chimney Flashing System
A dependable flashing installation does not rely on a single continuous strip of metal or a bucket of tar. Per modern building practices and IRC Section R905.6.6, a durable installation uses a four-part system that accommodates independent thermal movement between the roof deck and the chimney stack. For a complete look at these individual pieces, review The Roofing Brief 4-part flashing breakdown.
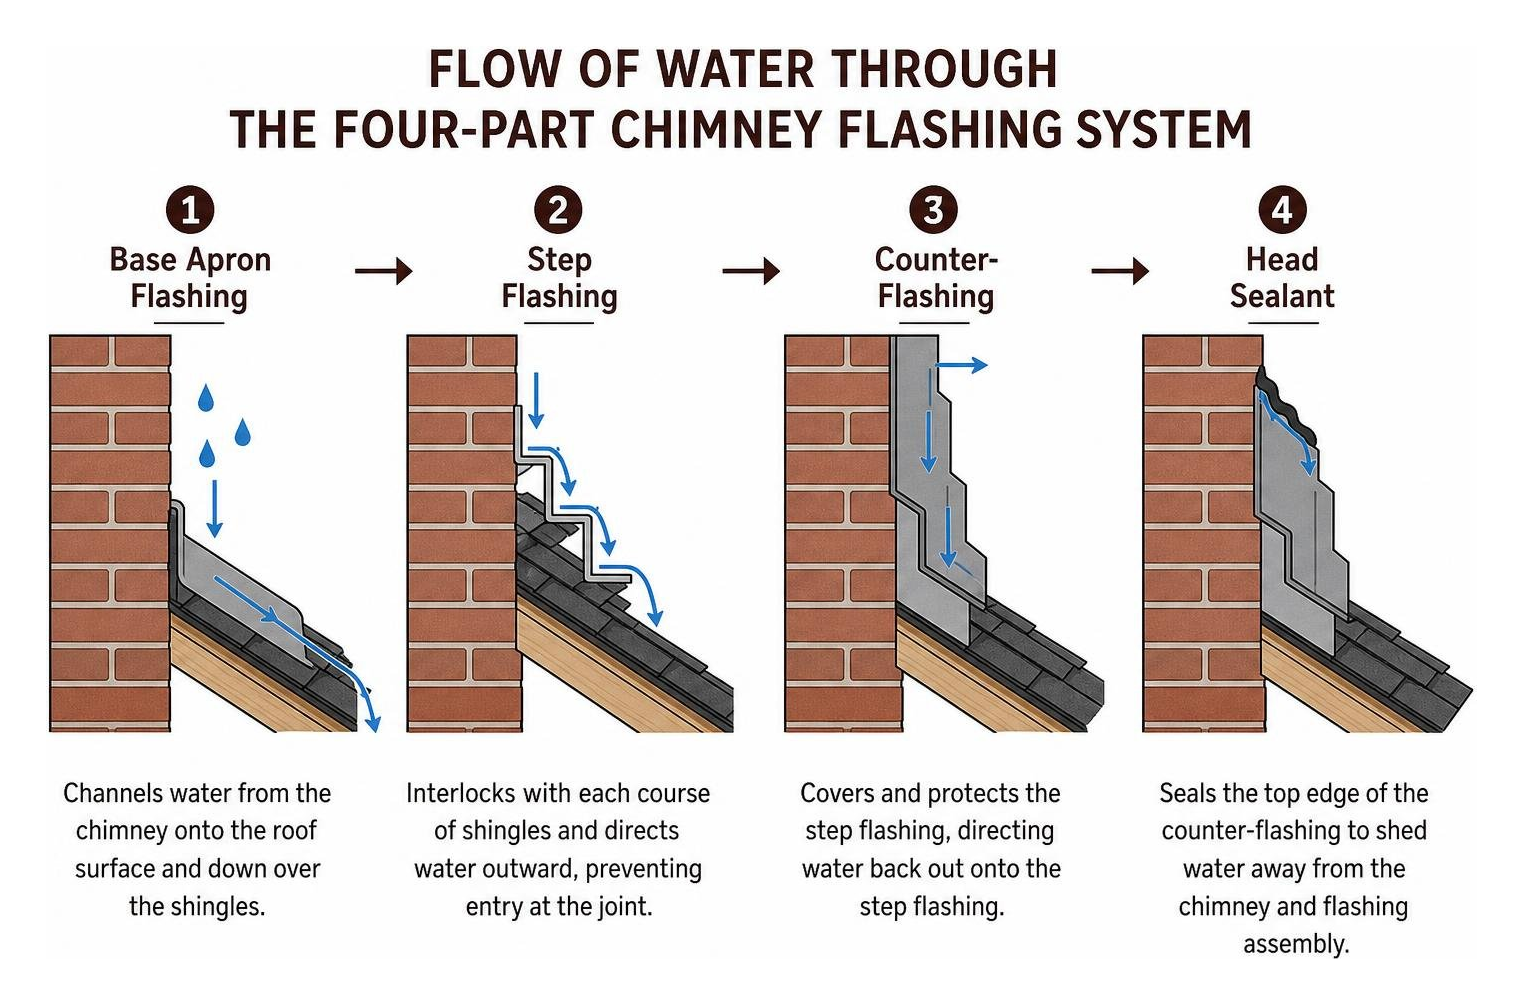
Apron, Step, and Counter-Flashing Mechanics
Each component in the four-part flashing system fulfills a specific water-shedding role:
- Base Apron Flashing: Positioned across the downhill face of the chimney, extending at least 4 inches up the brickwork and 4 to 6 inches over the downslope shingles to channel runoff safely downward.
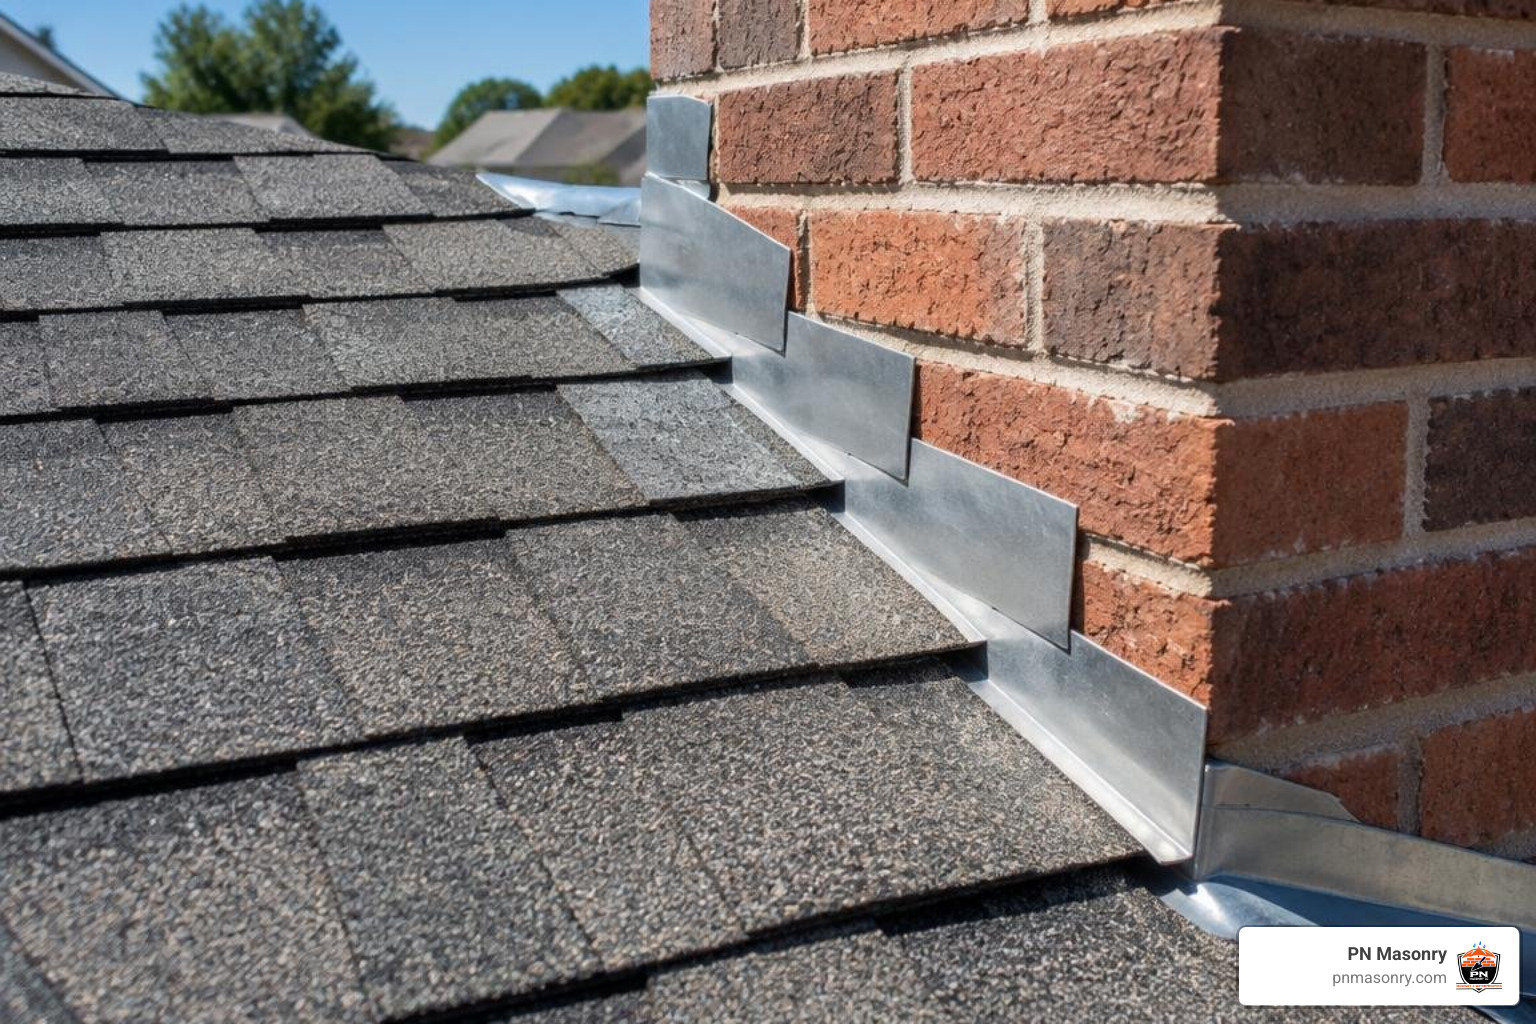
- Step Flashing: Individual 90-degree bent metal pieces woven progressively into each shingle course along the chimney sides. Each piece overlaps the preceding one by a minimum of 1 to 2 inches, shedding water downward like shingles on a roof.
- Counter-Flashing (Cap Flashing): An L-shaped metal piece whose top edge is embedded directly into a cut mortar joint (reglet). It hangs down over the vertical legs of both the base apron and the step flashing without being nailed to them, allowing the roof and chimney to expand and contract independently.
- Waterproofing Membranes & Sealants: Self-adhered ice-and-water membrane running beneath the metal, combined with high-grade, UV-stable polyurethane sealant to protect the brick-metal joint. Pairing this with waterproof brick sealing keeps porous brick surfaces protected against wind-driven moisture.
Why Wide Chimneys Require a Cricket
When a chimney measures wider than 30 inches parallel to the roof ridge, it creates a wide dam that traps rainwater, snow, and falling debris against the uphill masonry face.
Per International Residential Code (IRC) Section R1003.20, any chimney penetration exceeding 30 inches in width requires a roof cricket (saddle). A cricket is a small elevated, double-pitched roof framing assembly that splits and diverts uphill water runoff around both sides of the chimney stack. To understand how water management changes on complex roof intersections, consult Fine Homebuilding’s winged flashing guide for specialized corner geometries.
The Step-by-Step Chimney Flashing Replacement Process
Replacing chimney flashing demands systematic planning, proper safety measures, and precise sheet metal fabrication.
Tools and Materials Needed for Chimney Flashing Replacement
Before starting the repair, gather all necessary equipment:
- Safety Equipment: OSHA-compliant fall-arrest harness, roof anchors, non-slip footwear, safety goggles, and a dust respirator.
- Hand & Demolition Tools: Flat pry bar, roofing hammer, utility knife, heavy-duty tin snips, hand seamers, and a stiff wire brush.
- Masonry Equipment: Angle grinder with a diamond tuckpointing blade, masonry chisel, and pointing trowel.
- Sheet Metal & Underlayment: 24- to 26-gauge galvanized steel, 0.032-inch aluminum, or 16-ounce copper sheets; self-adhering modified bitumen ice-and-water shield.
- Sealants & Mechanical Fasteners: UV-stable polyurethane sealant (such as Tremco Vulkem), lead expansion plugs or masonry anchors, and galvanized roofing nails. Completing the top of the stack with protective chimney caps ensures full protection from the crown down to the roofline.
Step 1: Tear-Off, Substrate Prep, and Membrane Installation
- Strip away all shingles within an 18-to-24-inch clearance perimeter surrounding the chimney stack down to the bare wood roof decking.
- Pry away old corroded flashing, taking care not to gouge the brick or crack surrounding masonry units.
- Clean all old asphalt mastic, dried roof cement, and debris from the exposed brick and decking using a flat scraper and wire brush.
- Inspect the exposed roof decking for moisture rot; replace any compromised plywood or OSB sheets.
- Apply a high-temperature, self-adhering ice-and-water shield directly to the clean wooden deck, extending at least 12 inches out onto the roof deck and 4 to 6 inches up the vertical chimney face.
Step 2: Fitting Apron and Step Flashing into Shingle Courses
- Install the base apron flashing along the downhill masonry face, nailing the horizontal flange flat onto the roof deck while leaving the vertical leg resting flush against the brick.
- Lay your shingle course up to the bottom edge of the chimney.
- Place an L-shaped step flashing piece (minimum 4-inch vertical by 4-inch horizontal leg, 8 inches in length) over the shingle, butting the vertical leg flush against the brick.
- Fasten the horizontal leg to the roof deck using a single roofing nail near its top outer corner. Never nail the vertical leg into the chimney brick.
- Lay the subsequent shingle directly over the step flashing piece. Repeat this woven sequence up both sides of the chimney stack, maintaining a minimum 1-to-2-inch overlap between pieces.
Step 3: Cutting Reglets and Embedding Counter-Flashing
- Using an angle grinder equipped with a diamond blade, cut a straight horizontal reglet groove 2 to 3 inches deep into a sound mortar joint along all four faces of the chimney stack, roughly 4 to 6 inches above the roofline.
- Clear dust and loose mortar debris from the cut groove with a wire brush or leaf blower. If the surrounding masonry shows deterioration, coordinate repairs alongside damaged chimney crown restoration to protect the chimney stack uniformly.
- Bend the top flange of your counter-flashing pieces at a 90-degree angle to slip into the cut mortar joint.
- Insert the counter-flashing metal into the reglet, securing it mechanically with folded lead wedges or lead drive pins.
- Pack the joint and seal it thoroughly with a high-grade, UV-stable polyurethane elastomeric sealant, smoothing the bead to shed water outward away from the brick.
Material Selection, Lifespans, and 2026 Cost Factors
Choosing the right flashing material depends on your local climate, the roof’s expected lifespan, and your budget.
| Material Type | Material Cost / Linear Ft. | Average Service Lifespan | Primary Advantages | Best Application |
|---|---|---|---|---|
| Aluminum | $5 – $9 | 20 – 40 Years | Budget-friendly, malleable, rust-resistant | Standard asphalt shingle roofs |
| Galvanized Steel | $6 – $10 | 15 – 25 Years | High tensile strength, rigid, impact-resistant | High-wind regions & budget builds |
| Lead-Coated Copper | $14 – $22 | 40 – 60+ Years | Highly flexible, non-staining, very durable | Historic masonry & harsh winters |
| Copper (16 oz.) | $15 – $25 | 60 – 100+ Years | Maximum durability, self-healing patina, solderable | Tile, slate, and premium roofs |
Comparing Galvanized Steel, Aluminum, and Copper
- Galvanized Steel: Strong and rigid, making it resistant to physical impact and high winds. However, cut edges and areas where the zinc coating wears down will eventually rust, giving it a moderate service lifespan of 15 to 25 years.
- Aluminum: Highly resistant to atmospheric corrosion and easy to bend on site. While economical, it can react corrosively with wet alkaline mortar if not coated, and it cannot be soldered at complex corner joints.
- Copper: The gold standard for longevity. Copper will never rust, forms an oxidized patina that protects the metal, and can be fully soldered at watertight corner laps. Although copper costs 2.5 to 3 times more in raw materials than galvanized steel, its lifespan easily doubles or triples cheaper alternatives.
Regional Weather Pressures and Installation Pitfalls
Flashing performance varies significantly across different regional climates:
- High-Humidity and Coastal Climates: In coastal environments (such as South Florida or the Gulf Coast), intense UV exposure and salt-laden air rapidly degrade asphalt-based mastics. In these areas, embedded counter-flashing into sound mortar prevents 40% to 60% of recurring leaks, while 72% of early failures stem from overlooked mortar breakdown 2 to 3 years post-installation.
- Freeze-Thaw Climates: In Midwest regions like Cook County, Illinois, moisture trapped behind poorly sealed flashing freezes, expands, and dislodges metal from mortar joints.
Avoid common installation errors like face-nailing metal directly into the brick surface, omitting step flashing in favor of a single continuous L-metal strip, or relying on cheap roofing tar instead of cutting a true reglet groove.
| Scope of Flashing Replacement (2026 Pricing) | Typical Cost Range | Included Workmanship & Materials |
|---|---|---|
| Single Corner / Minor Section Repair | $300 – $600 | Localized step flashing swap & polyurethane reseal |
| Counter-Flashing Only Replacement | $500 – $1,200 | Reglet diamond-grinding, new metal tuck, and mortar seal |
| Standard Residential Full Reflash (Galvanized/Alum) | $800 – $1,600 | 4-part tear-off, ice & water shield, apron, step, counter |
| Full 4-Part Custom Copper Rebuild (30″-48″ Chimney) | $1,500 – $2,500+ | 16-oz copper fabrication, soldered corners, reglet work |
| Add New Custom Framing & Flashing for Cricket | $400 – $1,200 | Code-compliant saddle framing & underlayment wrap |
Frequently Asked Questions About Chimney Flashing
How much does professional chimney flashing replacement cost in 2026?
A standard professional chimney flashing replacement across the United States in 2026 ranges between $400 and $1,600. For a complete four-part flashing rebuild on an average 30-to-48-inch brick chimney, homeowners should expect costs between $800 and $2,200.
If the replacement includes custom copper fabrication, expects steep roof access, or requires adding a code-mandated cricket, costs generally range from $1,500 to $2,500+. Bundling the flashing replacement into an existing whole-roof replacement often saves money, reducing the flashing line item to $400 to $900 over base shingle costs.
Can I seal leaking chimney flashing with caulk or roof cement instead of replacing it?
Applying a layer of roofing tar, asphalt mastic, or surface caulk is only a short-term emergency patch. Asphalt-based roof cements quickly dry out, crack, and shrink under normal sun exposure.
More importantly, slathering caulk over failing flashing traps water against the brick masonry and roof deck, accelerating hidden wood rot and freeze-thaw damage. The only lasting repair is to remove the compromised metal and correctly embed new counter-flashing into the mortar joints.
What causes most DIY chimney flashing replacements to fail?
Industry data indicates that DIY flashing replacements fail roughly 60% of the time. The most frequent points of failure include:
- Nailing into the Masonry: Fastening the step flashing’s vertical leg directly to the chimney brick instead of the roof deck causes the metal to buckle and pull away as the house settles, accounting for 25% of premature failures.
- Surface Caulking Over Mortar Cuts: Gluing metal to the brick face with caulk instead of cutting a 2-to-3-inch reglet groove.
- Improper Overlaps: Leaving less than a 1-inch overlap between step flashing pieces, or failing to weave the metal under the uphill shingle courses.
- Skipping Underlayment: Neglecting to install an ice-and-water membrane barrier beneath the metal.
Protect Your Home with Professional Chimney Flashing
A leaking chimney is a serious issue that demands prompt attention. Ignoring damaged flashing allows water to rot roof rafters, degrade attic insulation, and ruin surrounding masonry walls. Investing in a properly installed four-part flashing system keeps your roof deck sound and your living areas dry through every season.
If your chimney shows signs of loose metal, cracked mortar, or water leaks around the roofline, our team is here to help. Contact PN Masonry today to schedule a comprehensive chimney flashing inspection and protect your home with skilled masonry and flashing services.