
Why Invest in a 13×13 Stainless Steel Chimney Cap for Your Home?
Choosing the right 13×13 stainless steel chimney cap comes down to three checks: confirm your clay flue tile’s outer dimensions fall between 11.5″ and 13.5″ square, select a 304-grade stainless steel construction for lasting corrosion resistance, and match the mounting style (bolt-on, inside-anchoring, or top-mount) to how far your tile extends above the crown. Getting these details right ensures a secure, weather-tight fit that keeps your chimney protected for decades.
An open chimney is essentially a massive hole in your roof inviting water, wildlife, and debris straight into your home. Rainwater is the primary enemy of any masonry chimney. When water enters an uncapped flue, it erodes clay tile liners, rusts metal dampers, deteriorates firebox mortar, and seeps into surrounding brickwork. In cold climates like Cook County, this trapped moisture undergoes repeated freeze-thaw cycles that cause spalling bricks and cracked chimney crowns. Installing a heavy-duty cap acts as an umbrella, directing gallons of driving rain safely onto the roof.
Beyond moisture exclusion, a 13×13 cap solves several critical venting and safety challenges:
- Pest and Wildlife Deterrence: Uncapped flues provide dark, sheltered spaces for birds, raccoons, bats, and squirrels to build nests. These nests block proper ventilation, trap toxic gases inside your living space, and create dangerous fire hazards. A solid screen keeps critters out so they do not make your flue their winter getaway.
- Spark Arrest and Roof Protection: Wood-burning fireplaces naturally throw floating embers up the chimney. A built-in mesh screen catches these sparks before they land on dry shingles or nearby tree branches, reducing the risk of accidental roof fires by up to 70%.
- Downdraft Mitigation: High winds passing over an open chimney top can force smoke, soot, and cold air backward down the flue into your living room. The solid metal hood of a chimney cap deflects horizontal wind gusts, stabilizing draft performance.
- Universal Fuel Compatibility: High-grade 304 stainless steel handles corrosive exhaust from wood stoves, coal-burning units, and high-efficiency oil or gas appliances without degrading.
If your masonry structure is already exhibiting cracked joints or water intrusion, pairing a new flue cover with professional chimney services ensures the entire system remains structurally sound and watertight for decades.
Key Design Styles and Mounting Methods for 13×13 Flues
Not every chimney flue tile is constructed the same way, which is why manufacturers produce different styles to mount securely to various clay and masonry configurations.
| Cap Style | Mounting Mechanism | Best For | Wind Resistance | Typical Price Range |
|---|---|---|---|---|
| Bolt-On / Corner-Mount | Slotted hex bolts tighten against exterior flue walls | Clay flue tiles extending 1–2+ inches above crown | High (deflects direct uplift) | $45 – $140 |
| Inside-Anchoring | Internal expanding friction struts inside throat | Flush tiles, short flues, high-wind zones | Superior (locked within masonry) | $180 – $240 |
| Top-Mount / Multi-Flue | Masonry tapcons driven directly into the crown | Multiple flues, irregular tiles, full crown coverage | Maximum (screwed into solid masonry) | $200 – $290 |
Selecting a 13×13 Stainless Steel Chimney Cap by Mounting Type
The physical characteristics of your chimney crown determine which mounting method provides the most secure attachment:
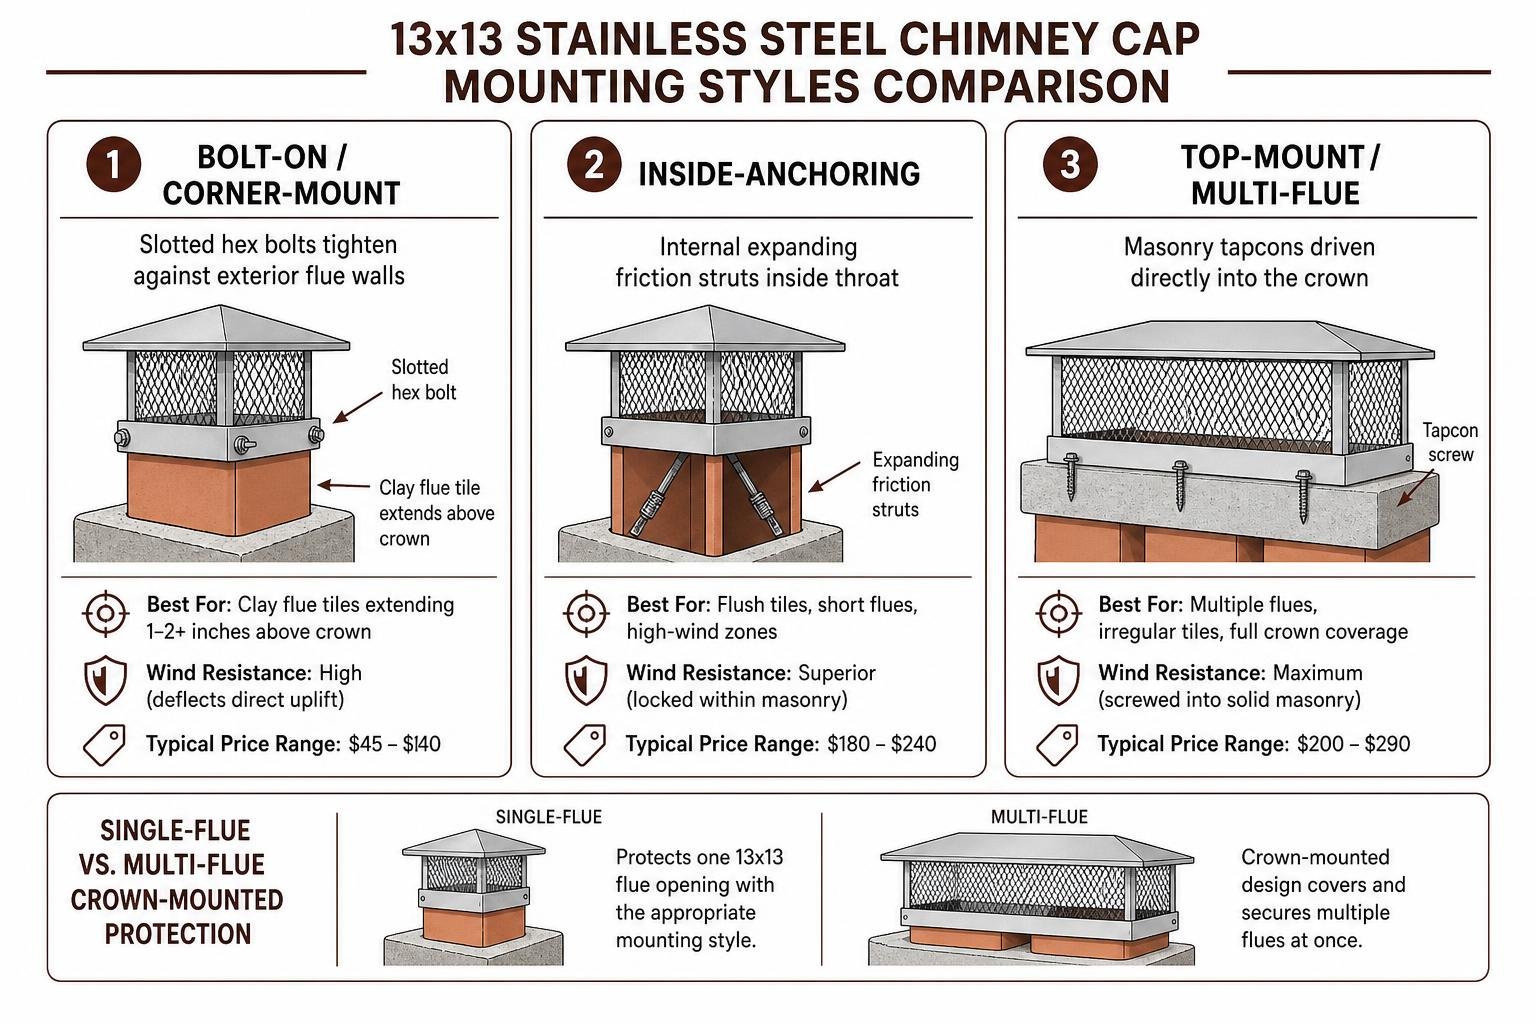
- Bolt-On / Corner-Mount Brackets: The most popular residential configuration, used on square clay flue tiles that extend at least an inch or two above the mortar crown. Slotted hex-head bolts thread through the cap’s base band against the outside perimeter of the clay tile. Premium designs utilize corner-mounting attachments that spread clamp force across the structural corners of the tile, providing outstanding grip in gusty winds while minimizing the risk of cracking brittle clay. Popular single-flue bolt-on models range from accessible DIY options to commercial-grade assemblies with adjustable metal flanges and long threaded bolts to accommodate standard manufacturing variations.
- Inside-Anchoring Systems: When a clay flue tile sits flush with the mortar wash or does not extend high enough for side bolts to grip, an inside-anchoring system is ideal. Heavy-duty models with spring-tensioned or strut-anchored bases insert straight into the flue throat. Because the anchoring hardware sits protected inside the flue walls, this design provides incredible stability during intense windstorms.
Single-Flue vs. Multi-Flue Crown-Mounted Protection
Single-flue caps attach directly to an individual tile opening, making them an economical choice when you have a lone clay liner extending above the chimney top. However, if your chimney features multiple flues situated close together, individual caps can crowd one another or interfere with venting clearances.
In these situations, a multi-flue crown-mounted unit attaches directly to the concrete wash using stainless steel tapcon screws and masonry anchors. These wide-coverage caps shield the clay flues while creating a generous 2.5-inch overhang that protects the mortar wash below. If your chimney’s concrete wash is already chipped or leaking, getting comprehensive chimney crown repair prior to installing a top-mount cap creates a weather-sealed barrier across the entire chimney top.
Material Specifications, Mesh Sizes, and Fire Safety Standards

A chimney cap endures extreme thermal swings, sulfur-laden flue gases, acidic soot, and relentless exterior weather. Selecting the proper steel grade and metal thickness ensures you only have to buy and install your cap once.
Durability Factors for a 13×13 Stainless Steel Chimney Cap
When shopping for a 13×13 stainless steel chimney cap, look for high-grade 304 stainless steel alloy construction. Premium caps feature distinct component thicknesses optimized for structural strength and weather protection:
- 24-Gauge Stainless Hood: A stamped or roll-formed hood lid sheds snow loads and resists denting from falling branches or hail.
- 18-Gauge Expanded Mesh: Provides a rigid barrier that aggressive animals cannot chew through or bend out of shape.
- 16-Gauge Base Plate or Mounting Band: Thick metal flanges provide the rigid foundation necessary to hold high-torque mounting bolts securely against masonry surfaces without warping.
Galvanized steel caps may carry a lower upfront price tag, but the protective zinc coating eventually oxidizes when exposed to acidic wood smoke and rainfall. Rust streaks will run down your chimney masonry, and the mesh will ultimately corrode. Premium 304 stainless steel resists corrosion indefinitely and includes manufacturer warranties ranging from 7 years to full lifetime coverage. For homeowners located within 25 miles of a saltwater coast, 304 stainless steel is mandatory to prevent salt-air pitting and premature metal failure.
Choosing the Right Mesh Size for Spark Arrest and Wildlife Deterrence
The side screen of your cap serves two competing goals: stopping debris and embers while maintaining proper fireplace draft.
- 3/4-Inch Expanded Mesh: The standard configuration used across most of North America. The 3/4-inch diamond or oval pattern easily blocks squirrels, raccoons, and birds while allowing exhaust gases to vent smoothly without restriction. It is less prone to clogging from airborne lint or heavy creosote soot.
- 5/8-Inch Expanded Mesh: Required by specific regional building codes (including strict fire safety mandates in California and high-risk wildfire zones). The tighter 5/8-inch opening provides enhanced spark arrest performance, stopping smaller floating embers from escaping the flue. However, homeowners burning unseasoned wood must inspect 5/8-inch mesh more frequently to prevent creosote buildup from choking the draft.
Flue Sizing and Installation Considerations
Installing a chimney cap requires accurate measurements and safe roof practices. Follow this step-by-step procedure to ensure a proper fit and a secure installation:
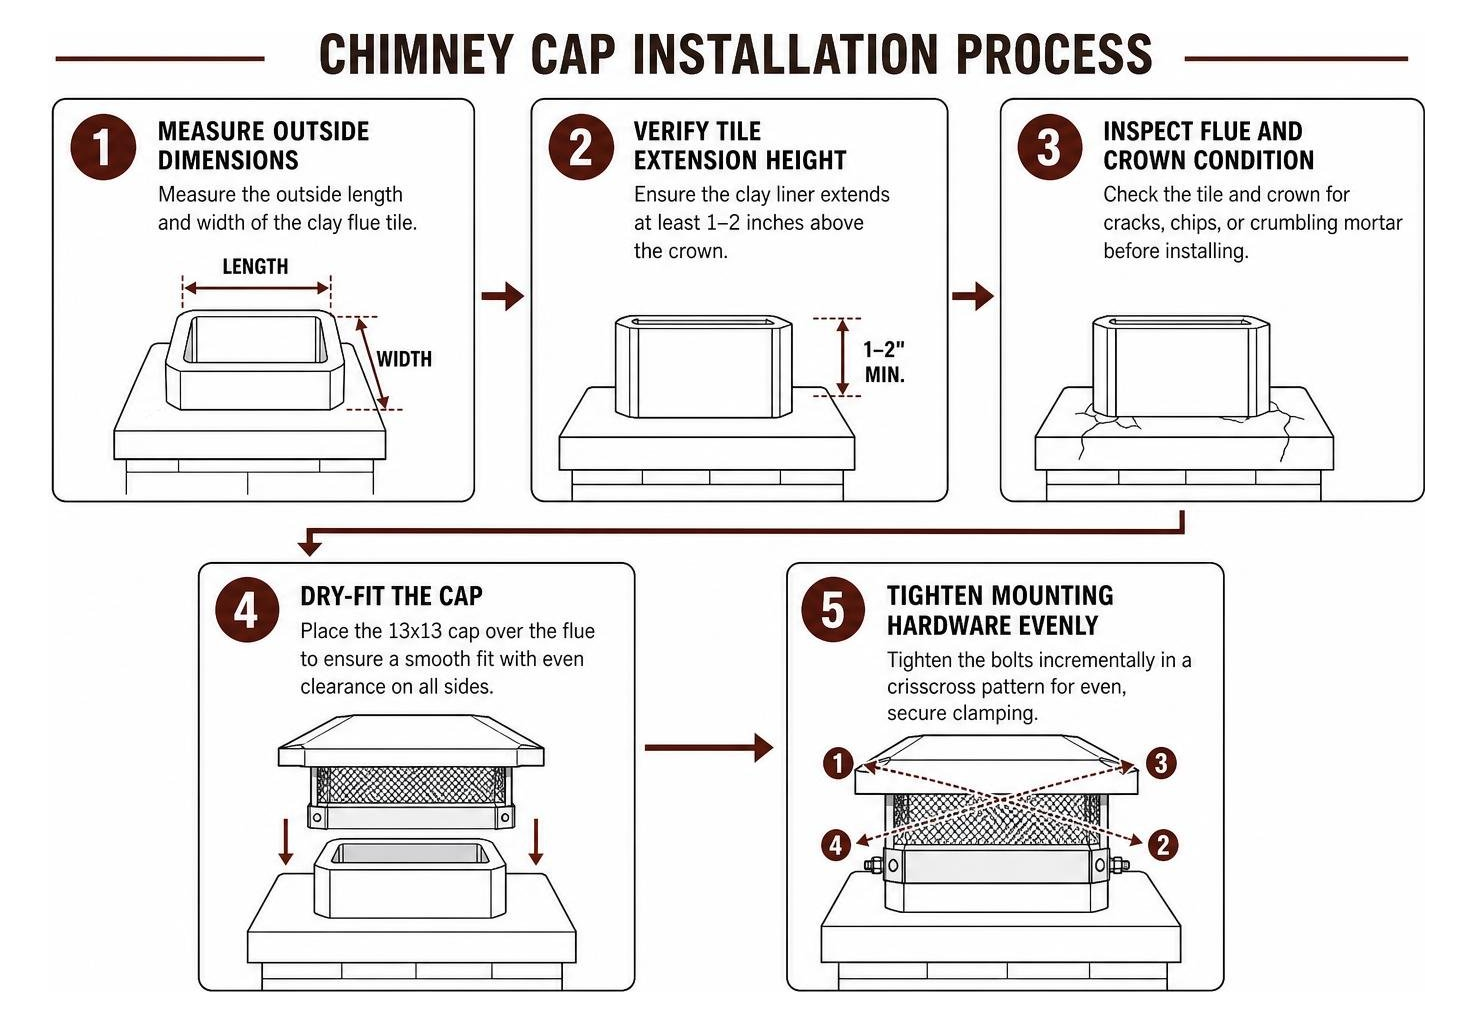
- Measure the Outside Dimensions: Climb safely to the chimney top and use a rigid tape measure to determine the outside length and width of the clay flue tile. A standard “13×13” nominal tile typically measures between 11.5 x 11.5 inches and 13.5 x 13.5 inches on its outer perimeter.
- Verify Tile Extension Height: Measure how far the clay liner extends above the concrete chimney crown. For standard side-bolt or corner-mount caps, you need at least 1 to 2 inches of exposed tile for the mounting brackets to grip securely.
- Inspect Flue and Crown Condition: Examine the top edge of the clay tile for cracks, chips, or crumbling mortar. Never tighten mounting bolts against fractured clay, as the clamping force can snap the tile. If the top of your chimney shows extensive cracking or loose bricks, schedule chimney rebuilding to restore structural stability before mounting heavy hardware.
- Dry-Fit the Cap: Set the assembled 13×13 cap over the flue to ensure the base band slides down smoothly over the clay tile with even clearance on all four sides.
- Tighten the Mounting Hardware Evenly: Thread the slotted hex-head mounting bolts through the pre-drilled weld nuts. Tighten each bolt incrementally with a nut driver or wrench, moving around the perimeter in a crisscross pattern so clamp pressure is distributed evenly without tilting the cap.
- Verify Screen Clearance: Ensure there is at least 5 to 6 inches of vertical clearance between the top rim of the clay flue and the underside of the cap hood. This ensures unrestricted exhaust flow and prevents drafting issues.
Frequently Asked Questions About Chimney Caps
How do I measure my flue tile to ensure a 13×13 cap fits?
Measure the outside length and outside width of the clay flue liner at the very top of your chimney. Nominal 13×13 clay tiles vary slightly depending on the manufacturer, but most fall within an exterior range of 11.5″ x 11.5″ up to 13.5″ x 13.5″. Bolt-on 13×13 caps are engineered with adjustable metal flanges and long threaded bolts to accommodate these standard manufacturing variations.
Is stainless steel better than galvanized steel for chimney caps?
Yes. While galvanized steel is cheaper initially, its thin zinc coating breaks down when exposed to acidic chimney flue gases and outdoor moisture, often leading to rust within 3 to 5 years. Stainless steel (specifically 304 grade) resists acid, rust, and thermal stress indefinitely. It will never leave unsightly orange rust stains across your masonry crown and chimney bricks.
Can a chimney cap restrict fireplace draft or cause creosote buildup?
A properly sized 13×13 cap with standard 3/4-inch mesh will not restrict your fireplace draft. Cap hoods are elevated 6 to 8 inches above the mesh base to provide a free-air exhaust area that exceeds the cross-sectional area of the flue liner itself. Creosote only accumulates on mesh screens if you routinely burn wet, unseasoned firewood or operate your fireplace with insufficient combustion air.
Conclusion
Protecting your chimney flue with a durable, properly sized cap is one of the most cost-effective investments you can make in your home’s exterior masonry. By keeping out torrential rain, blocking persistent wildlife, capturing dangerous sparks, and stabilizing fireplace draft, a high-quality stainless steel cap preserves your chimney system from the top down.
Take the time to verify your exterior flue measurements, select a mounting style suited to your crown layout, and choose corrosion-resistant 304 stainless steel components. For expert inspections, flue repairs, tuckpointing, or custom masonry upgrades across Cook County, connect with our skilled team at PN Masonry to ensure your entire chimney system remains safe, functional, and weather-tight throughout every season.