
Essential Preparation Before Bricking Up a Hole in the Wall
Bricking up a hole in the wall requires cleaning out debris, pre-wetting the cavity, spreading a level mortar bedding course, and toothing or mechanically tying matching bricks into the surrounding masonry courses. Once the new bricks are laid flush and plumb, the mortar joints are struck to match the existing profile and sealed to prevent water penetration. Proper execution preserves structural stability, improves energy efficiency, and creates a seamless finish.
Before mixing any mortar, you must evaluate the surrounding brickwork, assess the lintel supporting the masonry above, and verify local municipal regulations. Following established guidelines on bricking up large wall openings ensures that you do not compromise the building’s thermal envelope or structural equilibrium.
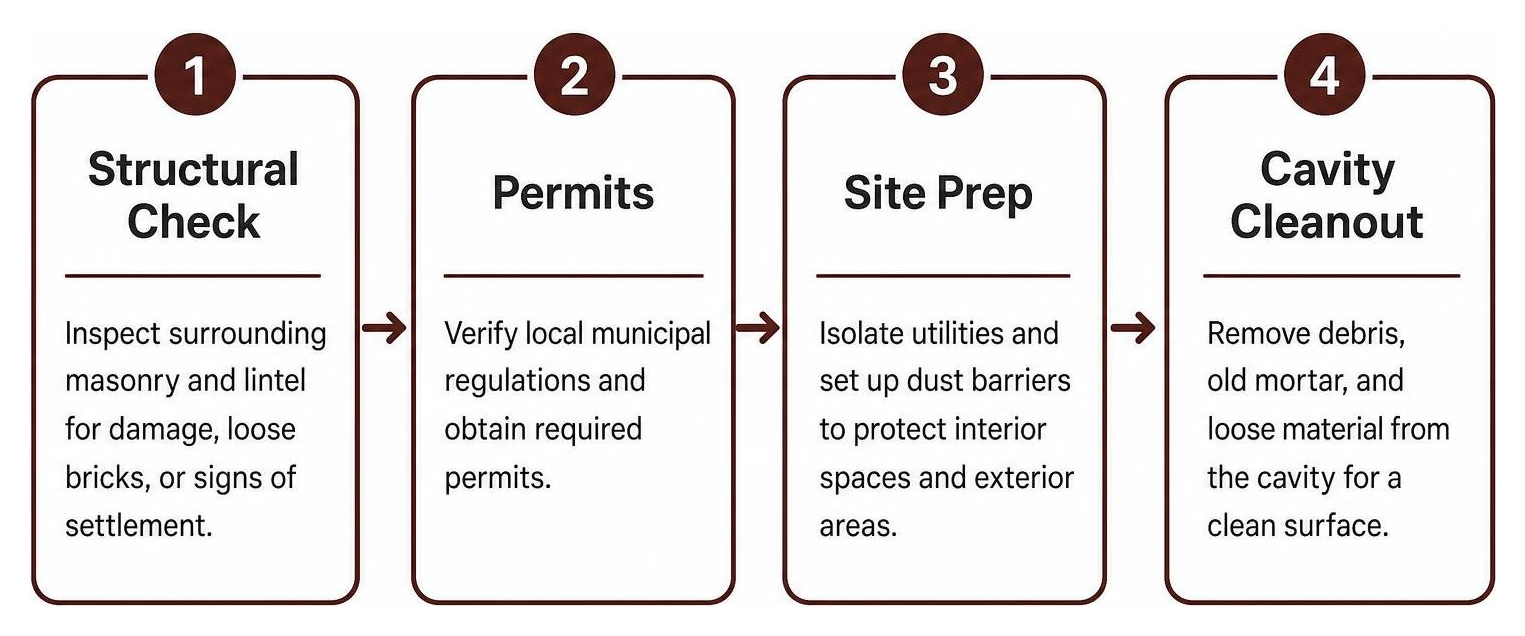
A thorough preparation process requires checking three main areas:
- Structural Integrity: Inspect the existing masonry surrounding the opening for loose bricks, deteriorating mortar, or signs of settlement.
- Utility Isolation: Locate and shut down any electrical conduits, plumbing lines, or HVAC vents that pass through or terminate inside the cavity.
- Site Containment: Seal off interior rooms using heavy plastic sheeting to contain masonry dust, and protect external landscaping from wet mortar spills.
Structural Load Assessment and Permit Requirements
Exterior brick walls are typically either load-bearing structural assemblies or exterior veneer tied back to structural framing. If you are sealing an opening that historically served as a doorway, window, or through-wall equipment portal, you must verify the structural load path above the gap.
In many municipalities across Cook County, altering an exterior wall or sealing a designated egress route requires building permits and structural review. When modifying structural portals, replacing wall openings and structural steel lintels may be necessary to ensure the weight of the upper stories remains properly supported throughout the project.
Required Masonry Tools and Safety Gear for Bricking Up a Hole in the Wall
High-quality masonry work relies on the right hand tools and safety gear. Mortar contains Portland cement and lime, which are caustic and pose chemical burn hazards to skin and eyes. Masonry dust generated during demolition and joint preparation contains respirable crystalline silica.
- Masonry Trowels: A 10-inch or 11-inch London or Philadelphia pattern trowel for mixing and spreading mortar beds, paired with a narrow margin trowel for tight joints.
- Levels and Alignment: A 48-inch spirit level, a 24-inch torpedo level, builder’s string line, and line blocks to maintain flat, plumb courses.
- Cutting and Demolition Tools: A heavy masonry hammer, a wide brick bolster chisel, and an angle grinder equipped with a diamond tuckpointing blade.
- Wall Ties and Fixings: Stainless steel or galvanized corrugated brick ties, expansion anchors, and masonry screws for mechanical structural bonding.
- Mixing Equipment: A clean wheelbarrow or heavy-duty plastic mixing tub, masonry hoe, and measured water buckets.
- Personal Protective Equipment (PPE): Heavy nitrile-coated work gloves, ANSI-approved impact safety goggles, hearing protection, and an OSHA-rated N95 or P100 respirator.
Step-by-Step Infill and Masonry Installation Process
Once the staging area is secure and the structural openings are prepared, the bricklaying process begins. The goal is to produce an infill that behaves as a single, monolithic unit with the existing structure.
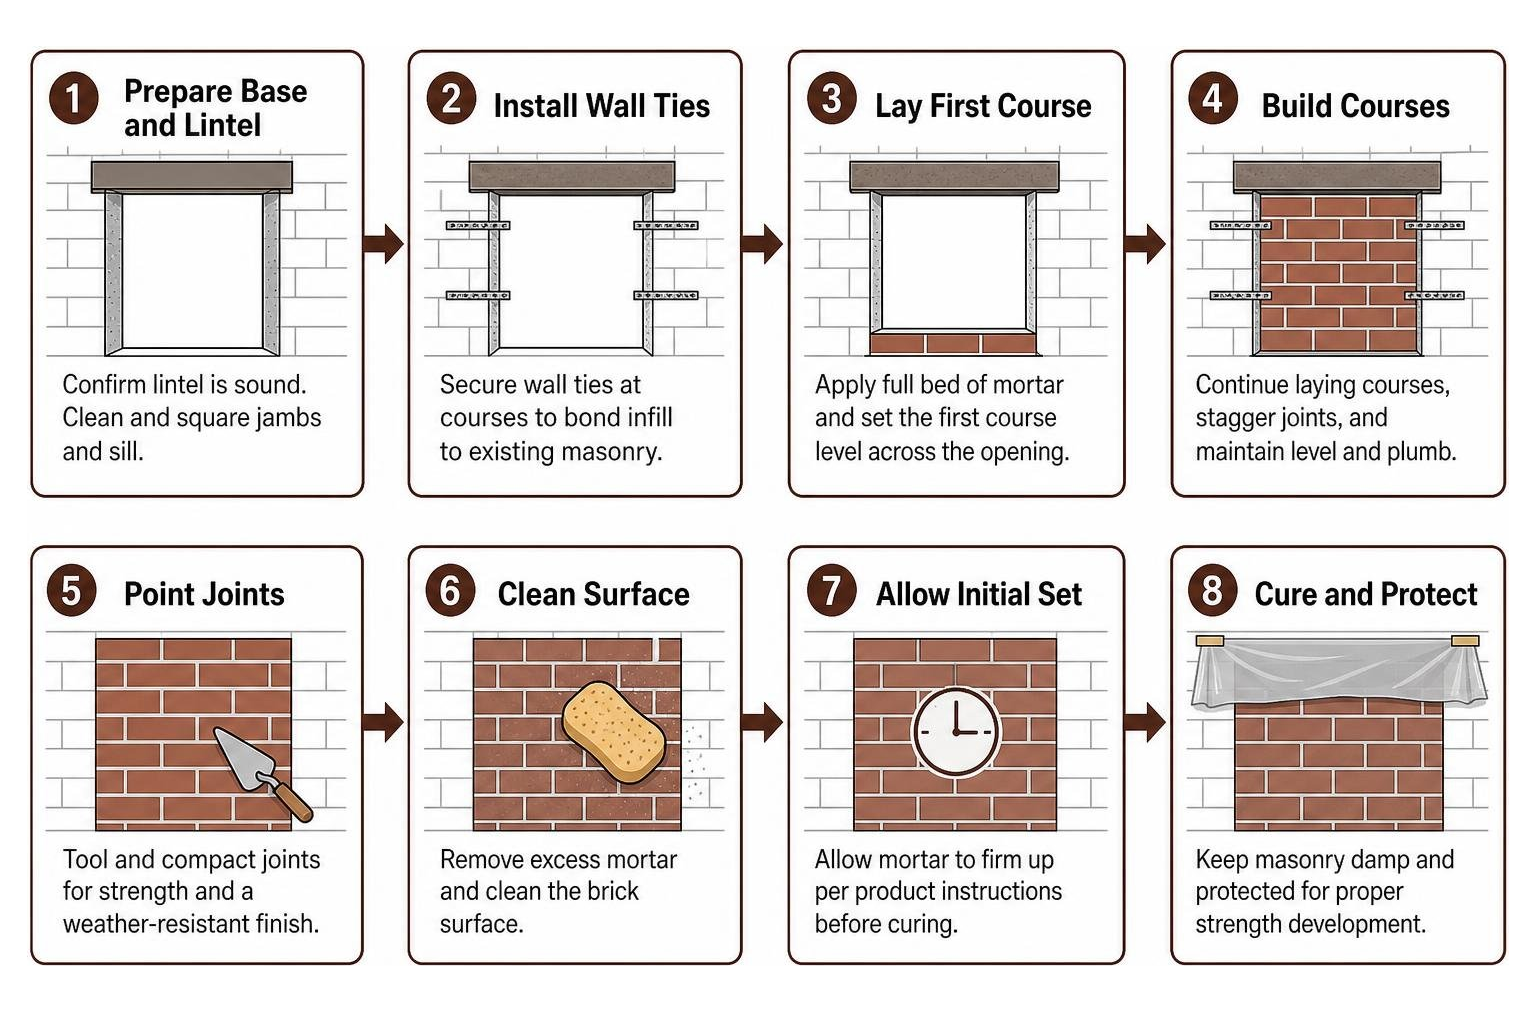
Preparing the Cavity and Bedding Mortar
A strong bond requires a clean, solid, and properly conditioned surface. Mortar will not adhere to crumbly joint dust, efflorescence, or loose debris.
- Clean the Cavity: Use a wire brush and cold chisel to knock away all deteriorating mortar, broken brick fragments, and old caulking. Vacuum the interior surfaces thoroughly.
- Pre-Wet the Substrate: Dry, porous brick quickly pulls water out of fresh mortar, causing it to dry prematurely and weaken. Spray the surrounding opening with clean water until it reaches a Saturated Surface Dry (SSD) condition. The brick should appear damp and dark, but with no standing water on the surface.
- Mix the Mortar: For modern residential brick veneer and commercial block, mix Type N mortar (or Type S for below-grade applications) to a smooth, buttery consistency—typically adhering to a 1:3 ratio of cement to clean masonry sand. If you are repairing historic structures built before the mid-20th century, swap standard Portland mixes for softer lime-based mortars to prevent damage to soft, historic bricks.
- Lay the Bedding Course: Spread a generous 1/2-inch to 3/4-inch mortar bed along the base of the opening, furrowing the center lightly with the tip of your trowel to ensure uniform displacement when setting the initial course.
Laying Bricks, Staggering Courses, and Tying In
To make the repair visually seamless and structurally sound, match the existing bonding pattern (such as a standard running bond or common bond).
Where possible, “tooth” out half-bricks from the existing wall edges using a masonry chisel to interlock the new work directly into the old. If toothing into the existing wall is structurally impractical, install mechanical corrugated wall ties anchored into the existing jambs every 16 inches vertically.
Apply mortar to the head joints (the vertical ends) of each brick before sliding it into position. Tap the brick into the mortar bed using the wooden or plastic handle of your trowel until it sits level and flush with your string line. Check each course with your 48-inch spirit level across three planes: horizontal level, vertical plumb, and face alignment.
Wipe away any excess mortar that squeezes out of the joints before it cures. The mortar will achieve a functional set within 24 hours, but keep vibration and structural loads off the new section during this initial curing phase.
Blending, Weatherproofing, and Structural Integrity

A functional repair must keep water out while blending in aesthetically. A patch that uses the wrong color mortar or mismatched joint profiles will remain visible for the life of the building.
Matching Brick Color, Mortar Texture, and Joint Profiles
Matching aged brickwork requires careful attention to the brick units, mortar hue, and joint profiles.
- Brick Selection: Whenever possible, salvage original bricks from other remodeling areas on the property. If buying new, bring a cleaned sample of the existing brick to a masonry supplier to match its color, absorption rate, core configuration, and surface texture.
- Mortar Color Matching: Mortar dries several shades lighter than it appears when wet in the tub. You can replicate aged mortar by blending iron-oxide pigments into the mix or harvesting pulverized brick dust and local sand to match the weathered aggregate profile.
- Joint Profile Match: Once the mortar becomes thumbprint-hard, strike the joints using a tool that matches the surrounding wall—such as a concave jointer, a flat rake, or a V-jointer. Matching original tuckpointing lines prevents the new section from standing out against the rest of the facade.
Comparing Fillers: Mortar vs Epoxy for Bricking Up a Hole in the Wall
Not every hole in a brick wall requires laying whole brick units. Small anchor penetrations, core blowouts, and spalls call for different repair methods based on their diameter and depth.
| Feature / Metric | Standard Masonry Mortar (Type N / S) | Two-Part Structural Masonry Epoxy | Acrylic / Silicone Masonry Caulk |
|---|---|---|---|
| Best Hole Size | Openings > 1/2″ diameter, full brick voids | Penetrations < 1/2" requiring high strength | Cosmetic micro-holes < 1/4" |
| Compressive Strength | 750 to 1,800+ PSI | Exceeds 7,000+ PSI (stronger than brick) | Low / Non-structural |
| Vapor Permeability | Highly breathable | Non-permeable (forms solid seal) | Low to moderate permeability |
| Cure Time to Service | 24 hours functional; 28 days full | 24 to 72 hours complete cure | 12 to 24 hours tack-free |
| Application Method | Trowel compaction in 1/4″ lifts | High-thrust caulking gun void injection | Standard caulking gun extrusion |
For small penetrations left by removed anchors, see this guide on patching mounting holes in exterior brick. Deep holes should be filled from the back outward to avoid trapped air pockets that can hold water and cause freeze-thaw damage.
Sealing and Long-Term Weather Resistance
Once the infill has fully cured, exterior walls need protection from wind-driven rain. Moisture entering through joint micro-fissures can cause efflorescence, freeze-thaw spalling, and interior water damage.
Applying breathable brick and block waterproofing sealers creates a water-repellent barrier that lets interior moisture vapor escape safely, keeping your new brickwork durable and weather-tight for years to come.
Frequently Asked Questions About Masonry Infill Repairs
How long does mortar take to fully cure after an infill repair?
Masonry mortar achieves an initial, functional set within 24 hours under standard ambient conditions (around 70°F and 50% relative humidity). However, the chemical hydration process that allows Portland cement and lime to achieve their full design compressive strength takes approximately 28 days. During the first week of curing, protect fresh mortar from direct high heat, freezing temperatures, and heavy rains to ensure the joints do not dry out too quickly or crack.
Do I need a permit or engineer to brick up an opening in a load-bearing wall?
Yes, in most jurisdictions, permanently closing an opening in an exterior or load-bearing wall requires municipal building permits. If the opening was an engineered portal, supported by a structural lintel, or part of a required egress path, a structural engineer must verify that closing it will not redistribute weight improperly or violate building codes. Always consult your local building department before removing window frames or altering exterior masonry.
Can I use wood filler or spackle to patch holes in brickwork?
No. Standard wood filler, drywall compound, and interior spackle should never be used on exterior or interior brickwork. These products lack the compressive strength, UV resistance, and thermal expansion properties needed for masonry. When exposed to outdoor moisture and temperature swings, wood fillers and spackle break down, pull away from the brick, and let water into the wall assembly. Always use dedicated Type N or S mortar mixes, hydraulic patching cements, or two-part structural epoxies designed specifically for masonry substrates.
Conclusion
Closing an opening in a brick wall requires careful attention to both structural engineering and historic trade craft. When you match structural load paths, prepare cavity substrates cleanly, use compatible mortar mixes, and replicate original joint profiles, your infill will perform as a durable, weather-tight extension of the original wall.
Whether you are closing an unneeded window, repairing a wall penetration, or restoring a facade, handling heavy masonry on residential and commercial structures requires expertise. Our team at PN Masonry provides full-service tuckpointing, structural masonry alterations, and comprehensive restoration across Cook County, Illinois. Contact PN Masonry today to discuss your next residential or commercial project.