
Understanding Cleanout Doors: Purpose, Materials, and Sizing
Completing a DIY chimney cleanout door replacement involves four key steps: measuring the masonry rough opening, chiseling out the old rusted frame and clearing debris, setting the new frame into a bed of refractory mortar, and securing it with masonry screws and high-heat sealant.
A cleanout door serves as the primary service portal for your chimney system. Positioned at the flue base—frequently in a basement, crawlspace, or along an exterior masonry wall—it provides direct access to the ash pit where debris, fallen creosote, and ash accumulate over heating seasons.
Beyond making ash cleanup easy, a properly sealed door maintains correct chimney draft and ensures fire safety compliance. When the door sits tightly against the masonry, it stops room air from being pulled into the flue, which preserves the updraft needed for your fireplace or wood stove. Regular ash removal through this access point prevents corrosive chemical compounds (formed when wood ash mixes with moisture) from deteriorating the foundation of your chimney. For homeowners managing aging masonry, integrating door checks into comprehensive chimney services keeps the entire exhaust structure working as intended.
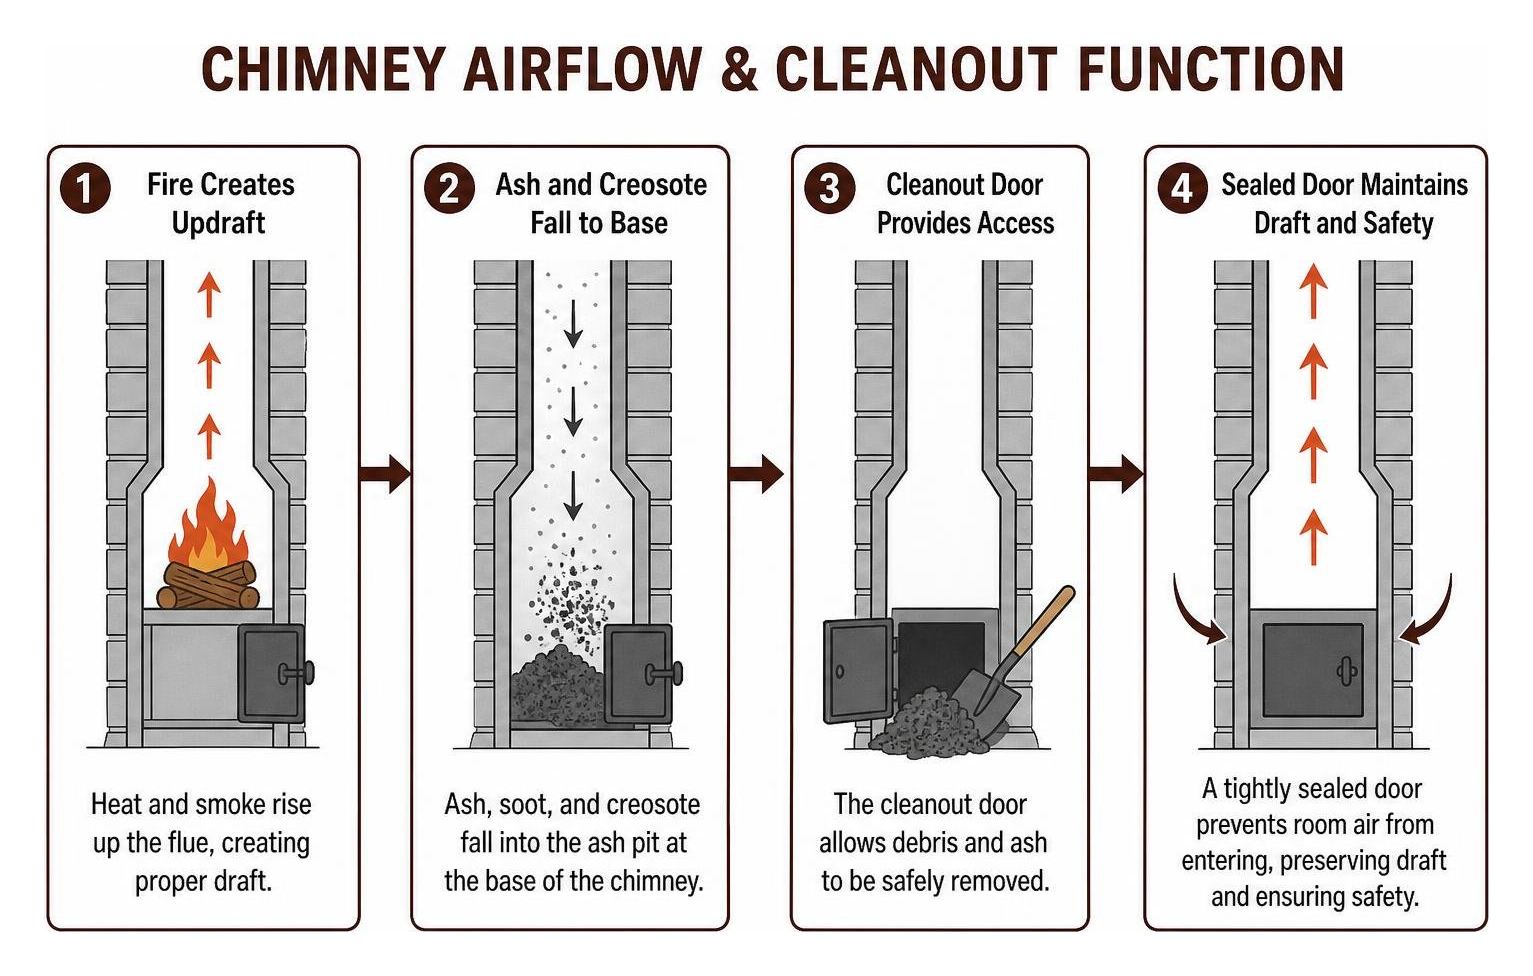
Cleanout Door Functions and Warning Signs
Cleanout doors take quite a beating over time. Because they sit at the lowest point of the exhaust system, they are directly exposed to dropping soot, falling condensation, and fluctuating temperatures.
Watch for these warning signs that indicate immediate replacement is needed:
- Rust Perforation and Flaking: Moisture running down an uncapped flue mixes with soot to create an acidic slurry. Over years, this rusts through thin stamped metal or standard cast iron.
- Draft Leaks and Smoke Odors: If you smell a campfire in your basement on humid days, or feel a cold draft sweeping around the frame in winter, the seal has failed.
- Broken Hinges or Latch Pins: Thermal cycling and heavy handling often snap older cast iron hinge tabs or seize single-bolt closures.
- Loose or Cracked Surrounding Mortar: If the entire metal frame wobbles when you touch the handle, the original anchoring system has detached from the brickwork.
- Water Pooling and Moisture Infiltration: Persistent dampness around the base of the door indicates water is entering the flue or penetrating around the frame edges.
- Pest Activity: Gaps wider than 1/4 inch invite mice, bats, and insects into the lower flue cavity.
Measuring for Your Chimney Cleanout Door Replacement
Getting the dimensions right before buying a replacement saves you from chiseling out extra brickwork or struggling with an undersized frame.
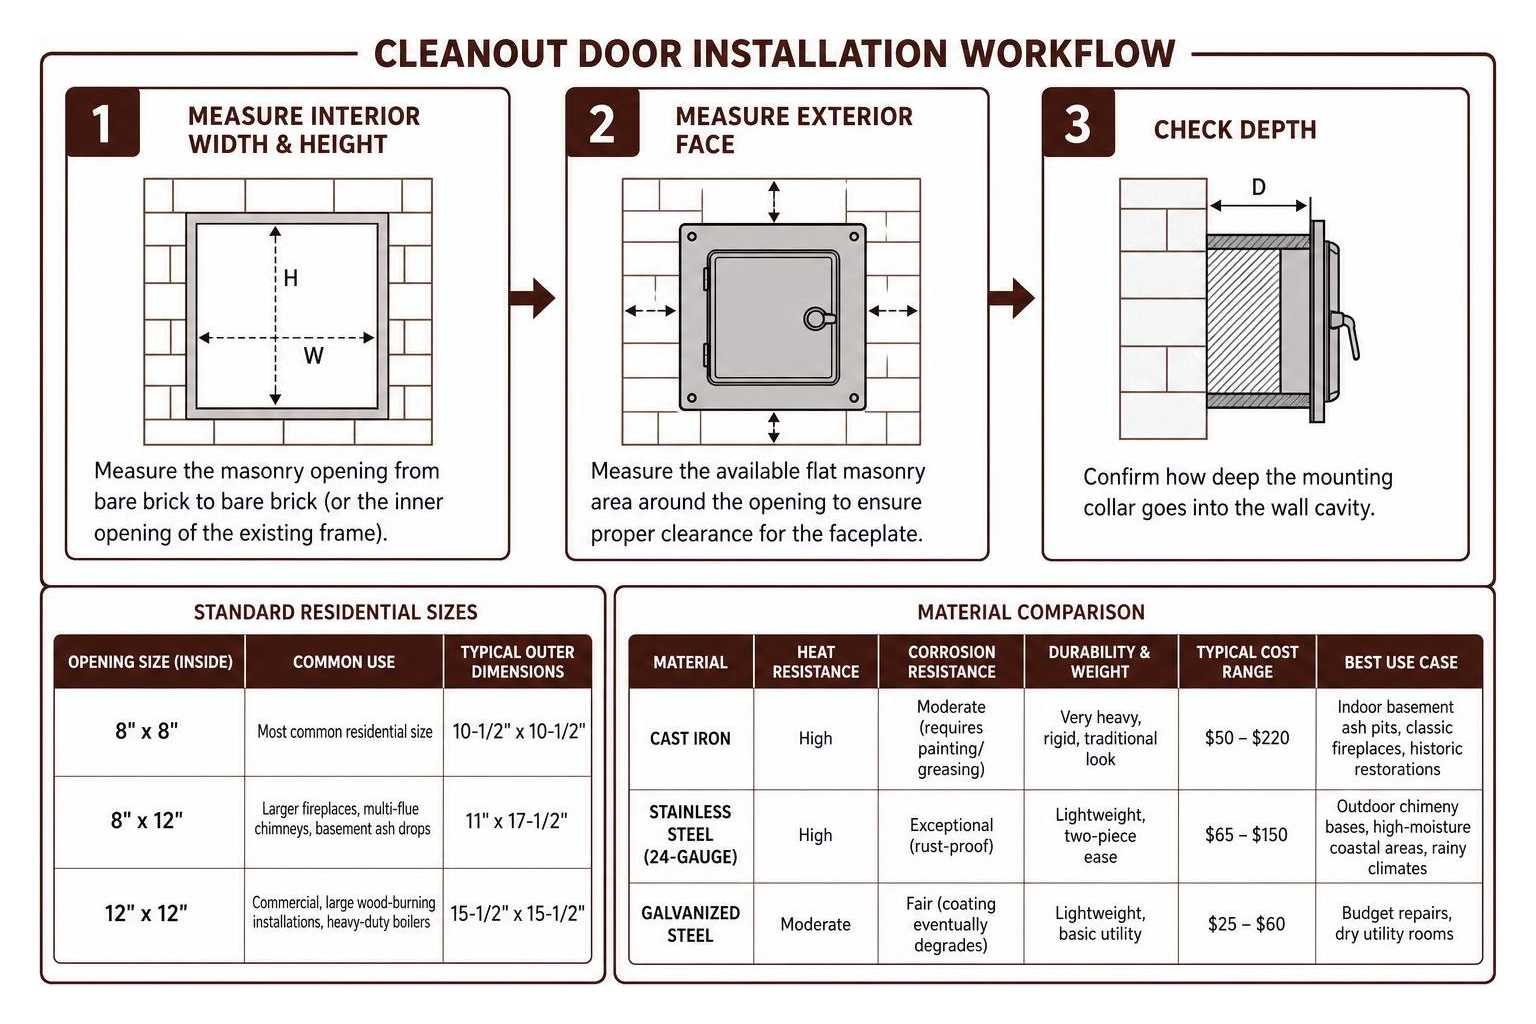
When shopping for a door, you will encounter two main measurements: the rough opening (the inner masonry dimensions inside the brick or block opening) and the outer frame dimensions (the overall faceplate size that sits against the surface of the wall). Cleanout doors are categorized by the rough opening they fit.
- Measure the Interior Width and Height: Measure the masonry opening from bare brick to bare brick (or the inner opening of the existing frame if the frame cannot yet be removed).
- Measure the Exterior Face: Measure the available flat masonry area around the opening to make sure the door’s faceplate has adequate clearance and will not overlap trim, foundation footings, or electrical conduits.
- Check Depth: Confirm how deep the mounting collar goes into the wall cavity.
Standard residential sizes include:
- 8″ x 8″ Openings: The most common residential size. A typical unit, like the USSC 8×8 replacement door, fits an 8-inch square opening with a slightly larger outer decorative flange to overlap the masonry joint. Similarly, the Liberty Foundry Co. cleanout door features an 8-1/2″ x 8-1/2″ door plate within a 10-1/2″ x 10-1/2″ frame engineered for 8″ x 8″ rough openings.
- 8″ x 12″ Openings: Frequently used on larger fireplace flues, multi-flue chimneys, or basement installations with dedicated ash drops. High-grade cast iron cleanout doors and models like the Minuteman cast iron clean out door fit these rectangular footprints, often providing outer dimensions around 11″ x 17.5″ to cover irregularities in the rough opening.
- 12″ x 12″ Openings: Common in commercial setups, large wood-burning installations, or chimneys servicing heavy-duty boilers. Units such as the heavy-duty Chimney Clean Out Door are engineered for these 12″ x 12″ inside dimensions, measuring 15-1/2″ x 15-1/2″ on the outside face.
Choosing the Right Material: Cast Iron vs. Stainless Steel
Selecting the right door material comes down to the installation environment, budget, and exposure to weather.
| Material | Heat Resistance | Corrosion Resistance | Durability & Weight | Typical Cost Range | Best Use Case |
|---|---|---|---|---|---|
| Cast Iron | High | Moderate (requires painting/greasing) | Very heavy, rigid, traditional look | $50 – $220 | Indoor basement ash pits, classic fireplaces, historic restorations |
| Stainless Steel (24-Gauge) | High | Exceptional (rust-proof) | Lightweight, two-piece ease | $65 – $150 | Outdoor chimney bases, high-moisture coastal areas, rainy climates |
| Galvanized Steel | Moderate | Fair (coating eventually degrades) | Lightweight, basic utility | $25 – $60 | Budget repairs, dry utility rooms |
- Cast Iron: The historical standard. Cast iron offers immense thermal stability and will not warp under direct contact with hot ash. However, unpainted cast iron reacts with moisture and sulfur residues, causing surface rust over time. It typically features a hinged frame with a single-bolt closure or butterfly latch.
- Stainless Steel: Modern 24-gauge stainless steel models (like the Forever® series) are naturally corrosion-proof. They often use a two-piece design where the frame mounts into the mortar bed and a removable handled door locks into place, simplifying cleanout tasks.
- Galvanized Steel: An economical option commonly stocked in hardware stores for under $100. It performs well in dry interior basements but can deteriorate quickly if exposed to exterior weather or chronic flue condensation.
Complete Step-by-Step Chimney Cleanout Door Replacement
Replacing a worn-out cleanout door is straightforward if you prepare the masonry properly. Before you pick up your tools, make sure the fireplace or appliance has been unlit and cold for at least 48 hours. If the surrounding brickwork or lintel has deteriorated beyond simple surface cracking, address the masonry opening repair to ensure the structure can hold mechanical fasteners safely.
Essential Tools for Chimney Cleanout Door Replacement
Gather these tools and materials before starting:
- Safety Equipment: Heavy leather work gloves, safety glasses, and an N95 or P100 dust respirator (ash and silica dust become airborne instantly).
- Masonry Demolition & Cleaning: 1-inch cold chisel, 2-to-3 lb masonry hand-drilling hammer, stiff wire brush, shop vacuum with a fine-dust/HEPA filter, heavy-duty drop cloth.
- Installation & Anchoring: Hammer drill or rotary hammer, 3/16-inch masonry drill bits, slotted/hex drive bits, 1/4-inch x 1-3/4-inch Tapcon concrete screws (or stainless steel masonry fasteners).
- Setting & Sealing Materials: Refractory mortar (pre-mixed or dry-mix rated for high heat), cartridge of high-temperature furnace cement, elastomeric masonry sealant, fiberglass gasket tape (if not pre-installed on the door).
- Measuring & Leveling: Tape measure, torpedo level, small margin trowel.
Removing the Old Rusted Cleanout Frame
- Prep the Workspace: Lay heavy drop cloths across the floor below the cleanout door. Soot stains concrete, wood, and carpet quickly.
- Cut the Old Seal: Use your cold chisel to score the mortar joint or old sealant around the perimeter flange of the existing frame.
- Chisel Out the Frame: Position the chisel tip where the metal frame meets the mortar bed. Strike firmly with your masonry hammer to break the mortar bond. Work around the top, sides, and bottom.
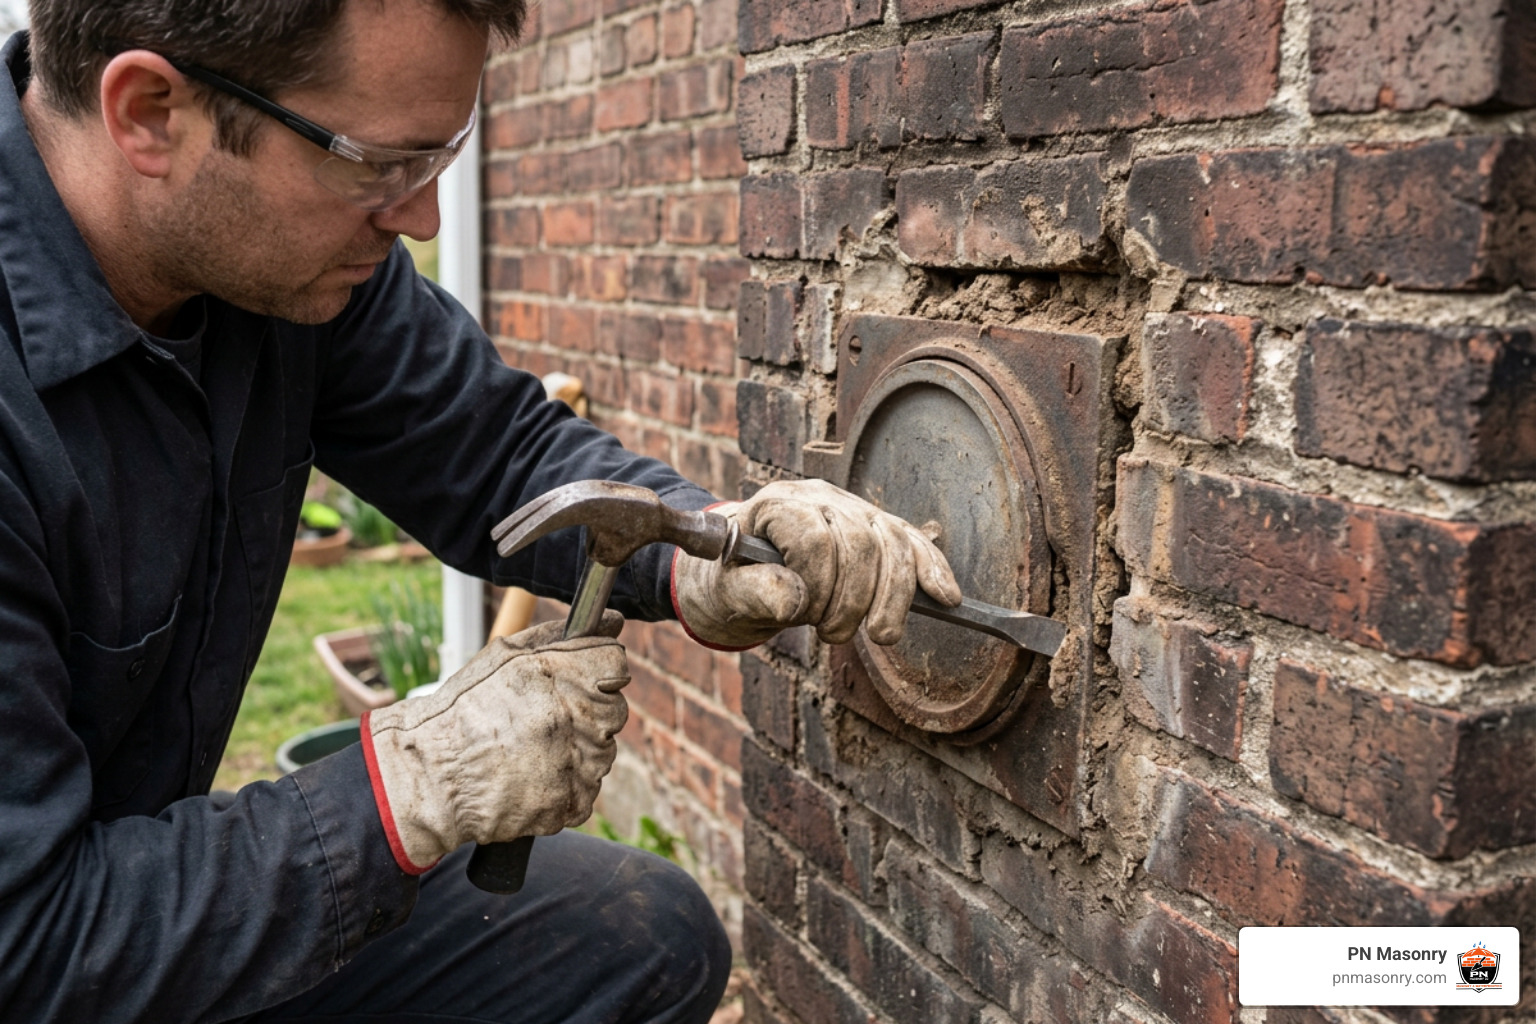
- Pry the Frame Out: Insert a flat pry bar behind the cast iron or steel flange. Gently lever the unit forward. If the frame was set with rear-extending masonry straps embedded into the wall, work the chisel deeper along the sides to sever or free the anchors without cracking the surrounding brick.
- Vacuum and Clean the Opening: Remove all crumbling mortar, loose brick chips, and accumulated ash from the base of the flue opening. Use a wire brush to scrub the inner brick jambs down to sound, solid masonry, then vacuum the opening thoroughly. If you discover crumbling mortar joints in the surrounding chimney wall during cleanout removal, taking time for professional tuckpointing now will keep the new frame firmly seated for decades.
Setting, Leveling, and Securing the New Frame
- Dry Fit the Replacement: Slide the new frame into the rough opening. Verify that the door flange sits flat against the face of the brick or CMU block wall and that the door can open and swing (or lift off) freely.
- Mark Anchor Holes: Most replacement frames come with pre-drilled mounting holes along the inner collar or face flange. Use a pencil or center punch to mark the hole locations onto the masonry.
- Drill Pilot Holes: Remove the frame. Using a hammer drill and the manufacturer-recommended masonry bit (typically 3/16″ for standard 1/4″ Tapcon screws), drill pilot holes into the brick or solid mortar joints at least 1/2-inch deeper than the screw length. Avoid drilling too close to the edge of older, brittle bricks to prevent spalling. Vacuum out the dust from inside the drilled holes.
- Apply the Mortar Bed: Dampen the masonry opening lightly with a spray bottle to prevent the dry brick from pulling moisture out of the fresh mortar. Using a margin trowel, apply a 1/2-inch bed of high-temperature refractory mortar along the bottom and sides of the masonry opening.
- Set and Anchor the Frame: Press the frame into the wet mortar bed. Place your torpedo level across the top frame edge and against the side jambs. Drive your Tapcon masonry screws through the frame mounting holes into the pre-drilled masonry. Snug the screws down evenly—do not over-torque, which can crack cast iron frames or strip out masonry pilot holes.
Sealing and Attaching the Access Door
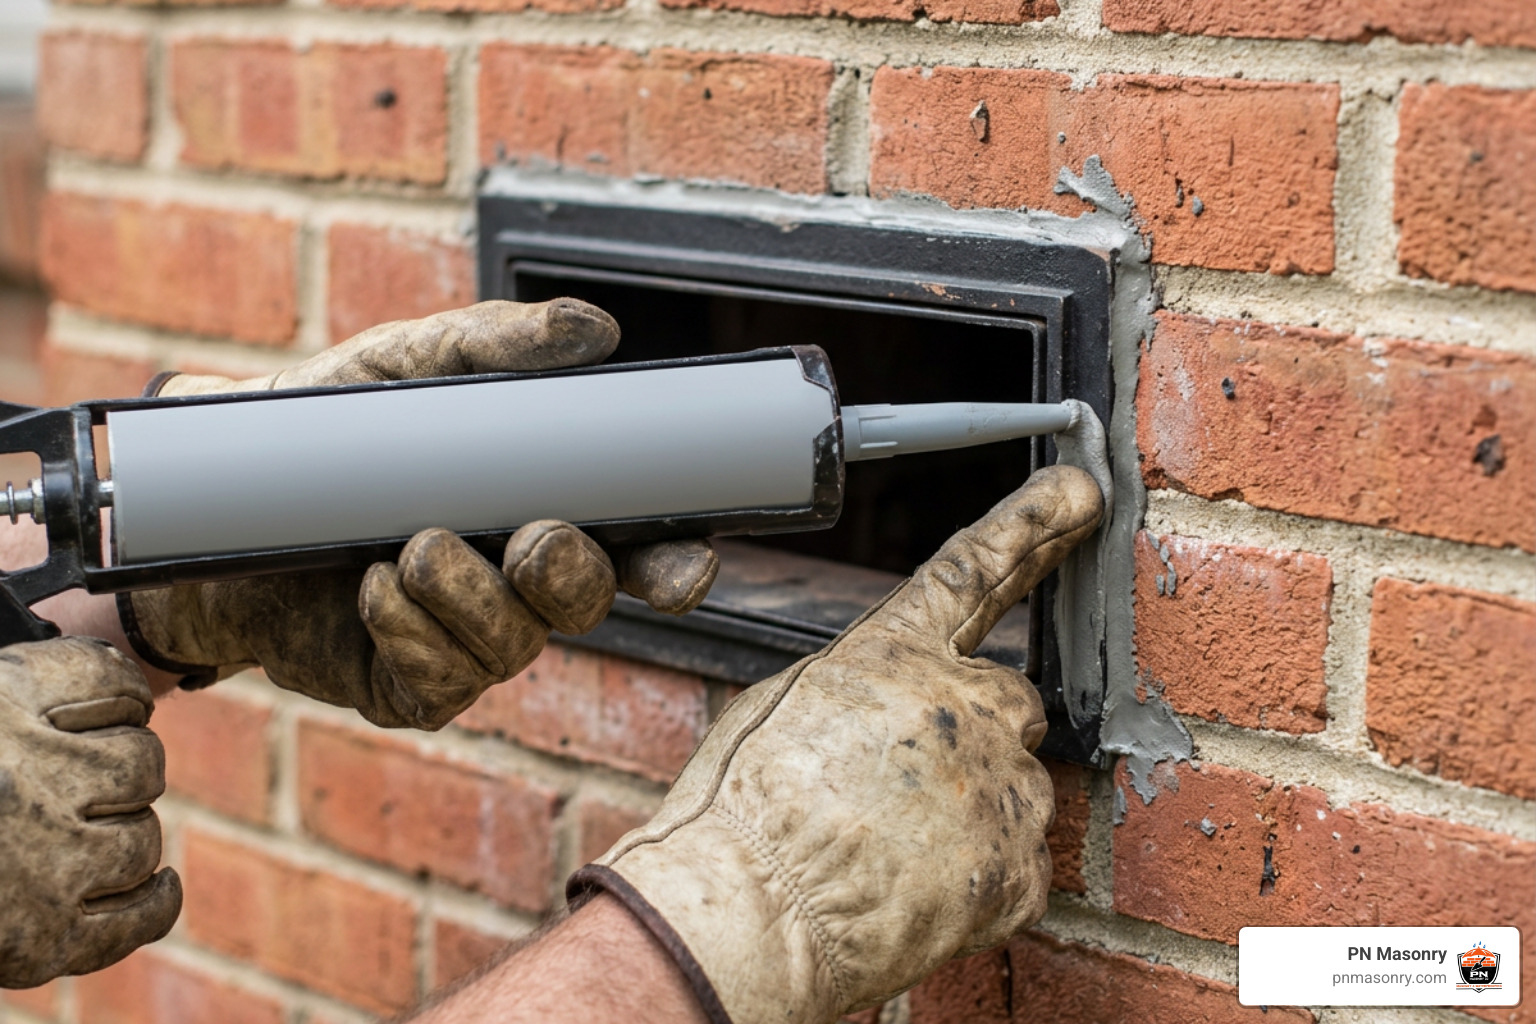
- Fill Gaps and Joints: Pack refractory mortar or high-temperature furnace cement into any remaining voids between the metal frame collar and the masonry opening. Smooth the joints with your trowel for a clean transition.
- Seal the Outer Perimeter: Apply a neat bead of heat-resistant, elastomeric sealant around the outer perimeter where the metal faceplate meets the exterior masonry face. This secondary perimeter seal stops water runoff from tracking behind the frame.
- Install the Door Plate: For two-piece or hinged setups, hang the door onto the hinge pins or slot the faceplate into the frame tracks.
- Verify the Gasket and Closure: Check that the fiberglass gasket compresses evenly when the single-bolt closure or latch mechanism is tightened down. If your door does not have a factory gasket, attach a strip of self-adhesive high-temperature fiberglass weatherstripping along the inner door rim to ensure a smoke- and air-tight seal.
Post-Installation Care and Long-Term Maintenance
Once your new cleanout door is installed, a little routine care will keep it operating smoothly and prevent corrosion.
- Protect Against Rust: If you installed a raw or primed cast iron door, coat the exterior face with a high-temperature (1200°F rated) rust-inhibiting satin black paint. Reapply every few years if surface discoloration or spot rusting appears.
- Lubricate Hinge and Latch Fasteners: Apply a dab of high-temperature anti-seize lubricant or industrial grease to the threads of single-bolt closures and hinge pins. This keeps the bolt from seizing up from moisture and heat. Consider upgrading carbon steel latch hardware to stainless steel bolts.
- Clean Out the Ash Pit Annually: Never let wet ash sit against the cleanout door for months. Empty the ash pit at the end of every burning season so dry air can circulate freely.
- Inspect Seals Seasonally: Each autumn, inspect the fiberglass door gasket and the perimeter mortar joint for hairline cracking, replacing any damaged gaskets before firing up your system.
Frequently Asked Questions About Cleanout Doors
Can I install a cleanout door using only furnace cement without screws?
Relying entirely on adhesive bonding or furnace cement without mechanical fasteners is not recommended. Furnace cement can turn brittle when exposed to thermal cycling and physical vibrations (such as doors opening, closing, or catching on ash shovels). Using 1/4-inch Tapcon screws or masonry anchors alongside high-temperature mortar ensures the frame remains mechanically locked to the masonry structure regardless of joint movement.
How do I stop moisture from rusting my basement cleanout door?
Basement moisture rusts cleanout doors from both the inside and outside. To fix internal moisture, install an exterior chimney cap up top to stop rain from pouring directly down the flue, and check that flue condensation is not accumulating. For external moisture, seal the frame perimeter with elastomeric sealant, coat cast iron with high-heat rust-resistant paint, and maintain indoor basement humidity below 50% with a dehumidifier.
When should I stop DIY and call a professional mason?
You can handle a standard cleanout door replacement with basic masonry tools if the surrounding wall is solid. However, you should stop and consult a professional if you notice:
- Cracked, loose, or spalling bricks extending several courses above the opening.
- A crumbling inner flue liner or dropped terracotta tile fragments blocking the cleanout.
- A failed or rusted steel lintel that has caused step cracks in the wall.
- Signs of foundation shifting or water entering through structural foundation cracks.
In cases of deep structural deterioration, scheduling a chimney rebuilding is the safest path to restore the integrity of the masonry.
Conclusion
Replacing a deteriorated chimney cleanout door is one of the most rewarding home maintenance projects you can take on. With a few hand tools, the correct measurements, and an afternoon of careful work, you can eliminate cold basement drafts, keep ash contained, and protect your chimney base from moisture damage.
When you take the time to set the frame level, anchor it securely with masonry screws, and apply high-temperature mortar and gaskets, you ensure clean, safe, and efficient heating seasons for years to come. If you run into severe brick decay, loose structural blocks, or want a full masonry safety inspection, turn to the team at PN Masonry for expert masonry services tailored to your home.