
Essential Surface Preparation and Safety Protocols
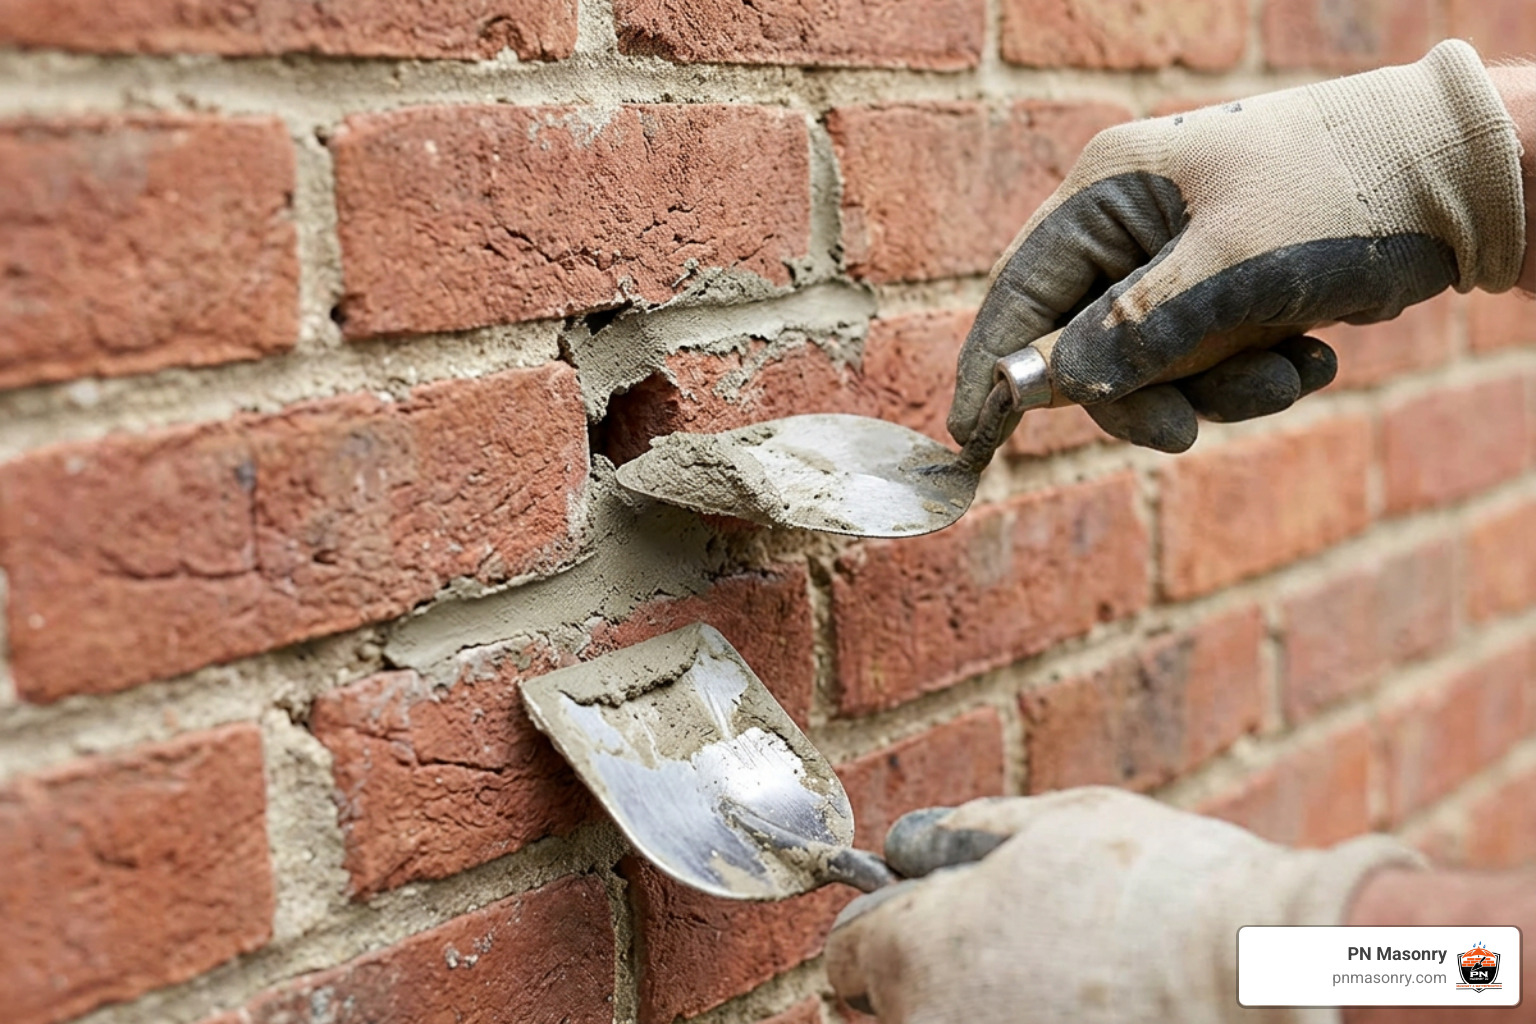
To cover a hole in a brick wall effectively, clear out all loose debris and crumbling mortar, lightly mist the exposed cavity with water to prevent rapid moisture loss, pack the void with Type N mortar or structural epoxy in 0.5-inch layers, and tool the patch flush with the surrounding masonry.
Every lasting masonry repair comes down to careful preparation. Mortar does not adhere permanently to old, crumbling mortar; it sticks to clean, solid brick. To achieve a dependable bond, you must expose at least three-quarters of an inch of clean brick substrate within the opening before adding fresh patching compound.
When bricks sustain damage, micro-fissures and residual mortar dust coat the cavity. Clearing out the damaged zone creates a sound base and prevents residual moisture from deteriorating the substrate.
Begin by scraping away cracked mortar, broken masonry fragments, and peeling paint using a stiff wire brush or a narrow plugging chisel. For deeper voids, sweep or vacuum out residual particles.
After mechanical cleaning, manage the masonry’s moisture levels. Dry clay brick behaves like a sponge, pulling water out of fresh mortar before it can set properly. This rapid water loss weakens the repair and leaves it prone to flaking. Lightly mist the inner edges of the cavity with clean water using a spray bottle or a damp masonry sponge just before filling. The brick should appear damp without standing water puddles.
If you notice widespread deterioration across the surrounding wall during prep work, simple spot filling may not solve the underlying issue. In such cases, tuckpointing deteriorating mortar joints across the entire section will protect the structural integrity of your building envelope.
Tools and Safety Gear Needed to Cover Hole in Brick Wall Projects
Working with brick, mortar, and concrete generates fine particulate matter, including respirable crystalline silica dust. When grinding or chiseling out old joints, always use an angle grinder equipped with a dedicated dust-shroud attachment connected directly to a certified HEPA vacuum.
Equip yourself with the following safety items and tools before starting:
- Safety Glasses and Face Shield: High-impact, ANSI-rated eye protection prevents flying masonry chips from causing eye injury.
- Respirator Mask: Wear an OSHA-compliant N95 or dual-cartridge P100 respirator to filter airborne silica dust.
- Heavy-Duty Masonry Gloves: Alkaline compounds in wet Portland cement and lime can irritate skin; use heavy nitrile-coated or split-cowhide work gloves.
- Angle Grinder & Diamond Blade: Essential for cutting clean margins around damaged sections.
- Plugging Chisel & Mason’s Hammer: Used to carefully remove degraded joint mortar without fracturing adjacent brick faces.
- Flat Pointer & Margin Trowel: For packing, layering, and smoothing mortar deep inside narrow voids.
- Concave Joint Finisher: For shaping the final mortar profile to shed rainwater naturally.
How to Cover Hole in Brick Wall Surfaces: Step-by-Step
Selecting the right patching method depends on the size of the void, its exposure to rain, and whether it must support structural loads.
| Material Type | Best Use Cases | Structural Strength | Flexibility | Curing Time |
|---|---|---|---|---|
| Type N Mortar Mix | Voids > 0.5 in, missing joints, spalled brick faces | Medium (750–900 PSI) | High breathability | 24–48 hrs initial; 28 days full |
| Two-Part Epoxy | Anchor holes needing re-drilling, high-stress mounts | High (> 2,000 PSI) | Low (rigid) | 2–4 hours |
| Masonry Acrylic Caulk | Hairline cosmetic cracks, narrow gaps (< 0.25 in) | Minimal (sealant only) | High | 12–24 hours |
| PVA / Lime Plaster | Interior plaster surfaces over exposed brick | Medium | Medium | 24 hours per coat |
Follow this step-by-step process for general patching using Type N mortar:
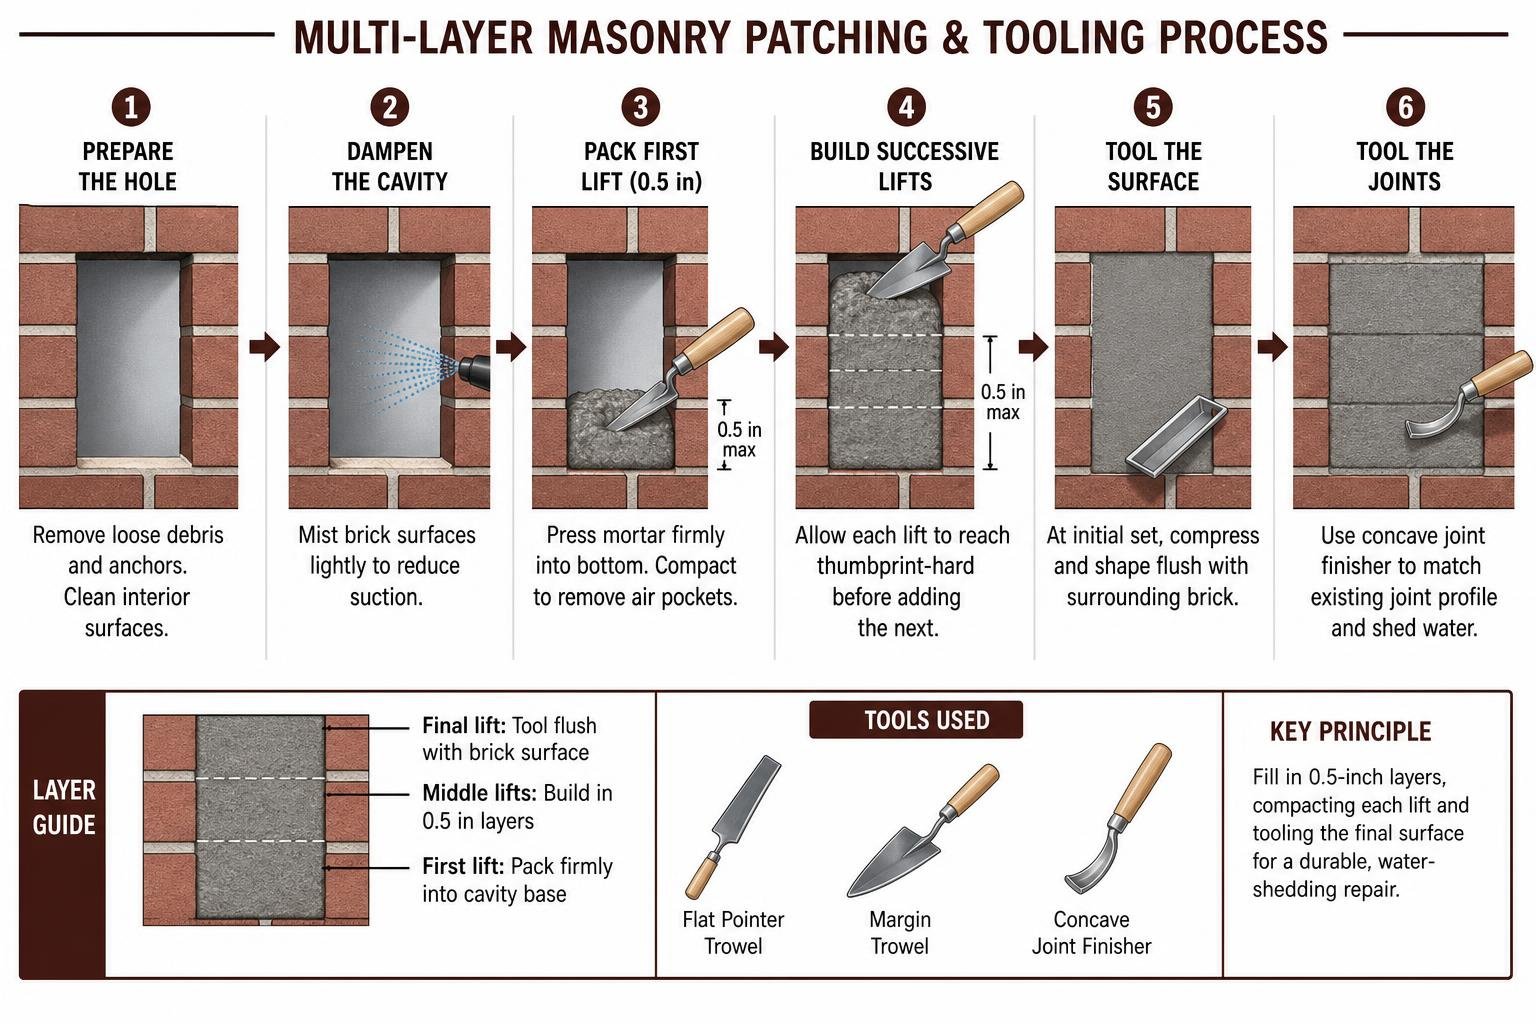
- Assess and Clear the Hole: Remove loose debris and mechanical anchors. Ensure the interior surfaces are free from grease, algae, and loose dust.
- Dampen the Cavity: Mist the brick surfaces lightly to reduce suction, ensuring the fresh mortar cures properly.
- Mix the Repair Mortar: Mix 1 part Type N Portland cement/lime blend with 2.5 to 3 parts clean masonry sand. Add water gradually until the mixture achieves a stiff, workable consistency similar to thick oatmeal or peanut butter. Avoid over-watering, as excess wetness leads to weak mortar and shrinkage cracks.
- Pack in Successive Lifts: For voids deeper than 0.5 inches, do not fill the entire cavity at once. Press mortar firmly into the bottom of the void using a narrow flat pointer trowel, compacting it to eliminate internal air pockets. Fill in 0.5-inch layers, allowing each layer to become thumbprint-hard before applying the next.
- Tool the Surface: Once the final layer reaches initial set (stiff enough to hold a thumbprint without sticking to your glove), compress and shape the patch flush with the surrounding brick using your finishing tool.
- Protect Mechanical Openings: For utility lines or exterior cables passing through an exterior wall, seal around the sleeve and fit an exterior Cable Hole Entry or Exit Brick Blast Exterior Wall Cover Plate Black | Kenable over the penetration to keep driving rain out while preserving wall aesthetics.
Using Donor Brick Dust to Cover Hole in Brick Wall Anchors
Standard gray mortar stands out on red, buff, or weathered brick. You can create an invisible, blended repair for drilled holes by using pulverized brick dust harvested from an identical “donor” brick.
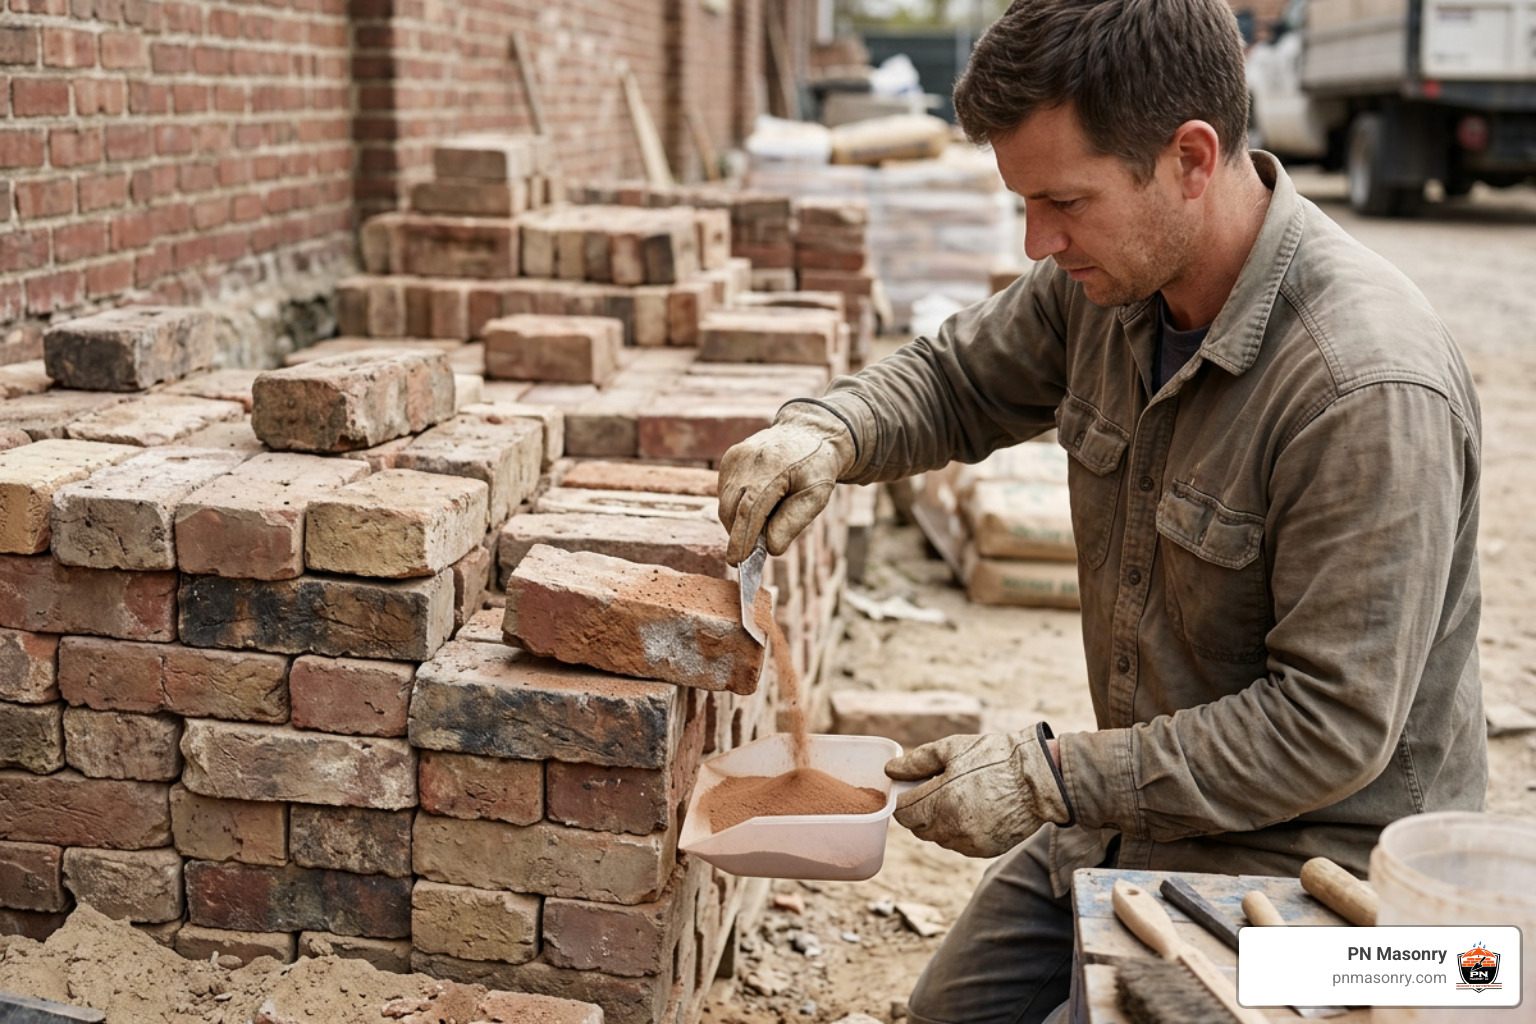
- Harvesting Donor Dust: Locate an inconspicuous area—such as behind an air conditioning condenser, beneath a low deck ledger, or from an extra loose brick. Using a masonry drill bit or angle grinder, grind off a small amount of the brick face to collect fine brick powder into a small container.
- Blending Ratios: Mix the pulverized brick dust directly with your patching compound or clear acrylic masonry bonder:
- Standard Red Clay Brick: 50% brick dust / 50% fine mortar binder.
- Buff / Tan Brick: 60% brick dust / 40% fine mortar binder.
- Dark / Weathered Brick: 70% brick dust / 30% binder.
- Application & Texture: Pack the hole with your mortar base, leaving it recessed about 1/16 of an inch from the brick face. Apply the custom-blended donor dust paste onto the front surface. While the paste is tacky, press dry donor dust over the patch with a small sponge or soft brush to replicate the natural texture of the surrounding wall.
Re-Drilling Holes with High-Strength Epoxy Fillers
When a screw pulls out of a wall or leaves behind an oversized, crumbling void, standard mortar will not provide the shear strength needed to hold a new fastener in the same spot. A structural two-part epoxy paste solves this problem.
First, scrape out all broken masonry chips from the blown-out hole. Enlarge the interior of the hole slightly with a masonry bit; this creates an anchor point that locks the epoxy core inside the brick.
Inject a high-strength, two-part structural anchoring epoxy into the void, working from back to front to prevent trapped air pockets. Fill the hole completely flush with the surrounding brick face. Let the epoxy cure according to the manufacturer’s directions (usually 2 to 4 hours, depending on ambient temperatures).
Once the resin cures, drill a pilot hole into the center of the epoxy plug using a high-speed carbide-tipped drill bit. Insert your screw or anchor into the cured epoxy. The surrounding resin transfers loads directly into the brickwork, providing a strong anchor point for heavy fixtures.
Repairing Large Voids and Structural Brick Openings
When wall damage extends beyond small drill holes to include multiple fractured bricks or missing sections, you will need to replace entire units rather than rely on surface patches. Large holes compromise structural stability by interrupting the running bond pattern, which distributes weight evenly across the wall.
The proper repair method is called toothing-in. This technique removes whole and half bricks in a staggered, alternating pattern to seamlessly integrate new units with the existing masonry.
- Safety Assessment: Before removing any structural bricks, check the wall above the opening for stair-step cracking or sagging. If the void spans wider than two brick lengths, install temporary structural shoring or prop a temporary steel lintel to support the masonry above.
- Mortar Removal and Brick Extraction: Cut out the damaged bricks using an angle grinder equipped with a diamond wheel, working carefully around the surrounding units. Use a hammer and plugging chisel to remove remaining mortar beds until clean, sound brick surfaces are exposed.
- Tie to the Backing Structure: For cavity walls or double-wythe brick systems, install corrosion-resistant stainless steel wall ties every 16 inches vertically to anchor the outer repair wythe directly to the structural backup.
- Laying Replacement Bricks: Dampen the surrounding opening. Spread a full 3/8-inch bed of Type N mortar across the bottom of the opening and apply mortar to both ends of your replacement brick (the head joints). Slide the brick into the pocket, tapping it into alignment with a trowel handle until its face and joints match the surrounding wall.
- Tooling the Joints: Let the mortar set until it is thumbprint-hard, then compress and smooth the joint lines with a concave jointer to match the original mortar profile.
For damaged structural support over windows, doors, or open spans, professional evaluation is critical. Explore our services for masonry windows and doors openings replacement to ensure lintels and structural framework meet current building safety codes.
If your property has extensive mortar deterioration across multiple elevations, our team provides comprehensive brick facade restoration in Franklin Park, IL to restore strength and appearance.
For weep voids and drainage openings, avoid filling them with solid mortar, which traps internal moisture. Instead, install a 40PCS Stainless Steel Brick Wall Hole Cover, Stackable Weep Hole Cover for Crack Repair Kit to keep pests out while allowing built-up wall moisture to drain freely.
Patching Plaster and Veneers Over Exposed Brick Substrates
When interior plaster degrades, spalls, or falls away from an underlying structural brick wall, applying standard drywall joint compound directly to the brick will lead to problems. Porous clay bricks quickly draw water out of joint compound, causing the patch to shrink, crack, and pull away from the wall within weeks.
To restore a plaster finish over exposed masonry, manage suction and establish a strong mechanical bond:
- Surface Preparation and Efflorescence Check: Clean loose plaster from the perimeter of the damage. Inspect the exposed brick for efflorescence—a powdery white mineral salt deposit caused by moisture migration. If efflorescence is present, clean it thoroughly and eliminate the source of moisture before proceeding.
- Applying a Bonding Agent: Roll or brush a dedicated acrylic or polyvinyl acetate (PVA) masonry bonding agent across the exposed brick faces and mortar lines. This seals the porous surface, controls suction, and creates a tacky bonding surface for the plaster.
- Mechanical Reinforcement: For repairs wider than six inches, fasten galvanized diamond metal lath over the exposed brick using masonry screws driven into the mortar joints. Never drive anchors directly into the brick faces, which can cause internal cracking. The lath provides a solid mechanical anchor that holds the new plaster securely in place.
- Three-Coat Application:
- Scratch Coat: Press a structural base-coat plaster firmly through the metal lath against the sealed brick. Before it fully hardens, score horizontal lines across the surface with a plasterer’s comb to create a textured key for the next coat.
- Brown Coat: Apply a secondary leveling coat once the scratch coat hardens (roughly 24 hours). Smooth it flat, leaving it roughly 1/8-inch recessed below the finished wall plane.
- Finish Coat: Apply a final skim coat of fine finishing plaster. Feather the edges out at least six inches past the border of the patch to blend seamlessly with the existing wall. Once dry, prime the patch with an alkali-resistant primer before painting.
If you are replacing failing interior plaster or exterior surfaces with decorative masonry, our stone veneer installation and replacement services provide durable, long-term options for your home or commercial building.
Long-Term Weatherproofing and Curing Requirements
A well-installed masonry patch can still fail in cold weather if it is not allowed to cure properly.
Portland cement and hydraulic lime mortars do not dry simply through evaporation; they gain structural strength through a chemical reaction called hydration. In this process, cement particles form interlocking crystals as they interact with water.
- The 28-Day Curing Window: Cement-based mortar repairs require approximately 28 days to reach their full structural compressive strength. The first 72 hours are critical. If the mortar dries out too quickly due to high winds, dry heat, or direct sunlight, hydration stops, leaving the patch weak and prone to crumbling.
- Moisture Management: Lightly mist the patched area with clean water once or twice daily for the first three days following repair. In hot or sunny conditions, cover the patch with a damp sheet of burlap or polyethylene sheeting to help retain moisture.
- Breathable Weatherproofing: After the repair has cured for at least 28 days, apply a silane-siloxane penetrating masonry sealer. Unlike elastomeric paints or silicone sealers that form an impermeable plastic film, silane-siloxane formulas chemically bond to the pores within the brick and mortar.
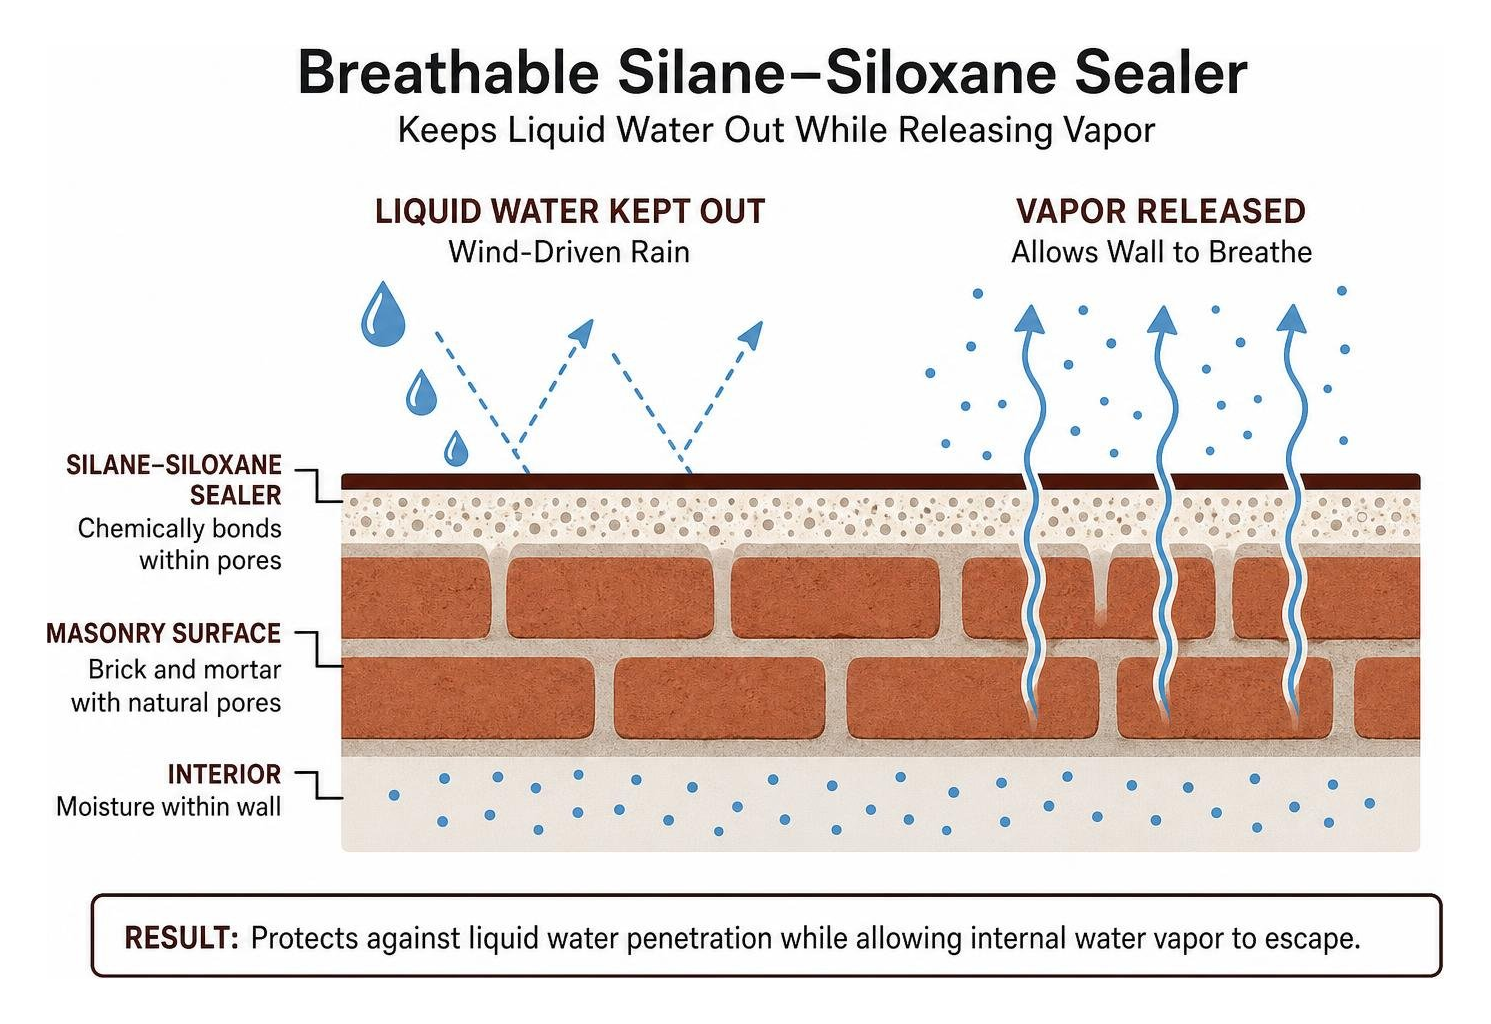
This breathable barrier keeps wind-driven liquid rainwater out while allowing internal water vapor to escape. We recommend resealing exterior brick repairs every 5 to 7 years to protect against freeze-thaw cracking.
For older properties requiring historically accurate lime-based mortars, our building restoration service in Franklin Park, IL delivers careful restoration that protects your masonry’s longevity and historical value.
Frequently Asked Questions About Brick Hole Repairs
Can regular joint compound or concrete be used to fill brick holes?
No. Standard drywall joint compound should never be used on exterior brick or exposed interior structural brick. It is water-soluble, lacks mechanical durability, and quickly cracks as moisture levels change.
Standard Portland concrete is also poorly suited for patching brick. Concrete is far too rigid and dense compared to clay brick. As seasonal temperatures fluctuate, the patch expands and contracts at a different rate than the surrounding wall, causing the brick edges to spall and crack. Always use a compatible Type N or Type O lime-cement mortar mix, which offers the flexibility and vapor permeability needed for masonry repairs.
How do I fix a crumbling anchor hole that will not hold a screw?
When a mounting hole blows out and loses its grip, mechanical plastic anchors will no longer hold. The best solution is to clear all loose dust from the hole, enlarge the interior cavity slightly to create an internal key, and fill it with a two-part structural anchoring epoxy.
Allow the epoxy to cure into a solid composite plug, then drill a new pilot hole directly into the center of the resin. This creates a solid anchor point that will hold screws without placing outward bursting pressure on the surrounding brick.
How often should patched masonry be resealed against water leaks?
Exterior masonry repairs should be treated with a breathable silane-siloxane penetrating sealer after the initial 28-day cure, and re-sealed every 5 to 7 years.
In regions with frequent freeze-thaw cycles like Illinois, unsealed mortar repairs can absorb moisture, which freezes and expands, damaging the bond lines. Regular applications of a silane-siloxane sealer keep water out while letting internal moisture escape safely.
Protect Your Brickwork from Water Infiltration
A hole in a brick wall is more than a cosmetic blemish—it is a direct entry point for moisture that can lead to structural movement, interior water damage, and freeze-thaw deterioration. Most small drilled holes and anchor points can be repaired with basic tools, the right patching compounds, and proper surface preparation.
However, if your property exhibits wide stair-step cracks, loose masonry, bulging walls, or widespread mortar breakdown, simple surface patches will not fix the root cause.
At PN Masonry, our team provides comprehensive masonry services across residential homes, multi-family properties, and commercial facilities throughout Cook County, Illinois. Whether you need precise tuckpointing, lintel replacement, chimney rebuilding, or full facade restoration, we deliver reliable repairs that stand up to the elements.
Contact us today or visit our main masonry repair and tuckpointing page to schedule an on-site structural evaluation and protect your brickwork for years to come.