
Repair Chipped Limestone Before Flaking Spreads
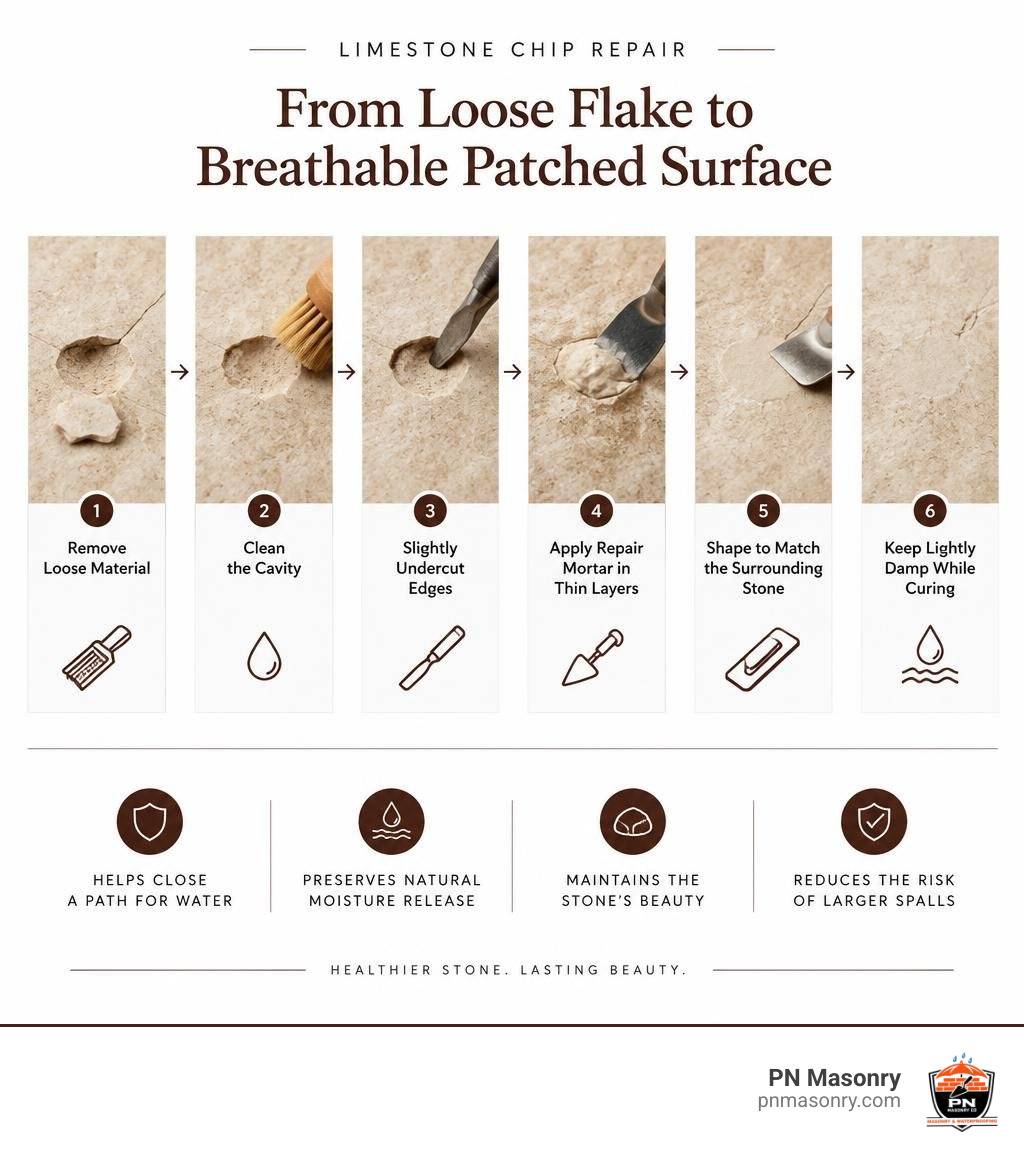
For a small, stable chip in a limestone tile or surface, remove loose material, clean the cavity, slightly undercut the edges, and rebuild it with a color-matched, breathable lime-based repair mortar. Apply the patch in thin layers, shape it to match the surrounding stone, and keep it lightly damp while it begins to cure.
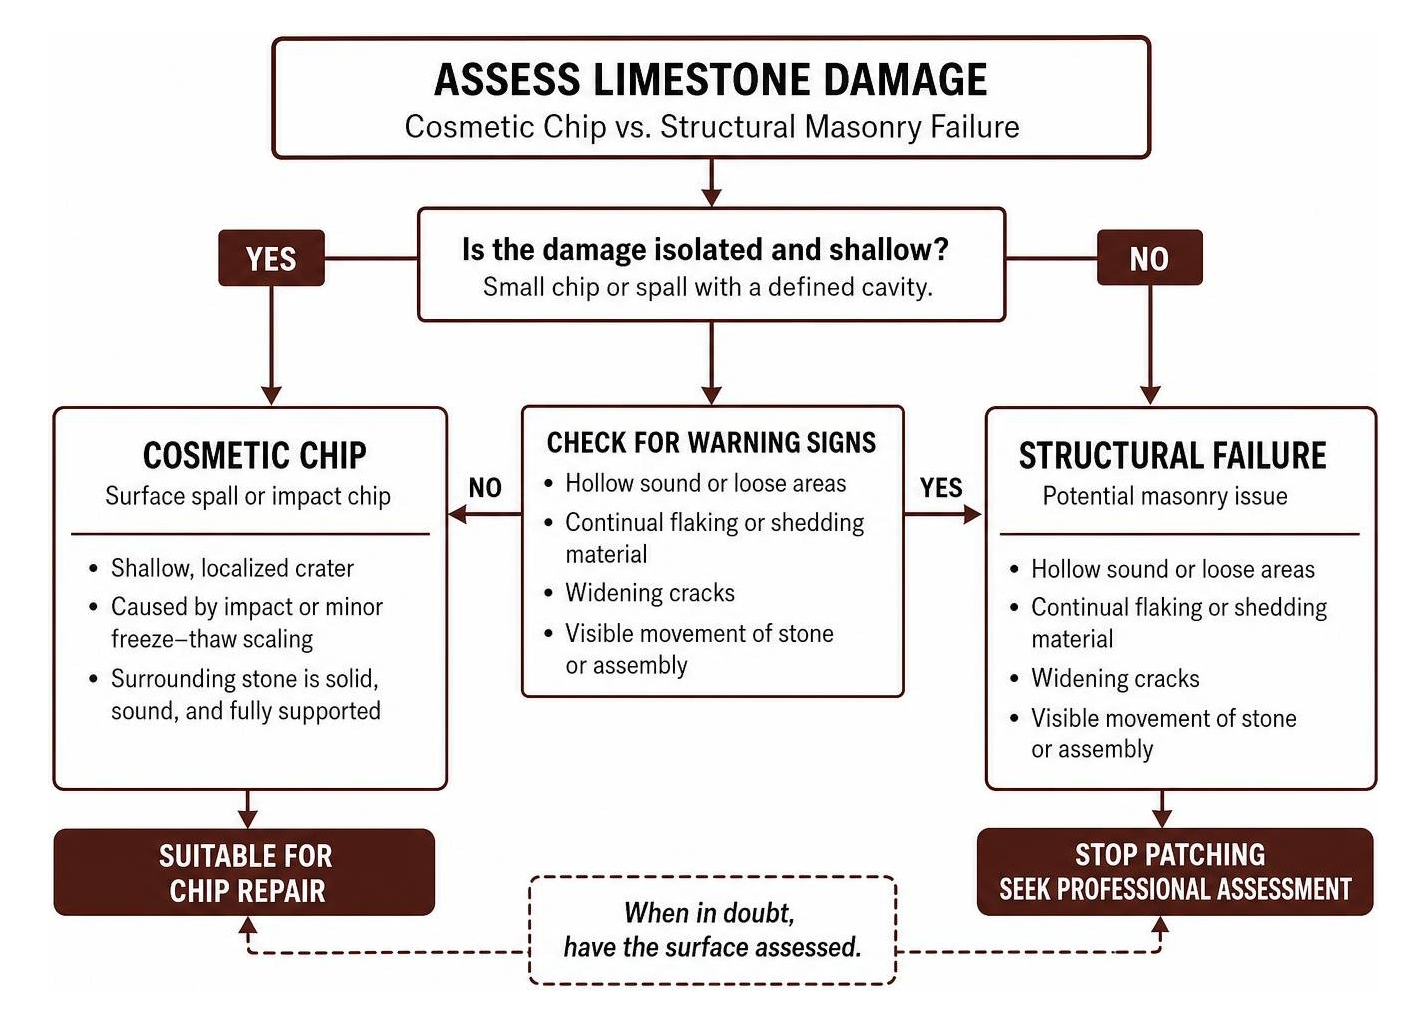
Do not treat every chip as cosmetic. Flaking limestone can result from impact, moisture, freeze-thaw cycles, or a hard, non-breathable past repair that traps water inside the stone. If the surrounding area sounds hollow, keeps shedding material, has widening cracks, or shows stone movement, stop patching and have the surface assessed.
A proper limestone chip repair does more than hide a blemish. It helps close a path for water, preserves the stone’s natural ability to release moisture, and reduces the risk of larger spalls later.
Assessing Limestone Damage: Cosmetic Chip vs. Structural Failure
Before reaching for a trowel or mixing up a batch of repair compound, we need to determine what caused the stone to break. Limestone is an organic, sedimentary rock prized for its warm look and soft workability. However, its natural porosity makes it sensitive to physical impact, water infiltration, and building movement.
Not all limestone damage is created equal. Treating a structural fault as a superficial chip will only result in the patch popping right back out—often taking an even larger chunk of stone with it.
Structural Cracking vs. Surface Spalls
To diagnose the problem, inspect the cavity, the surrounding stone face, and the adjacent mortar joints:
- Isolated Surface Spalls & Impact Chips: These are shallow, localized craters typically caused by physical blows (a dropped tool, a rogue lawnmower pebble) or minor localized freeze-thaw surface scaling. The surrounding masonry remains solid, sound, and fully supported.
- Hairline Fractures & Stress Cracks: If a fine line extends from the chip into the core of the stone block or crosses multiple units, the stone is experiencing mechanical stress, shifting, or foundational settlement.
- Subsurface Delamination: In freeze-thaw climates like ours in Cook County, Illinois, trapped water expands by roughly 9% upon freezing. This pops off the outer face of the stone in sheets, leaving soft, crumbly layers underneath.
Perform a simple sounding test. Lightly tap the stone around the chipped area with a wooden mallet or the wooden handle of a margin trowel. A healthy stone produces a clear, solid “clink.” A hollow, dull “thud” reveals subsurface delamination, meaning the stone has detached internally and will continue to crumble.
When you encounter shifting units, wide cracks, or systemic moisture damage across a facade, simple patching is no longer sufficient. You will need comprehensive building restoration services to stabilize the structure and protect the property’s architectural integrity.
Essential Tools and Materials for Limestone Chip Repair
Achieving a durable patch requires specialized restoration tools that protect soft limestone from unnecessary shock:
- Carbide-Tipped Chisels & Small Rake: For controlled carving without fracturing neighboring stone. Avoid heavy rotary hammer drills on soft limestone.
- Small Hammer / Mallet: A 1-lb wooden or soft dead-blow mallet for gentle precision.
- Natural Bristle & Nylon Brushes: To scrub away stone dust and loose silt. Never use carbon steel wire brushes, which leave tiny metal fragments that rust into unsightly orange stains.
- Vapor-Permeable Lime Mortar: Natural Hydraulic Lime (NHL 2.0 or 3.5) blended with well-graded, washed silica sand or crushed limestone aggregate.
- Earth-Tone Mineral Pigments: Alkali-resistant, UV-stable powdered iron oxides to match natural stone shades (buff, ochre, umber, cream).
- Stainless Steel Margin Trowels & Dental Spatulas: For tight layering, packing, and miniature sculpting.
- Spray Misting Bottle & Clean Water: To manage stone hydration before and during application.
For detailed background on historic stone restoration approaches, review this pro restoration guide for chipped limestone walls.
Step-by-Step Limestone Chip Repair Guide
Fixing a stone chip is as much an art form as it is material science. Follow these proven restoration steps to achieve a seamless, long-lasting repair.
Step 1: Surface Preparation and Undercutting
The number one reason stone patches fail is poor edge preparation. Feathering a patch—tapering the mortar to a wafer-thin edge over the face of the stone—always results in peeling, flaking, and rapid deterioration. Mortar requires a defined edge to retain strength.
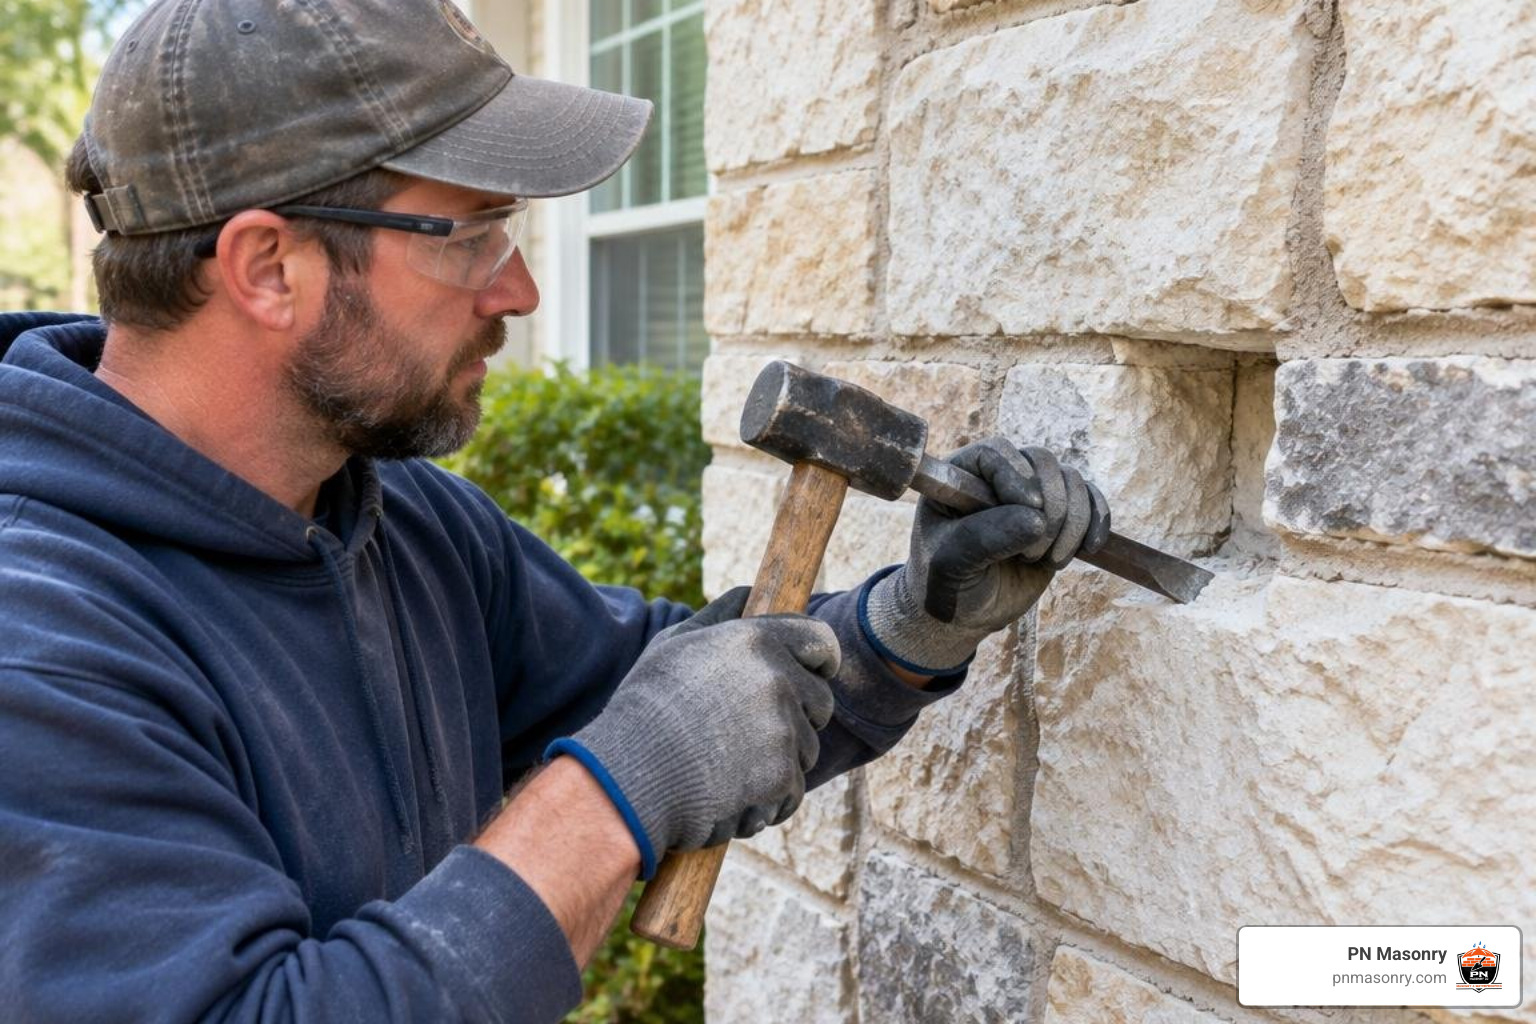
- Chisel a Square Shoulder: Using a small, sharp carbide chisel held perpendicular to the surface, carve the perimeter of the chip to create a neat 90-degree shoulder, establishing a minimum depth of 1/2 inch across the entire repair cavity.
- Create a Mechanical Key (Undercutting): Angle your chisel slightly inward to create a reverse bevel (a dovetail shape), where the base of the cavity is slightly wider than the surface opening. This mechanical interlock physically locks the cured patch into the stone, preventing it from popping forward under temperature swings.
- Remove Loose Aggregate: Chip away all soft, powdered, or spalling stone until you reach dense, sound limestone.
- Dust Extraction and Cleaning: Vacuum the cavity thoroughly, then scrub it with clean water and a stiff nylon brush to remove fine limestone dust that could act as a bond breaker.
- Pre-Wet the Substrate: Dry limestone is extremely thirsty. If you apply wet mortar directly to dry limestone, the stone will instantly suck all the moisture out of the mix—a failure known as “de-watering.” This ruins the hydraulic bond and leaves you with a crumbly patch. Mist the cavity repeatedly for 30–60 minutes prior to patching so the stone reaches a Saturated Surface Dry (SSD) state: thoroughly hydrated, but with no glistening standing water.
Step 2: Selecting and Color-Matching Breathable Mortar
Matching the physical properties of the mortar to the stone is essential. Natural limestone demands high vapor permeability; moisture entering the wall must freely evaporate back out through the patch.
- Binder Selection: Use Natural Hydraulic Lime (NHL 2.0 for soft limestone, NHL 3.5 for medium-density exterior units). Lime-based mortars remain softer and more breathable than the surrounding stone, acting as a sacrificial element that protects the host limestone.
- Aggregate Matching: Use a mix of sharp silica sand and sieved limestone dust that replicates the natural grain and matrix of your stone.
- Color-Matching Strategy: Natural stone exhibits subtle color shifts. Add mineral pigments in tiny increments. Always remember that lime mortar undergoes a significant wet-to-dry shift, typically drying 30% to 50% lighter than it appears when wet in the mixing bucket.
- Dry-Down Test: Mix a small test batch, spread a 1/4-inch sample on a spare piece of scrap limestone or cardboard, and dry it completely with a heat gun or hair dryer before committing to your wall patch.
For ready-to-use factory kits designed for small cosmetic fixes, commercial products like the Last Patch Limestone Repair Kit provide pre-measured, color-matched solutions for non-structural chips.
Step 3: Layering, Tooling, and Sculpting the Patch
Applying a thick wad of mortar in a single pass leads to shrinkage cracks and internal slumping. Precision patching requires a disciplined, layered approach.
- Scratch Coat Application: Butter the pre-dampened cavity with a thin 1/8-inch slip coat of mortar, burnishing it firmly into every pore and undercut corner using a small spatula.
- Lifting in Stages: Build the repair up in 1/4-inch to 3/8-inch lifts. Press each layer firmly into place to eliminate internal air voids. Scratch the surface of each intermediate layer with a small nail to create tooth for the next layer. Allow each lift to firm up (typically 1–2 hours depending on humidity) before applying the next.
- Overfill Slightly: Build the final layer approximately 1/16 to 1/8 inch beyond the flush surface of the surrounding stone.
- Initial Shaping at Thumbprint Hardness: Wait until the mortar achieves “thumbprint hardness”—when firm thumb pressure leaves an impression without wet paste sticking to your skin.
- Carve Back to Texture: Using a small scraper, margin trowel edge, or wooden sculpting tool, gently scrape the overfilled mortar back flush with the adjacent stone. Carving back at this stage exposes the natural aggregate, matching the matte, porous texture of aged limestone instead of leaving a slick, troweled skin.
If your project involves broader facade upgrades or deteriorated cladding units, integrate your chip repair alongside professional stone veneer installation and replacement to guarantee structural alignment across all building elevations.
Why Bondo and Standard Epoxies Fail on Natural Stone
Homeowners and inexperienced contractors frequently reach for quick-fix auto body fillers (like Bondo) or impermeable polyester/epoxy resins to patch exterior stone. While these products harden quickly, they can cause long-term damage on exterior, breathable masonry.
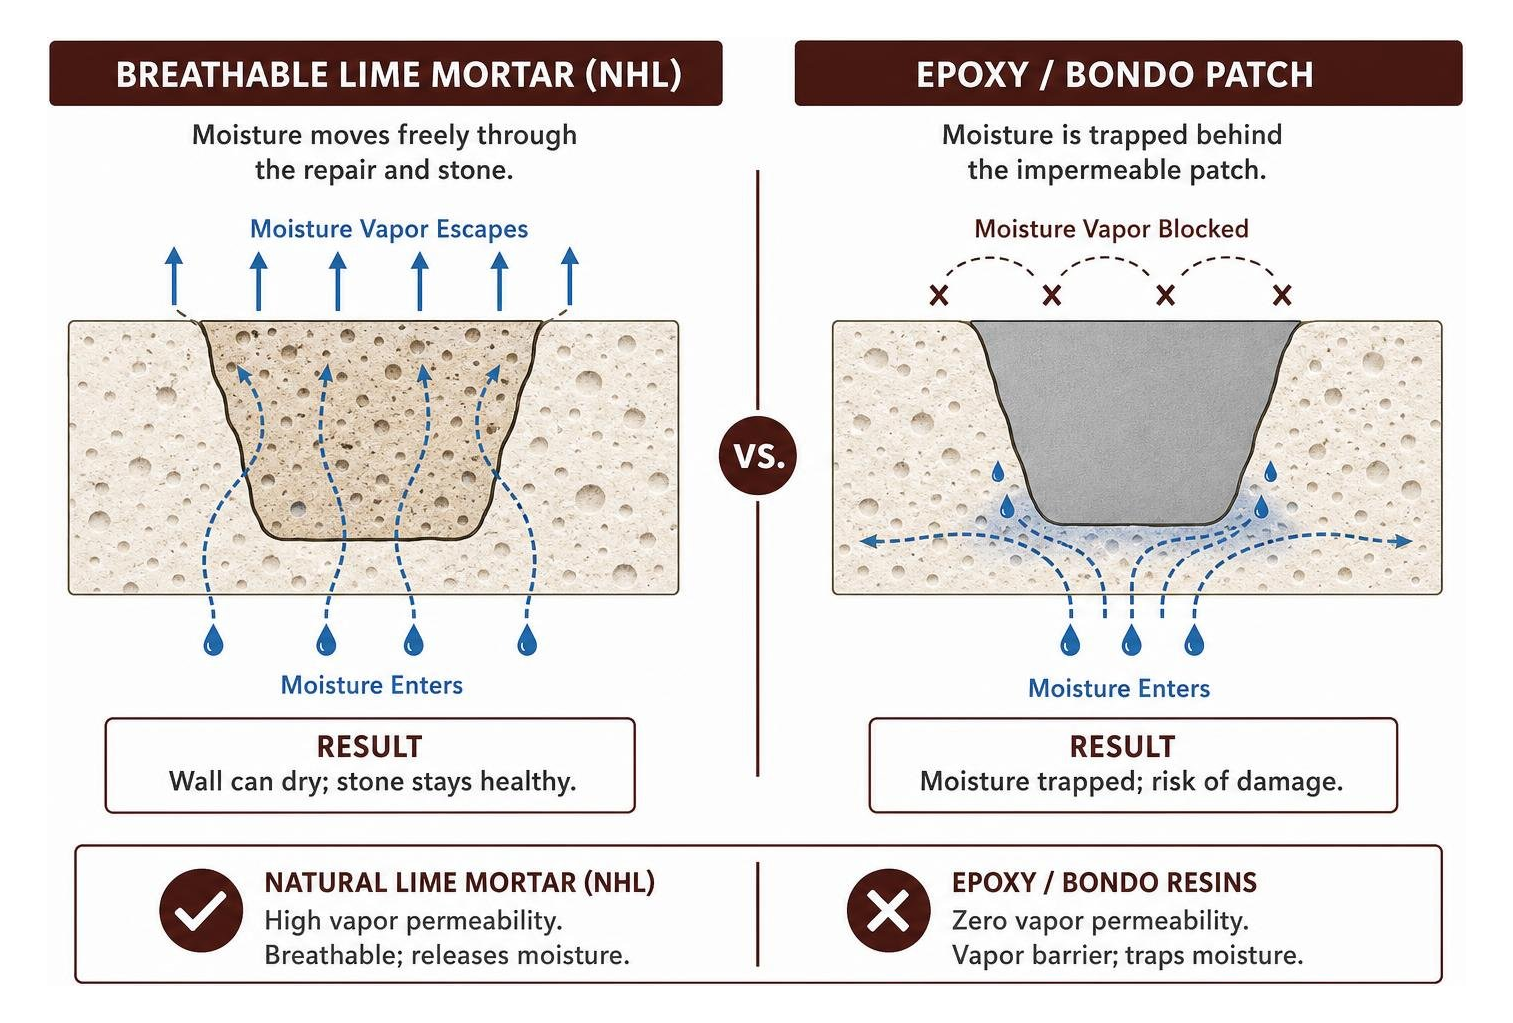
Limestone is a dynamic, porous sponge that continually absorbs ambient humidity and soil moisture, releasing it through vapor transmission. When an impermeable epoxy or resin plug is inserted into a limestone face, it creates an impenetrable dam.
| Feature / Metric | Natural Lime-Based Mortar (NHL) | Standard Epoxy / Bondo Resins |
|---|---|---|
| Vapor Permeability | High (Breathable; releases moisture) | Zero (Vapor barrier; traps moisture) |
| Thermal Expansion | Matches natural stone flexibility | High (Expands/contracts violently with heat) |
| Moisture Management | Wicks moisture outward harmlessly | Causes subflorescence and perimeter spalls |
| UV Stability | Completely UV-stable; never degrades | Yellows, chalks, and cracks over time |
| Long-Term Reversibility | Sacrificial; protects host stone | Rips adjacent natural stone apart when failing |
When moisture migrates through the limestone and hits the back of a rigid, impermeable epoxy patch, it cannot escape. During winter freezing cycles, this trapped water expands, blowing out the natural stone directly surrounding the epoxy plug.
Furthermore, dissolved mineral salts (efflorescence) crystallize behind the impermeable barrier. Known as subflorescence, this internal crystallization exerts hundreds of pounds of pressure inside the stone pores, turning the stone behind the repair to mush.
Whenever you address localized stone decay, ensure that surrounding mortar lines are also in peak condition. Pairing stone patching with high-quality masonry tuckpointing guarantees your entire wall breathes uniformly and expels water correctly.
Curing, Sanding, and Protecting Repaired Limestone
A professional lime patch does not dry by evaporation alone; it cures through chemical carbonation, slowly re-absorbing carbon dioxide from the air to turn back into solid limestone.
Curing Times and Damp Aftercare
Rushing the curing process is a common mistake. If a lime repair dries out too quickly, carbonation stops completely, leaving a weak, powdery patch prone to premature dusting.
- The Critical 48 Hours: Keep the repaired stone damp for the first 24 to 48 hours. Lightly mist the patch with a water spray bottle 2 to 3 times a day.
- Burlap Protection: For outdoor repairs exposed to wind or direct sun, cover the patch with damp natural burlap and secure a sheet of plastic over it (leaving an air gap) to prevent rapid evaporation.
- Temperature Thresholds: Never apply lime repairs when temperatures are expected to drop below 45°F (7°C) within 72 hours, or when temperatures exceed 85°F (29°C) in direct baking sunlight. Freezing halts the carbonation cycle and shatters the green mortar mix.
Once the repair has cured for at least 7 to 10 days, you can perform very gentle surface blending using a fine 120-grit to 220-grit sanding sponge, focusing only on the patch edges to blend it seamlessly into the stone’s profile.
Sealing with Penetrating Water Repellents
Should you seal the finished repair? Yes, but only with the right class of sealer.
Never apply film-forming acrylic, polyurethane, or silicone wet-look sealers to natural limestone. These create an impermeable plastic skin that mimics the damage caused by epoxy patches.
Instead, protect the masonry using a deeply penetrating, breathable Silane-Siloxane water repellent. These specialty chemical treatments alter the surface tension of the limestone pores, creating a hydrophobic barrier that causes liquid water to bead off while maintaining 90%+ vapor transmission.
For maximum seasonal protection across commercial and residential structures, discover our comprehensive approach to brick, block, and stone sealing waterproofing.
Frequently Asked Questions About Limestone Chip Repair
Can I DIY a minor limestone chip repair on an interior fireplace or floor?
Yes, small interior chips on fireplace surrounds or limestone floor tiles that are protected from freezing weather can often be managed with DIY techniques. For interior repairs where you still have the missing stone fragment, apply a stone-grade acrylic or polyester adhesive, press the fragment firmly into place, and wipe away squeeze-out immediately.
For tiny cosmetic voids on smooth interior surrounds, mix fine limestone dust with a clear stone adhesive to create an exact-color paste, overfill the void slightly, let it dry, and sand flush with 220-grit sandpaper.
How long does it take for lime-based repair mortar to fully cure?
Natural hydraulic lime reaches its initial physical set within 24 to 48 hours, reaching sufficient strength for light handling. However, full chemical curing through carbonation takes several weeks to several months, gradually increasing in hardness and weather resistance as it interacts with ambient carbon dioxide.
When should I hire a professional for limestone patching?
You should engage a professional masonry contractor when:
- The chip is part of a structural stone lintel, arch, or load-bearing corner.
- Subsurface delamination or hollow sounding covers an area larger than a standard brick.
- Multiple stone panels across an exterior facade are spalling, indicating systemic moisture entrapment.
- The stone features intricate historic profiling or decorative carvings that require dutchman repairs (inserting a matching natural stone Dutchman plug).
Conclusion: Preserving Natural Stone Integrity
Limestone is one of the most durable and visually striking building materials in the world, but it demands respect for its unique physical chemistry. By ditching non-breathable plastic shortcuts like Bondo, carving proper mechanical undercuts, and using vapor-permeable, color-matched lime mortars, you can halt stone decay in its tracks and protect your property’s value for decades.
At PN Masonry, our team brings specialized expertise to historic residential architecture and heavy commercial masonry structures across Cook County, Illinois. Whether you need isolated limestone chip repairs, extensive lintel restoration, or building-wide moisture mitigation, we deliver craftsmanship built to last.
Contact us today at PN Masonry to schedule a stone assessment and give your property the expert care it deserves.