
Understanding Fireplace Inserts and Fuel Types
A successful chimney insert installation follows a clear sequence: measure the existing firebox opening, repair any damaged masonry, drop an insulated stainless steel flue liner from the chimney top, slide and level the insert into the firebox, connect the flue collar, and seal the surround. This process turns an open brick cavity into a powerful, sealed home heating system. A traditional masonry fireplace brings unmatched visual charm, but thermodynamically speaking, it operates essentially like an open exhaust window. Cool air from your living space fuels the combustion and gets drawn straight up the masonry flue, carrying up to 90% of the fire’s usable energy with it.
A fireplace insert is a self-contained, heavily insulated firebox engineered to turn that open brick cavity into a powerful, sealed home heating system. When considering an upgrade, selecting the right fuel source is your first major decision.
| Insert Type | Typical Efficiency | Average Heat Output (BTU/hr) | Estimated Operating Cost | Best Use Case |
|---|---|---|---|---|
| Wood-Burning | 68% – 78% | 40,000 – 110,000 | Low (if sourcing local cordwood) | Maximum radiant heat, grid independence, authentic wood fire ambiance |
| Direct-Vent Gas | 70% – 85% | 20,000 – 45,000 | ~$0.40 – $0.50 per hour | Instant thermostatic control, push-button ease, continuous heating |
| Pellet | 70% – 80% | 30,000 – 50,000 | Moderate (bags of hardwood pellets) | Extended burn times via automated hoppers, steady baseline warmth |
| Electric | 99% (at point of use) | 4,500 – 9,000 | ~$0.18 per hour (high setting) | Aesthetic ambiance, supplemental zone warmth, zero venting required |
- Wood-Burning Inserts: Modern wood models feature heavy steel or cast-iron outer bodies, ceramic glass doors, refractory brick liners, and secondary combustion tubes or catalytic combustors. They generate authentic wood-fire heat while burning 50% to 60% cleaner than open hearths.
- Direct-Vent Gas Inserts: These units draw outdoor combustion air through a dedicated flexible flue liner and exhaust combustion byproducts out through a secondary liner inside the same chimney, eliminating room drafts entirely.
- Pellet Inserts: Using compressed sawdust pellets fed automatically by an electric auger, these units deliver consistent heat output for hours without manual reloading.
- Electric Inserts: The easiest retrofits available, using internal heating coils, blowers, and LED flame effects. They require no chimney flues or permits, though their heating capacity is limited compared to solid-fuel and gas options.
Choosing the Right Insert for Your Home
Selecting the right heating capacity prevents two common issues: underheating your living space or overheating the room so severely that you have to open windows in January.
Match the manufacturer’s rated heating area (which typically spans 500 to 2,700 square feet) and BTU output (ranging from 40,000 to over 100,000 BTU/hr for large wood units) to your home layout. Consider whether you plan to heat a single family room or practice whole-home zone heating. When retrofitting interior hearths or planning outdoor living spaces, reviewing custom fireplaces and outdoor hearths helps clarify how heating footprint and structural layout intersect.
Choose units bearing current EPA certification (achieving particulate emission ratings as low as 1.14 to 1.6 g/hr) to ensure clean, high-yield combustion. Integrated variable-speed blower systems are also worth looking for, as they pull cool room air around the outer jacket of the hot firebox and push heated air deep into the living space.
Planning Your Chimney Insert Installation and Sizing
Before ordering an insert, you must take precise three-dimensional measurements of the existing masonry opening:
- Front Width and Rear Width: Most masonry fireboxes taper inward toward the back wall. Measure both.
- Opening Height: Measure from the hearth floor to the lowest point of the lintel angle.
- Firebox Depth: Measure from the front face of the brick opening to the back wall at floor level and lintel level.
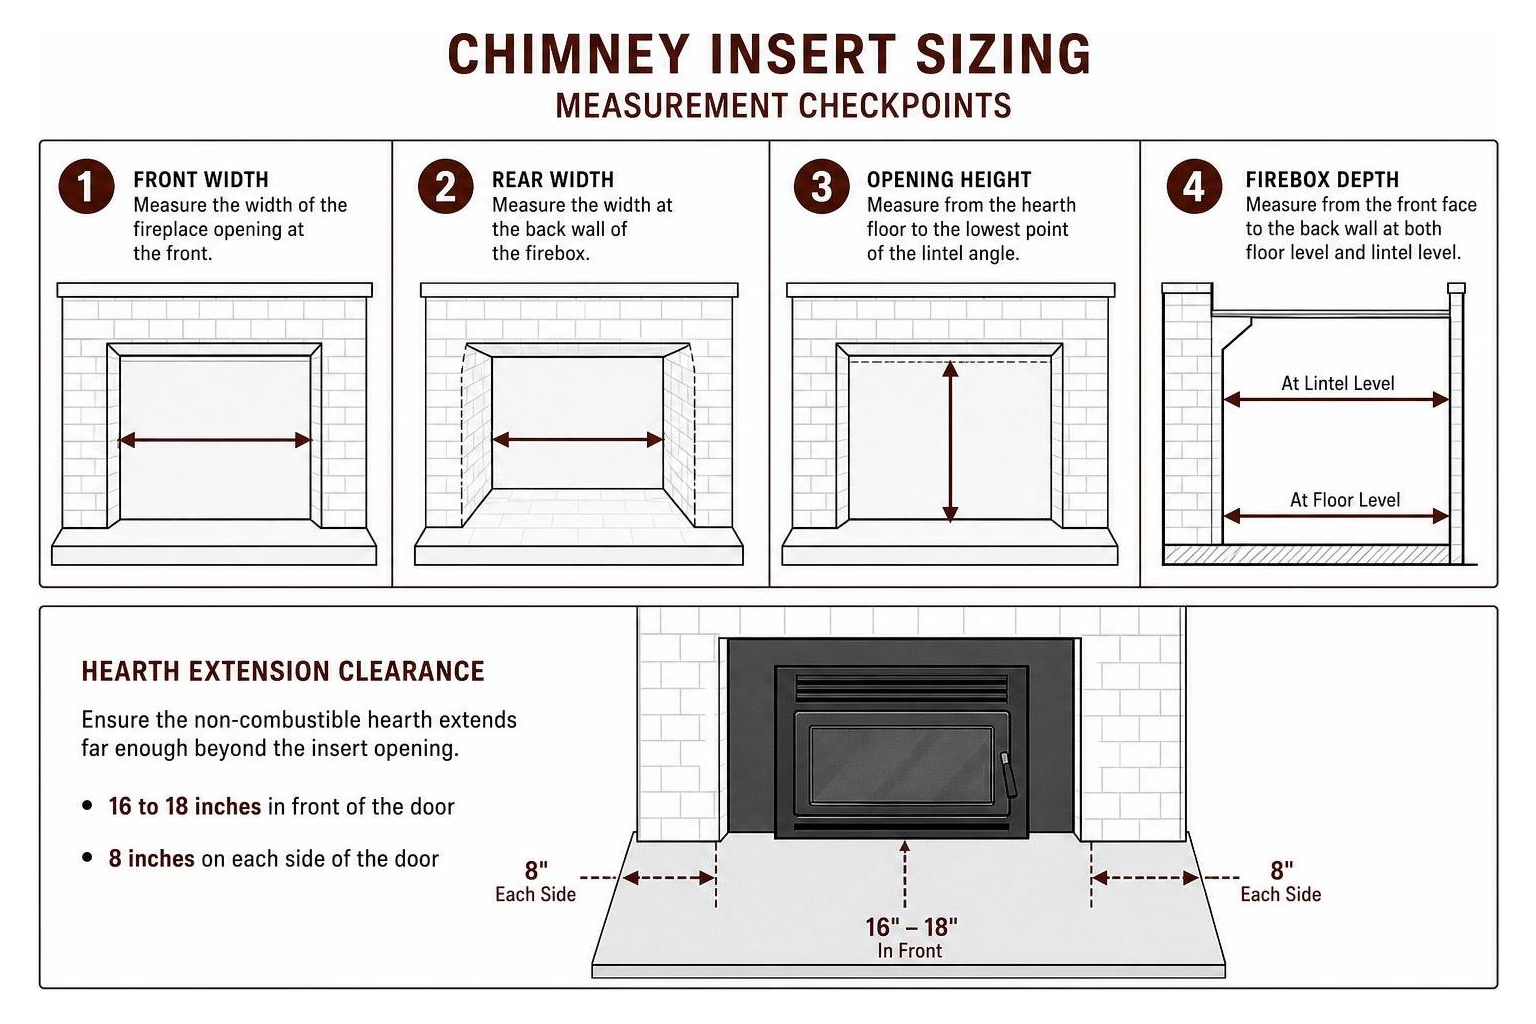
Confirm that the existing hearth extension provides adequate non-combustible floor protection in front of and to the sides of the appliance door (often requiring 16 to 18 inches in front and 8 inches on the sides).
Preparation also involves addressing lower chimney components. If your masonry base contains an old, leaky cleanout door in the basement or hearth floor, inspect it for air infiltration or structural failure. Taking care of replacing a damaged chimney cleanout door helps ensure the lower masonry base remains tightly sealed and draft-free.
Preparing the Fireplace and Flue for Installation
A quality installation relies on sound underlying masonry. Begin with a thorough cleaning of the firebox and smoke chamber using wire brushes and a HEPA-filtered ash vacuum to remove accumulated soot and creosote glaze.
Inspect the firebox bricks and mortar joints. If the existing masonry has spalling brick, deteriorating mortar, or damaged structural elements, these issues must be repaired prior to placing the heavy appliance. Reviewing fundamentals for restoring historic brick chimneys and general fireplace restoration essentials will help you spot structural concerns in the surrounding brickwork before you seal the cavity with a new insert.
Next, remove the original cast-iron damper plate. In most retrofit installations, the damper frame must either be unbolted, cut out, or locked permanently open to allow passage of the new continuous stainless steel liner.
Installing the Stainless Steel Chimney Liner
A wood-burning insert cannot simply vent into an oversized, unlined masonry chimney. Doing so causes the flue gases to expand, cool rapidly, lose draft velocity, and deposit dangerous layers of combustible creosote along the cold brick flue walls.
Under UL 1777 and NFPA 211 standards, a continuous stainless steel chimney liner (typically 6-inch diameter 304 or 316Ti alloy for wood) must run from the insert’s flue collar to the top of the chimney crown:
- Drop the Liner: From the rooftop, feed the flexible stainless steel liner down through the chimney flue. A pull-cone and guide rope managed by an assistant in the firebox helps steer the pipe past any chimney offsets.
- Insulate the Flue: In exterior chimneys or oversized masonry cavities, wrap the flexible liner in high-density ceramic fiber insulation blanket with wire mesh or pour a UL-listed vermiculite-based insulation mix around the liner to maintain flue gas temperature and draft strength. Follow the venting steps outlined in your unit’s Installation Instructions.
- Secure the Top Termination: Fasten the liner at the chimney top using a heavy-gauge stainless steel top plate sealed with high-temperature silicone sealant. Attach a spark-arrestor chimney cap to keep out moisture, debris, and animals.
- Draft Verification: A proper chimney height (a minimum of 12 feet of effective draw, extending 3 feet above the roof penetration and 2 feet higher than any roof surface within 10 feet) ensures operating draft stays within the target .04 to .08 W.C. range.
Step-by-Step Chimney Insert Installation Process
With the liner in place and hanging into the top of the firebox, you are ready to prepare the insert unit.
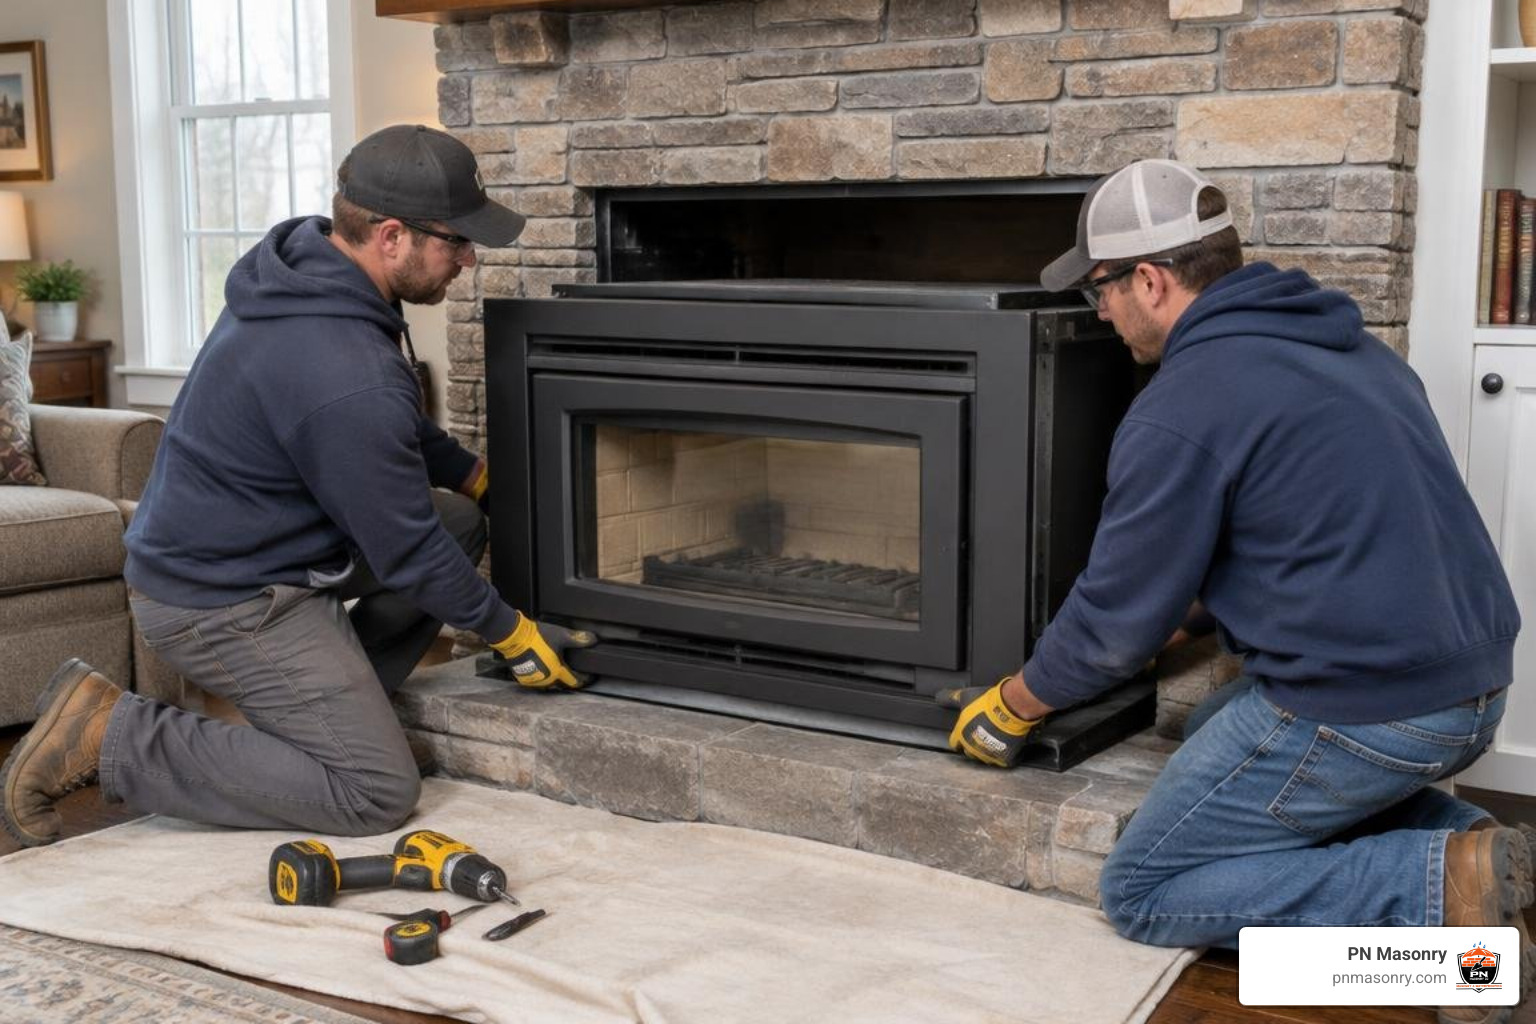
- Firebox Preparation and Electrical Routing: If your insert features an integrated convection blower, determine the electrical path. Run power to a nearby approved outlet or install an internal code-compliant conduit box inside the firebox cavity if supported by the manufacturer.
- Positioning the Appliance: Place protective boards or heavy moving blankets across the hearth extension. Carefully slide the insert into the masonry opening. Use the adjustable rear leveling bolts on the unit to ensure it sits plumb and level across both axes.
- Connecting the Flue Collar: Align the appliance flue outlet with the chimney liner adapter hanging from the damper area. Secure the liner adapter to the insert flue collar using stainless steel self-tapping screws and apply high-temperature furnace cement (rated to 2,000°F) to ensure a gas-tight seal.
- Internal Firebrick and Baffle Assembly: Following the appliance’s INSTALLATION AND OPERATION MANUAL, install the interior refractory bricks along the bottom and sides of the firebox, then secure the ceramic fiber baffle boards and thermal blanket above the secondary air burn tubes.
- Insulating the Surround Perimeter: Pack high-temperature mineral wool insulation into the perimeter gaps between the outer steel body of the insert and the inner face of the masonry firebox to prevent room air from escaping into the chimney void.
- Faceplate and Surround Installation: Attach the metal faceplate panels to the perimeter of the insert, adjusting the trim so it rests flush against the exterior brick face to conceal the firebox opening.
Safety Standards and Permits for Chimney Insert Installation
Installing a solid-fuel or gas appliance involves significant heat loads and combustible boundaries. Solid-fuel installations must comply with NFPA 211 standards in the United States or CSA B365 in Canada.
Before starting, check with your local municipal building department to obtain the required mechanical and building permits. Once installed, the appliance and chimney connection should be inspected by a local code enforcement officer or a certified professional from our team providing professional chimney services.
Clearance to combustibles is critical:
- Mantel Clearances: Maintain minimum clearances (typically 12 to 24 inches or more, depending on mantel depth and manufacturer specifications) between the insert top and combustible wood mantels. If necessary, install an approved sheet-metal deflector shield with a 1-inch air gap.
- Side Trim: Wood trim and side walls must adhere to specified clearances (commonly 10 to 14 inches minimum from the appliance centerline).
- Life Safety Equipment: Working smoke detectors and UL-listed carbon monoxide alarms must be installed on every level of the home, particularly near sleeping quarters and the room housing the hearth.
Maintenance, Operation, and Cost Considerations
To keep your newly installed insert operating at peak efficiency and avoid creosote build-up, follow these operational best practices:
- Burn Seasoned Hardwood Only: Use wood that has been split and seasoned under cover to a moisture content between 15% and 20% (verify using an electronic pin-type moisture meter). Burning green or wet wood wastes energy boiling off water, drops firebox temperatures, and creates heavy creosote deposits.
- Follow the Burn-In Procedure: New inserts require initial curing burns to set the high-temperature silicone paint on the steel body. Perform two low-heat fires (around 250°F for 20 minutes) followed by a medium-hot fire (around 450°F for 45 to 60 minutes), ventilating the living area to disperse curing odors.
- Ash Management: Allow ashes to cool completely before removing them. Store ash in a heavy metal container with a tight-fitting lid placed on a non-combustible stone or concrete surface well away from walls.
- Annual Sweeping and Liner Inspections: Have a certified sweep clean the stainless steel liner and inspect the firebox baffles and door gasket seals annually. Any creosote deposit reaching 1/8 inch or thicker must be cleaned immediately to prevent chimney fires.
For comprehensive fireplace maintenance and masonry upkeep, consulting a guide on choosing local brick fireplace restoration services helps ensure you choose qualified contractors for long-term hearth care.
Cost Breakdown Overview
Understanding the upfront investment helps plan your upgrade budget:
- Insert Unit: $1,500 – $4,500 (depending on brand, fuel type, and EPA efficiency tier)
- UL 1777 Stainless Steel Liner Kit: $400 – $1,200 (depending on chimney height and insulation requirements)
- Permits and Local Municipal Inspections: $100 – $350
- Professional Installation Labor: $1,200 – $2,500 (covering masonry prep, liner drop, leveling, and finishing)
Total project costs generally fall between $3,200 and $8,500. However, with wood inserts reducing wood consumption by half and modern units cutting room heat loss, homeowners routinely see measurable drops in winter heating bills.
Frequently Asked Questions About Fireplace Inserts
Do I always need a chimney liner when installing a wood insert?
Yes. Installing an EPA-certified wood insert requires a full-length, correctly sized stainless steel liner (meeting UL 1777 or ULC S635 standards) connected directly from the insert flue collar to the top of the chimney.
Venting an insert directly into an unlined, oversized clay tile flue causes flue gases to expand and cool, which ruins the natural draft, sends smoke back into the house, creates severe creosote buildup, and voids the manufacturer warranty.
Can I install a chimney insert myself or should I hire a professional?
While a skilled homeowner with masonry and roofing experience can handle basic mechanical tasks, professional installation is strongly recommended.
Working on steep rooflines, dropping heavy stainless steel liners past internal offsets, establishing gas-tight seals, modifying cast-iron dampers, and navigating local mechanical building codes require specialized tools and safety practices. Hiring a certified chimney contractor ensures your installation is safe, code-compliant, and fully covered by insurance.
How much money can a fireplace insert save on heating bills?
Replacing an open fireplace with an efficient wood or gas insert can reduce home heating expenses by 20% to 40% when used for strategic zone heating. Because an open fireplace operates at only 5% to 15% efficiency (and pulls warm indoor air out through the flue), sealing that opening and using a 70%+ efficient insert keeps heat inside your living space where you need it most.
Conclusion
Upgrading an open fireplace with a high-efficiency insert is one of the most effective ways to bring warmth, character, and lower utility bills to your home. By taking accurate firebox measurements, preparing the underlying brickwork, and installing a properly sized stainless steel liner, you turn an inefficient hearth into a reliable source of winter comfort.
At PN Masonry, we combine hands-on masonry expertise with complete chimney restoration, flue relining, and hearth repair services across residential and commercial properties throughout Cook County, Illinois. Whether your fireplace needs tuckpointing, structural firebox repair, or a complete safety overhaul before winter arrives, our experienced team is here to help you get the most out of your hearth.