
Stop Brick Wall Water Damage Before It Spreads
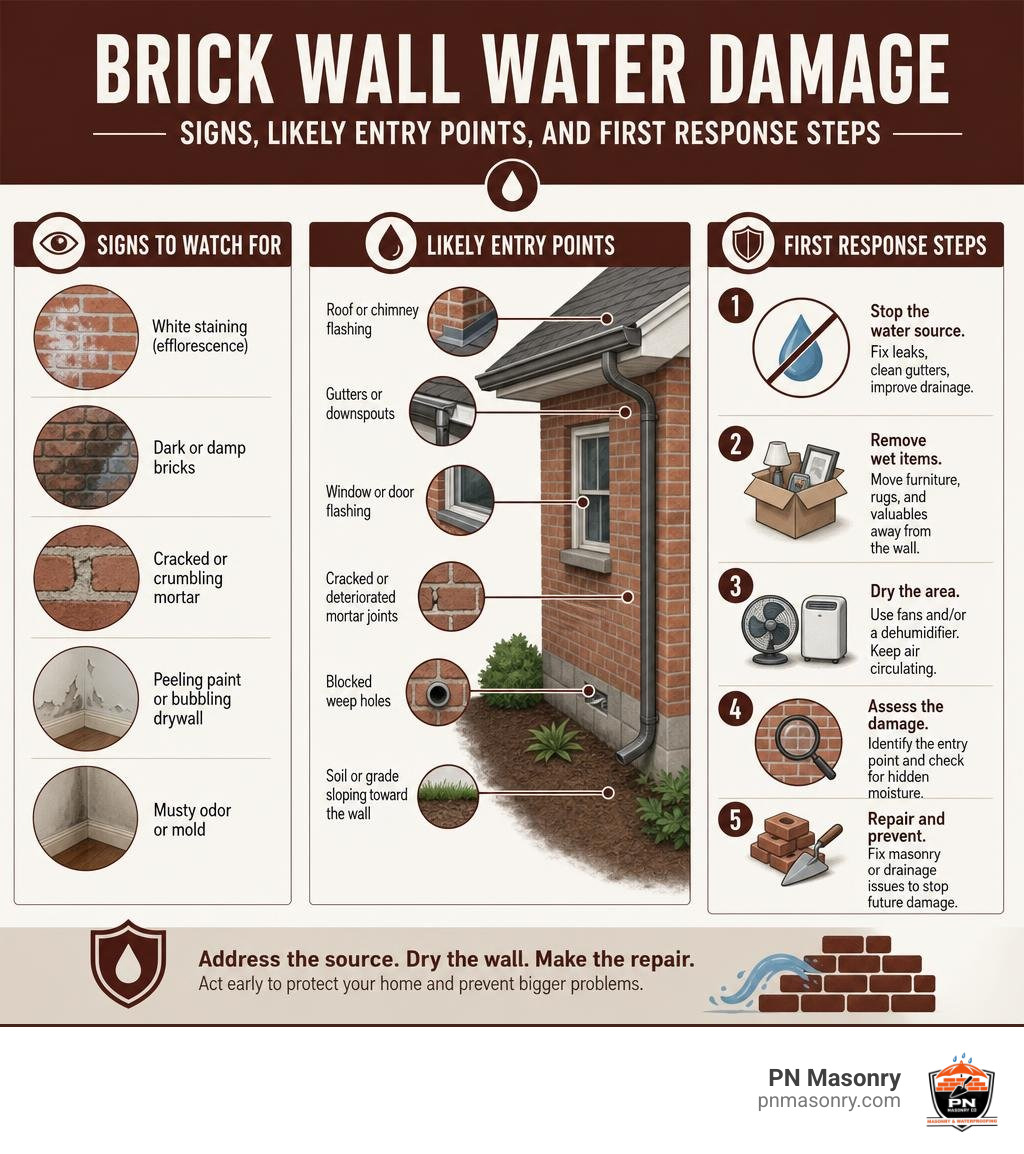
Brick wall water damage needs two actions right away: stop the water source and dry the affected area. Check for overflowing gutters, failed window or roof flashing, cracked mortar, blocked weep holes, plumbing leaks, and soil that slopes toward the home. Then move wet items, direct water away from the wall, and use fans or a dehumidifier while the wall is assessed.
Brick can absorb moisture, but water should not stay trapped in the wall system. Persistent seepage can damage mortar, rust steel lintels, stain interior finishes, and create a damp cavity where mold may begin growing in as little as 48 hours.
The key is not to simply cover the stain or paint over the problem. Find the entry point first, repair the masonry or drainage detail, and make sure the wall can dry properly. This guide explains how to spot hidden moisture, choose the right repair, and know when professional masonry help is the safer choice.
Understanding the Root Causes of Brick Wall Water Damage
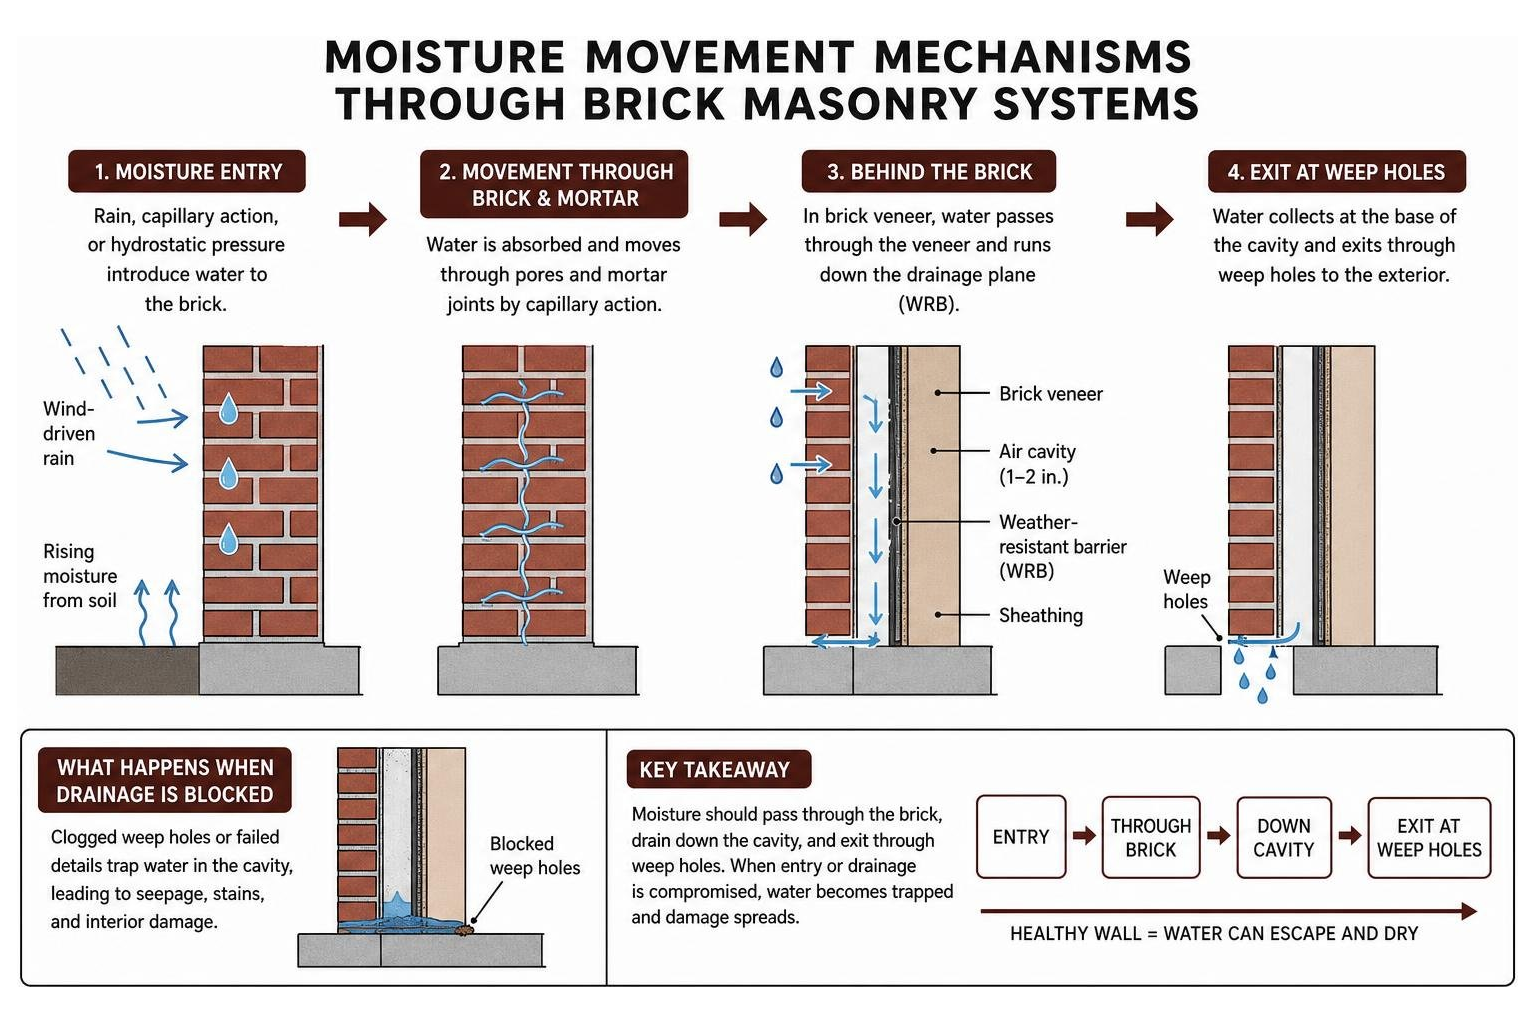
Brick gives homes a timeless look, but masonry is naturally porous. Clay bricks absorb water—sometimes up to 20% of their total weight during sustained downpours. In a healthy structure, that absorbed water evaporates outward naturally. Problems arise when excess moisture penetrates deeper than the exterior face, driven by capillary action, wind-driven rain, or hydrostatic pressure from saturated surrounding soil.
When external moisture works its way through microscopic pores or compromised mortar joints, it spreads into interior finishes and framing cavities. Water damage expands exponentially if left unchecked. What starts as a minor dark patch after an autumn shower can quickly turn into ruined drywall, rotted wall studs, and damaged insulation.
Solid Masonry vs. Brick Veneer Dynamics
To solve water seepage, you must first know how your wall was constructed. Older homes often feature multi-wythe solid masonry, where several layers of structural brick sit directly against each other. Modern residential homes, by contrast, rely mostly on brick veneer.
In a brick veneer build, the brick is not load-bearing; it is a decorative rainscreen. Behind that exterior brick sits a designated 1- to 2-inch air cavity, a weather-resistant barrier (WRB) over structural sheathing, and a network of weep holes at the base. Water is expected to pass through the outer brick veneer, run safely down the drainage plane, and exit through the weep holes. When those weep holes get clogged with dirt, insect nests, or dropped mortar from poor construction, the cavity fills with water like a blocked sink.
| Feature | Solid Masonry (Multi-Wythe) | Brick Veneer Construction |
|---|---|---|
| Structural Role | Brick supports roof and floor loads | Wood or steel frame supports structural loads |
| Water Strategy | Mass absorption and outward drying | Cavity drainage plane with functional weep holes |
| Primary Weakness | Mortar erosion, capillary rise, spalling | Blocked weep holes, torn WRB, flashing failure |
| Interior Barrier | Plaster applied directly or over furring | Drywall over stud framing with air cavity behind brick |
| Remediation Focus | Breathable repointing, deep water repellents | Clearing drainage paths, flashing repair, cavity drying |
Flashings, Lintels, and Drainage Plane Failures
The National Roofing Contractors Association notes that many water intrusion complaints actually stem from flashing deficiencies rather than roofing shingle failures. Missing, undersized, or improperly lapped kickout flashings and roof-to-wall transitions allow gallons of roof runoff to pour directly behind brick cladding during every storm.
Openings around windows and doors present another common failure point. Builder-grade window installations from the 1990s and 2000s often relied entirely on perimeter sealant at the rough opening without adequate pan flashings. In direct sunlight and seasonal heat, standard sealants shrink, split, or debond after 7 to 10 years, leaving an open route for wind-driven moisture.
Above those windows and doors, structural steel angle irons—known as lintels—carry the weight of the overhead brick. When moisture gets trapped behind the facade, these steel components rust. Rust expands the steel, exerting immense pressure on the surrounding masonry. This process cracks adjacent mortar joints and lets in even more water. If your lintels are bowing or shedding flakes of rust, masonry window and door opening repairs and steel lintel replacement will stabilize the opening and restore the hidden moisture barrier.
How to Accurately Detect Hidden Moisture Intrusion
Water rarely travels in a straight line. A damp spot appearing near a living room baseboard might originate from a failed roof flashing ten feet overhead, with the water tracking down wall studs before settling on the floorplate. Accurately pinpointing the entry point prevents you from wasting time patching areas that are not the root cause.

Warning Signs of Hidden Brick Wall Water Damage
Before water physically drips through your ceiling or drywall, your home usually provides subtle warnings. Watch for these common signs of trapped moisture:
- Efflorescence: A powdery white or crystalline deposit that forms on the brick face. It appears when water dissolves internal mineral salts in the brick or mortar, carries them to the surface, and evaporates, leaving the salts behind.
- Peeling, Bubbling Paint or Wallpaper: Paint that loses adhesion, bubbles, or sheds its topcoat along interior perimeter walls indicates moisture pressing from behind the drywall.
- Musty Odors: A continuous earthy or sour smell in certain rooms—especially after rain—suggests hidden mold growth within the wall cavity.
- Warped Baseboards and Buckling Floors: Wood trim absorbs moisture from below, swelling and pulling away from drywall screws or nails.
- Spalling Bricks: When absorbed moisture freezes during winter freeze-thaw cycles, the expanding ice pops off the outer face of the brick, leaving crumbling clay fragments below.
Non-Invasive Inspection and Moisture Mapping Tools
Finding water hidden behind brick veneer or plaster no longer requires knocking large holes into your drywall. Professional restoration crews rely on non-destructive moisture mapping tools to track water paths precisely:
- Thermal Imaging Cameras: Infrared technology detects tiny surface temperature differences caused by the evaporative cooling of trapped water. Wet insulation and damp wall cavities appear as distinctive cool patterns on screen.
- Pinless Moisture Meters: These devices use radio frequency signals to evaluate moisture content up to an inch deep into drywall, plaster, and subfloors without leaving pinholes.
- Cavity Borescopes: By inserting a small optical lens through a tiny pencil-sized hole in the baseboard line, technicians can inspect the interior condition of the weather barrier, wall ties, and insulation.
- Hygrometers: These tools measure indoor ambient relative humidity and dew points to determine whether the home environment supports active microbial growth.
Step-by-Step Remediation and Long-Term Waterproofing Solutions
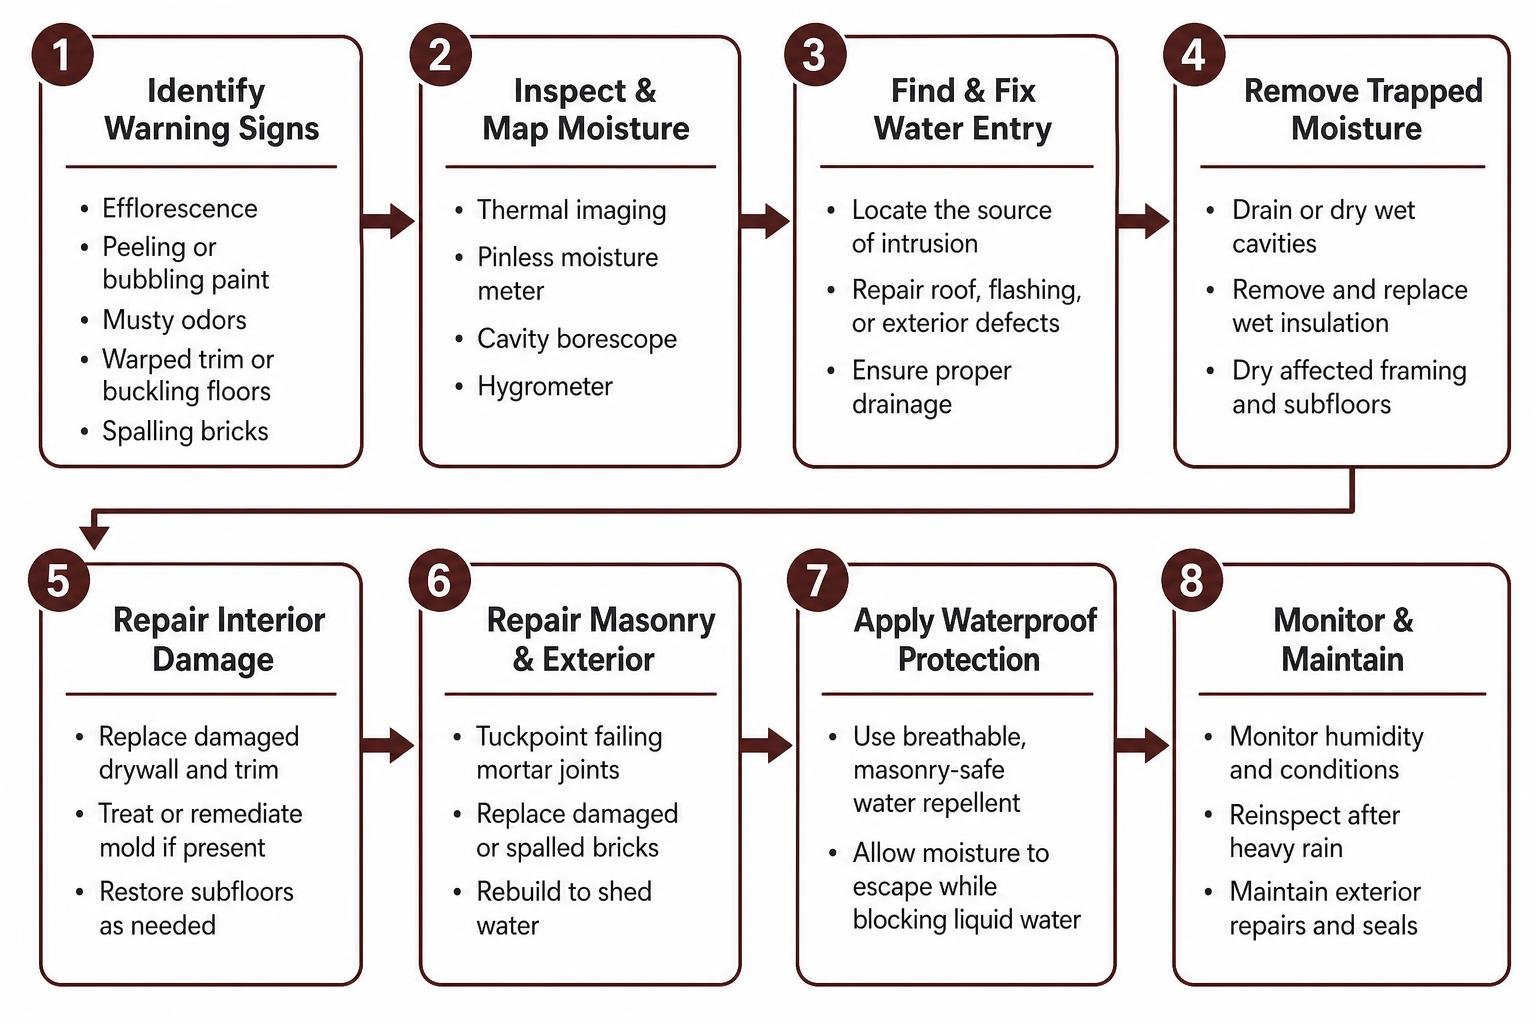
Addressing moisture in masonry requires a systematic approach. Simply slapping a thick coat of regular exterior paint over damp brick will trap the water inside, accelerating freeze-thaw cracking and rotting interior wall studs.
Exterior Masonry Repairs and Waterproof Coatings
Long-term protection starts on the outside. Mortar joints naturally deteriorate from weathering, vibration, and thermal expansion. When mortar turns sandy, cracks, or recesses beyond the brick edge, it must be cleared out and replaced.
Our team grinds out cracked, failing mortar to a uniform depth and applies fresh, color-matched mortar through professional tuckpointing to rebuild joint strength and shed rainwater.
Once the masonry joints are repaired, exterior treatments like brick and block sealing and waterproofing provide an invisible, hydrophobic barrier. We use silane-siloxane penetrating sealers, which bond chemically within the masonry pores rather than forming a plastic film on top.
This keeps liquid water from soaking in while letting interior water vapor escape. For buildings with extensive architectural cracking or older masonry work, a complete brick facade restoration restores structural integrity, clears weeping systems, and re-establishes weatherproof transitions around every window and door.

Interior Moisture Management and Emergency Extraction
If heavy storms have already pushed water through the cavity and soaked the interior, immediate extraction is critical. Industrial dehumidifiers and high-velocity air movers must run continuously to drop relative humidity below 50% and draw moisture out of the framing materials.
In single-wythe or basement utility areas where exterior excavation is physically impossible, interior negative-side damp-stop coatings can serve as a secondary line of defense. However, interior coatings should always be paired with active mechanical ventilation and proper interior perimeter drainage. Interior coatings alone cannot stop water from filling the outer brick pores; exterior repairs must always come first.
Professional Restoration vs. DIY and Cost Considerations
Small maintenance tasks—such as clearing surface dirt from weep hole covers, replacing a short bead of cracked caulking around a water spigot, or aiming a household fan at a damp spot—are fine for handy homeowners. But once water enters wall cavities, structural framing, or electrical pathways, professional help is necessary.
Our restoration work follows recognized Institute of Inspection, Cleaning and Restoration Certification (IICRC) protocols to ensure hidden moisture is completely dried out. For extensive structural masonry issues, choosing a comprehensive building restoration service ensures that structural ties, lintels, and exterior wall cladding are brought back to code safely.
Repair Costs and Prevention for Brick Wall Water Damage
The overall cost of resolving moisture damage depends on how long the water has been sitting inside the wall assembly. Water damage expands over time, which is why quick action saves money.
- Behind-Wall Water Extraction & Structural Drying: Typically ranges from $500 to $2,500, depending on room dimensions, equipment needs, and moisture spread.
- Leak Investigation, Flashing, & Mortar Repair: Localized repointing, lintel maintenance, and sealant replacement generally fall between $1,000 and $5,000.
- Structural Framing & Drywall Reconstruction: Comprehensive restoration that involves rebuilding rotted framing, replacing damp insulation, hanging new drywall, and repairing exterior masonry often ranges from $2,000 to $10,000 (and can reach $20,000+ for large, severe failures).
Be sure to document the initial damage thoroughly with date-stamped photos and moisture log readings. Many standard property insurance policies cover sudden internal pipe breaks or storm-created openings, though long-term neglect and continuous ground seepage are often excluded.
Landscape Grading and Preventative Maintenance
The soil and hard surfaces around your foundation play a big role in protecting exterior brickwork from moisture. Saturated ground against lower brick courses creates hydrostatic pressure that forces water up through the masonry via capillary action.
- Maintain a Positive Ground Slope: Make sure the soil drops at least 6 inches over the first 10 feet away from the foundation wall. Improper landscape grading can increase masonry moisture loading by more than 30% during sustained rainstorms.
- Extend Downspouts: Direct all downspout extensions at least 5 to 6 feet away from the foundation edge, discharging onto positive runoff slopes.
- Clean Gutters Seasonally: Clear fallen leaves, twigs, and roof grit every spring and fall to prevent roof runoff from overflowing directly down the brick facade.
- Protect Adjacent Flatwork: Keep water from pooling against ground-level brick by investing in driveway and concrete sealing to maintain smooth runoff along walkways and patios.
- Trim Foundation Plantings: Prune shrubs and dense ground covers at least 18 inches away from the brick face to promote steady airflow and let wet masonry dry naturally.
Frequently Asked Questions About Brick Wall Water Damage
Can I waterproof a brick wall from the inside only?
No, interior waterproofing should only be used as a secondary, temporary measure when exterior access is physically impossible. Applying a waterproof membrane to the interior face traps moisture inside the wall core. In cold climates, this trapped water freezes, breaks down the brick and mortar, and creates hidden pockets where mold can spread unseen. True water protection requires stopping water at the exterior face and keeping drainage paths open.
How quickly does mold develop behind water-damaged brick?
Under warm conditions, mold spores can settle and germinate within 24 to 48 hours in a damp, dark cavity. Wood wall studs, paper-faced drywall, and fiberglass insulation provide ample food for mold when moisture is present. If you suspect an interior cavity has stayed wet for more than two days, use thermal imaging to assess the moisture level and dry the framing immediately.
What causes stair-step cracks above brick windows?
Stair-step diagonal cracks following mortar lines above windows are usually caused by a rusted, failing steel lintel. As moisture gets behind the brick, the untreated steel angle iron rusts and expands—a force known as “rust jacking.” This lifting pressure fractures the surrounding mortar joints, creating wide gaps that let in even more water during rainstorms.
Conclusion
Brick walls are tough and durable, but they cannot handle unmanaged water intrusion on their own. Ignoring peeling paint, musty smells, cracked mortar joints, or blocked weep holes can quickly turn a quick maintenance task into an expensive structural repair.
Catching moisture early, fixing exterior drainage details, and keeping mortar joints well-maintained will protect your property’s value, indoor air quality, and structural integrity for decades to come.
If you are dealing with damp brick, crumbling mortar, or hidden leaks around your home or commercial building, let our team take a look. Contact PN Masonry today to schedule a complete masonry inspection and protect your property with reliable, lasting solutions.